Achievements & rewards
Achievements reward your guests for joining in – with a badge, points and optionally a real reward with stock. As the host you set the name, image, unlock conditions and optionally a real-world reward. Achievements are part of gamification (tasks, points, achievements); this guide covers only the Achievements tab.
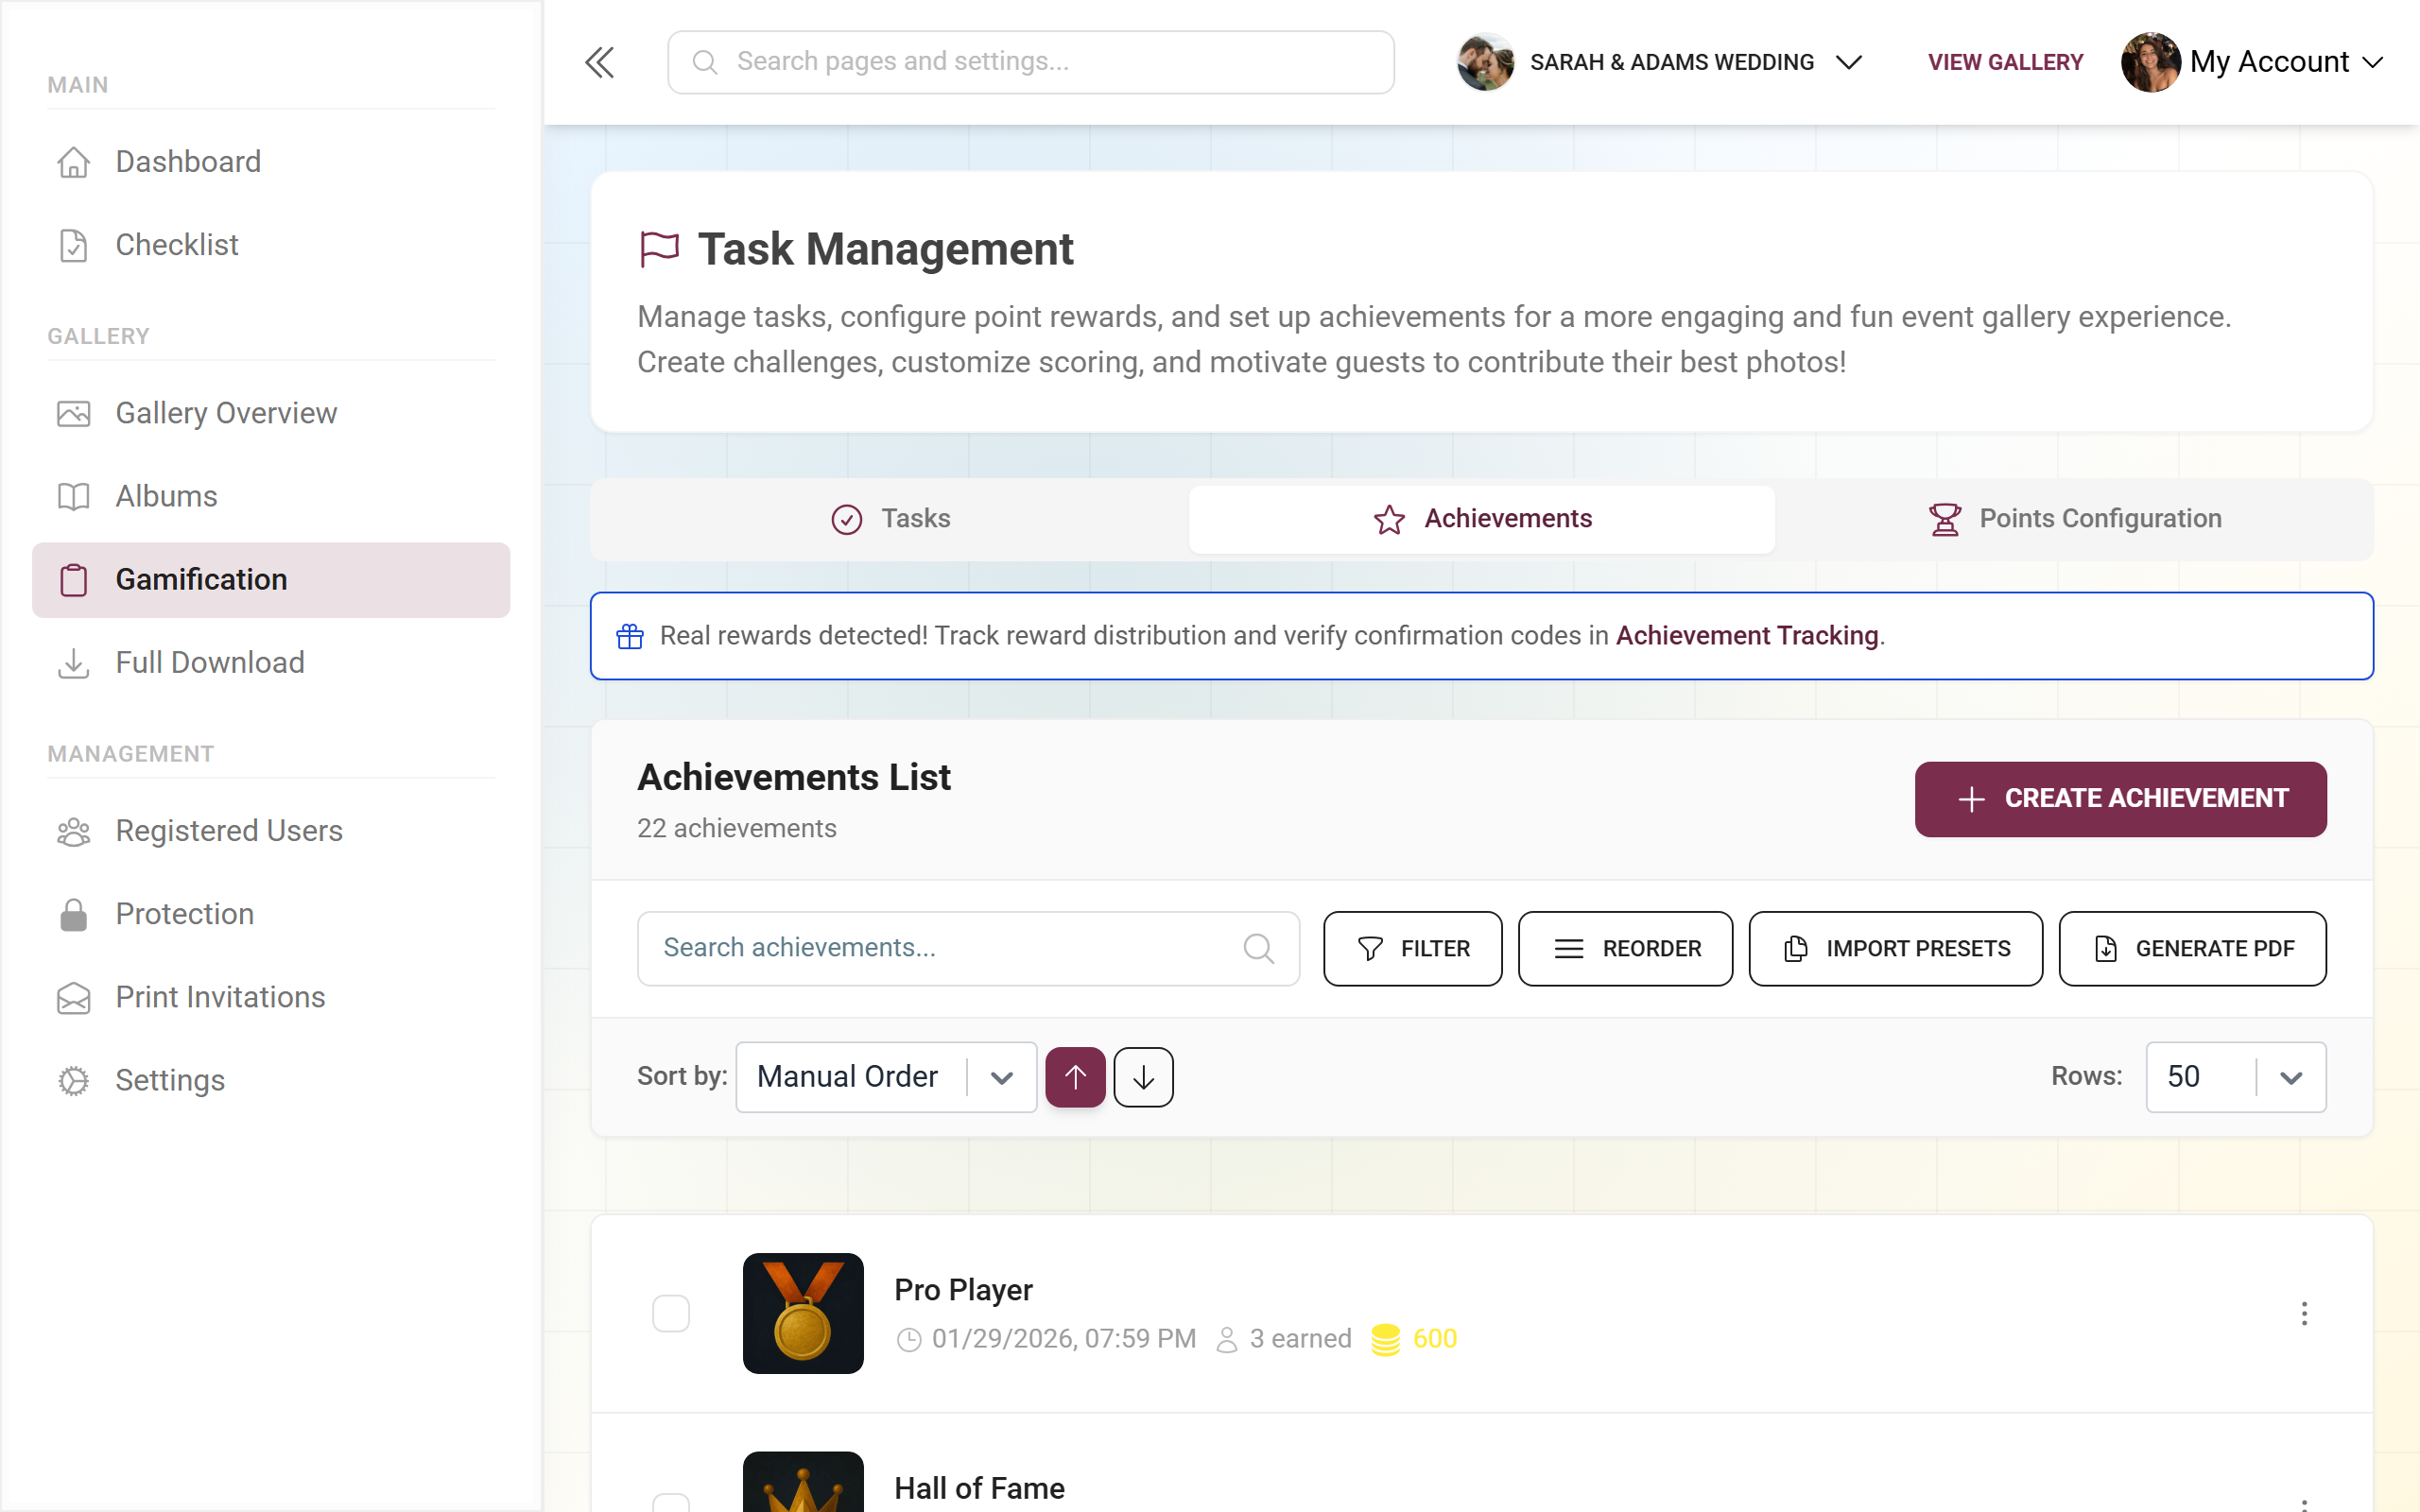
How to reach this area
Section titled “How to reach this area”-
Open your event’s admin area from the profile menu in the top right (see Reaching the admin area).
-
Go to task management. The page lives at the route
/admin/gallery/tasks-managerand shows three tabs:- Tasks – check-circle icon
- Achievements – star icon
- Points Configuration – trophy icon
-
Select the Achievements tab. You can also reach it directly by URL at
/admin/gallery/tasks-manager?tab=achievements.
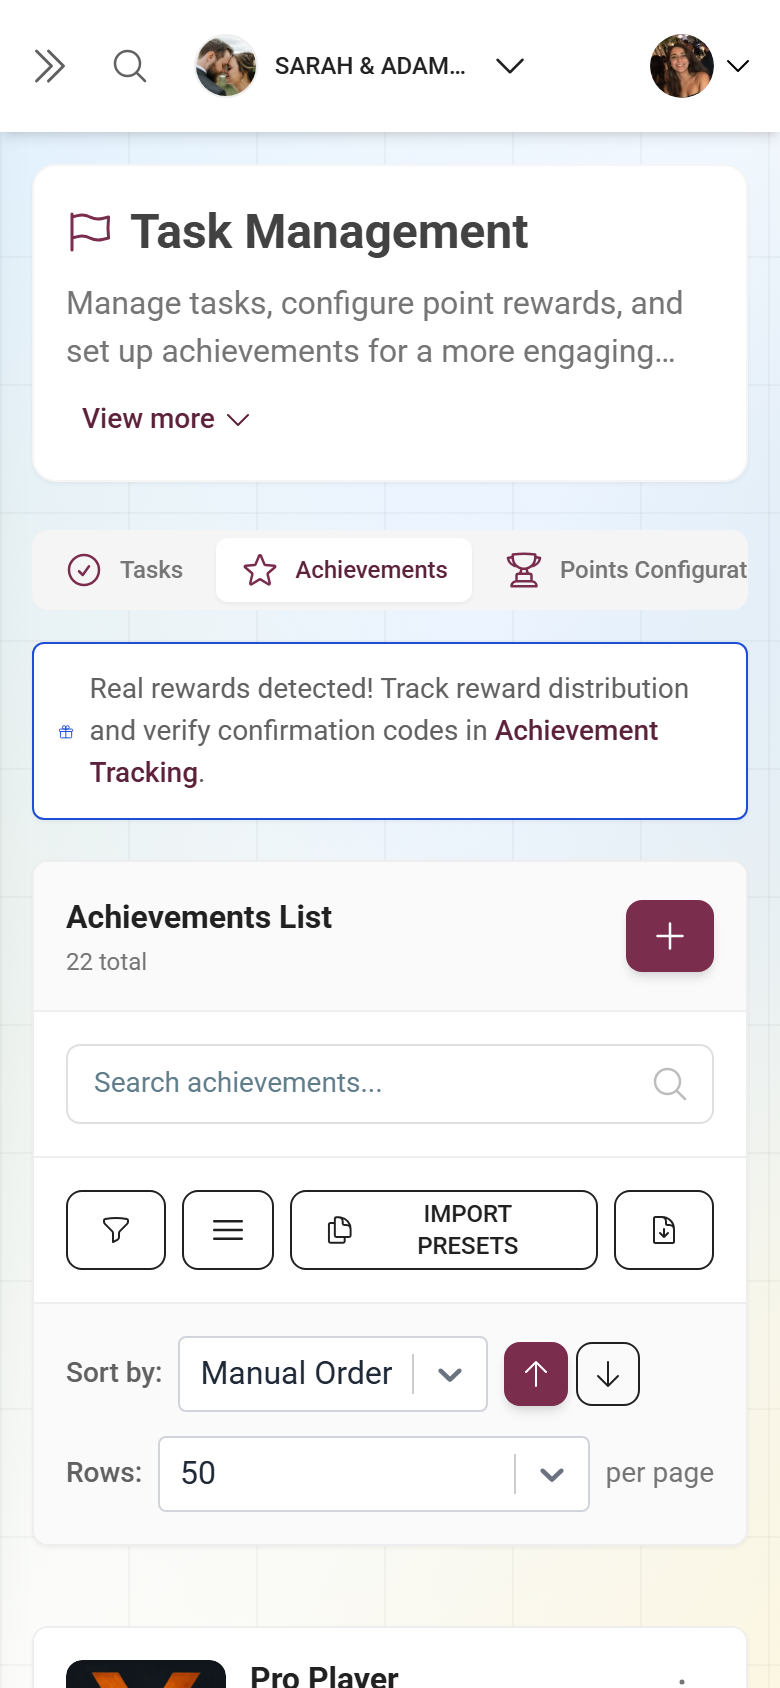
The Achievements tab at a glance
Section titled “The Achievements tab at a glance”At the top you see the title “Achievement Manager” with a counter showing how many achievements you have and your plan limit (x/limit). A warning appears once you reach 75% and 90% of the limit.
Header actions
Section titled “Header actions”- New Achievement (mobile New) – blue plus icon, opens the editor for a new achievement. Premium feature; locked without the right.
- Import Presets – opens the templates dialog to import ready-made achievements (premium).
- Generate PDF (mobile PDF) – creates a QR-card PDF for the achievements (premium). Disabled with 0 achievements.
- Filter – funnel icon with a badge counting active filters; opens a filter accordion.
- Reorder / when active Done – only visible when sorting is set to Manual Order. Enables drag-and-drop reordering; Done saves the order.
- Search – the field “Search achievements…” searches name, description, reward type and the public ID.
- Sort by – dropdown with Manual Order, Name (English), Creation Date, Earned Count and Natural (by conditions), plus ascending/descending arrows.
- Rows per page – 5 / 10 / 20 / 50 / 100 / 200 (default 50).
Notice banners
Section titled “Notice banners”- Yellow alert “Achievements are not enabled!” – appears when achievements are not switched on in settings. Achievements only become visible in guest profiles once you enable them under Features.
- Info card “Real rewards detected!” – appears as soon as at least one achievement has a real reward. It links to Reward tracking for redeeming and verifying.
A list entry
Section titled “A list entry”Clicking a row opens the edit dialog directly. Each entry shows the image (or a trophy placeholder), name and translation status. Watch for these icons and chips:
- Template chip (cloud icon) – the achievement was imported from a preset.
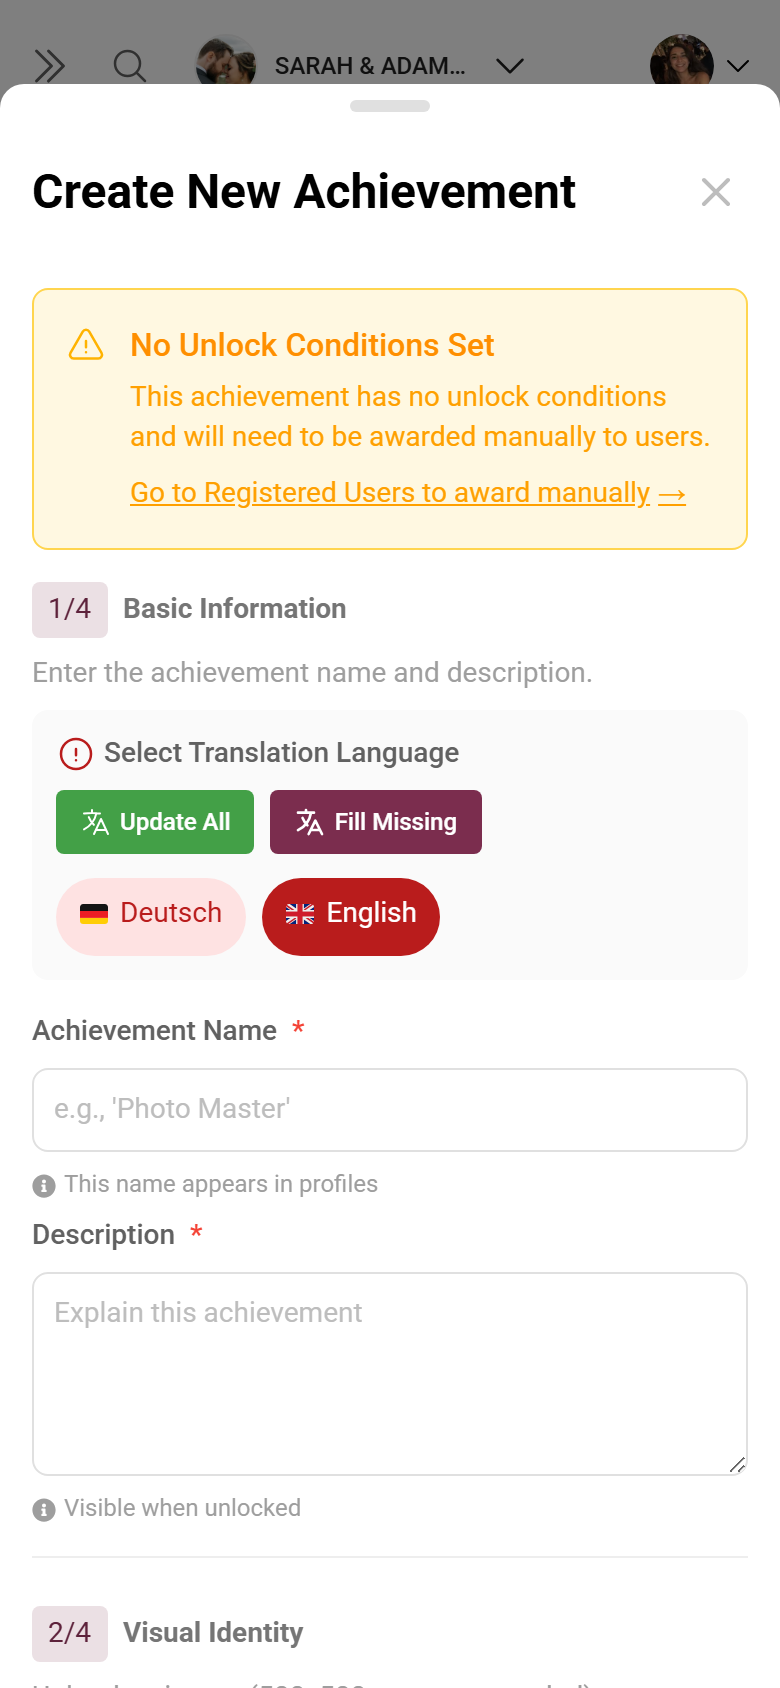
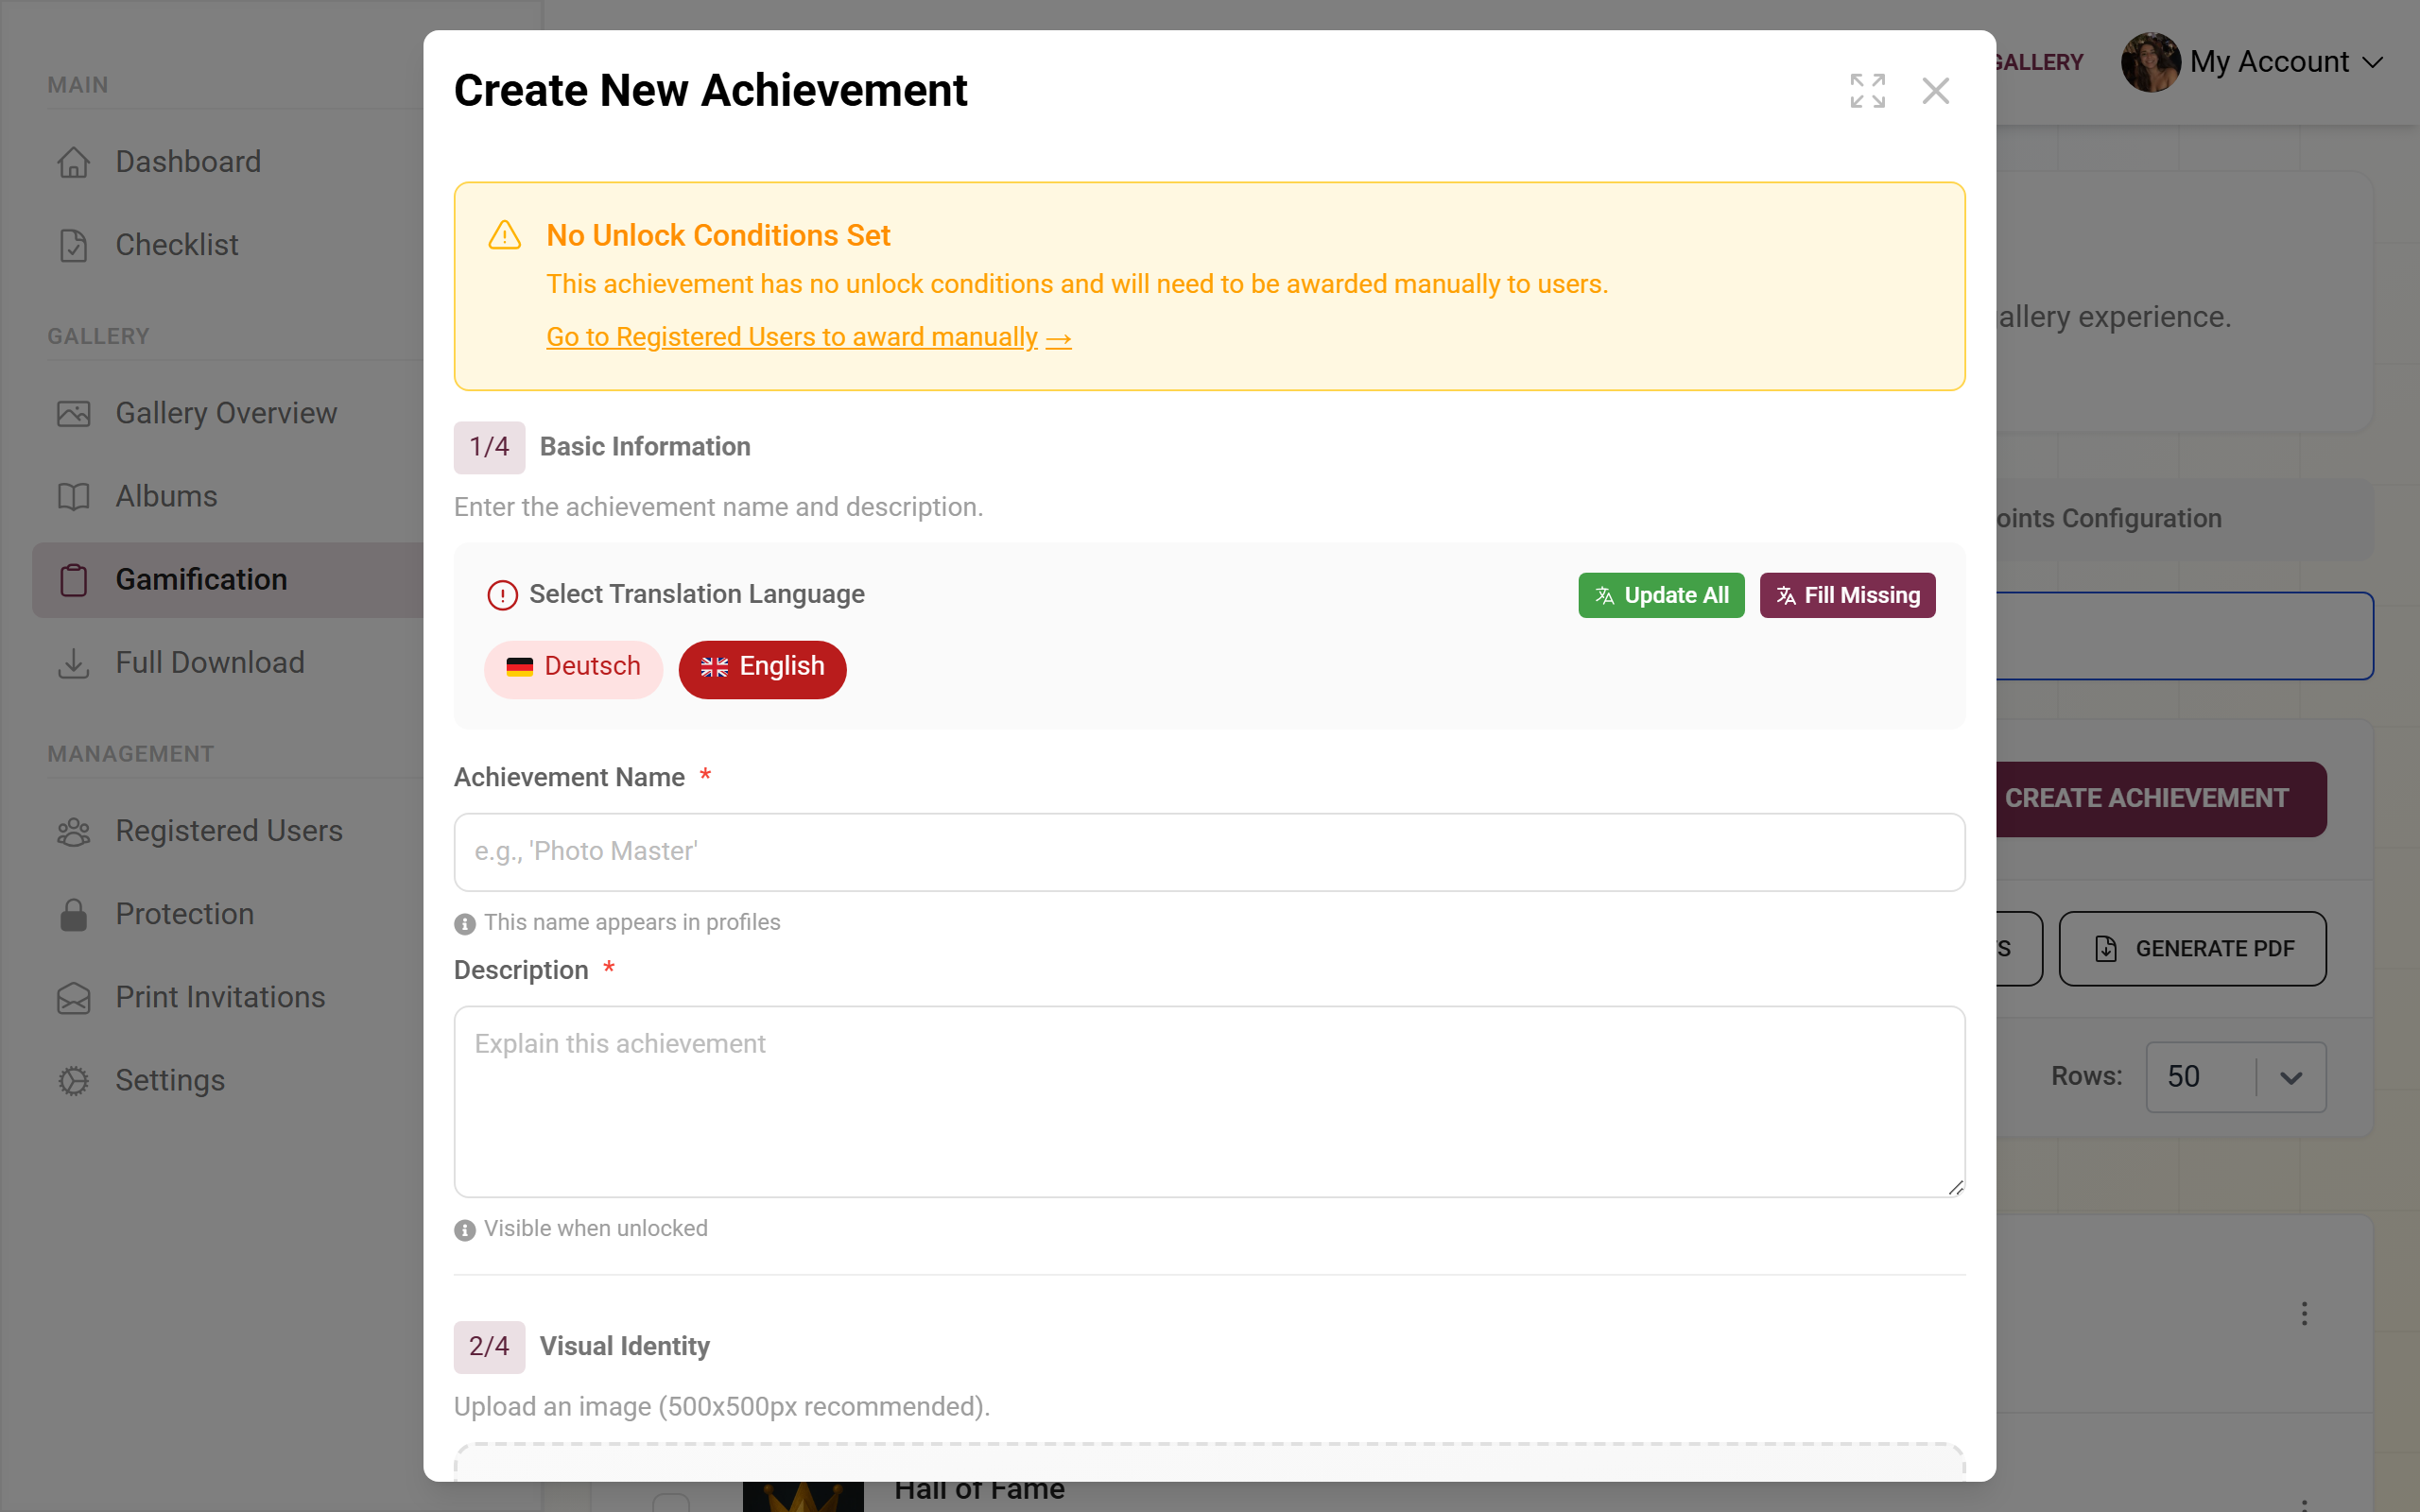
- Manual warning (yellow triangle) – the achievement has no conditions and must therefore be awarded manually. The tooltip links to Registered users.
- Metadata – creation date, “x earned” (how often it was unlocked), condition icons and reward icons (gift with remaining stock, green check with number of redemptions).
The three-dot menu (or right-click) offers: Select, View Recipients (only when earned at least once), Edit and Delete. Deleting is confirmed with “Delete achievement?” / “This action cannot be undone.” In selection mode (checkboxes) a bar appears for bulk delete and a PDF for the selection only.
Creating or editing an achievement
Section titled “Creating or editing an achievement”Open the editor via New Achievement (new) or by clicking an entry or Edit (edit). The dialog is titled “Create New Achievement” or “Edit Achievement”. It is not a tabbed dialog but a single, scrollable dialog with four numbered sections in this order: basic info → image → reward → conditions.
Section 1/4 – Basic Information (required)
Section titled “Section 1/4 – Basic Information (required)”Heading “Basic Information”, description “Enter the achievement name and description.”
-
Pick the language via the language selector. Name and description are multilingual; automatic translation is available.
-
Achievement Name (required) – placeholder “e.g., ‘Photo Master’”. This name appears in the guests’ profiles.
-
Description (required) – text field, placeholder “Explain this achievement”. Shown to the guest when they unlock it.
Section 2/4 – Visual Identity (optional)
Section titled “Section 2/4 – Visual Identity (optional)”Heading “Visual Identity”, description “Upload an image (500x500px recommended).”
- Upload a badge image via the drop zone (recommended ~500 × 500 px, square).
- Alternatively pick a ready-made badge via the template picker.
- Without an image the list shows a trophy placeholder.
Section 3/4 – Reward Type (premium)
Section titled “Section 3/4 – Reward Type (premium)”Heading “Reward Type”, description “Choose if this achievement offers a real-world reward.” The whole section sits behind a premium overlay: without the right for real rewards it is visible but locked.
-
Turn on the Real-world Reward switch (“Enable if a physical reward is available.”). This marks the achievement as a physical reward.
-
Reward Description (multilingual, with language selector) – placeholder “e.g., T-shirt size L, $50 gift card, or redemption instructions…”. Enter the exact redemption instructions here; the guest sees them when they unlock the achievement.
-
Reward Inventory (leave empty for unlimited) – number field, placeholder “e.g., 10”. Empty means unlimited. If the reward has already been redeemed, a note shows how many times the achievement has been claimed.
Section 4/4 – Unlock Conditions
Section titled “Section 4/4 – Unlock Conditions”Heading “Unlock Conditions”, description “Set one or more conditions for unlocking the achievement.” At the top there is a Basic / Advanced toggle. Advanced mode is a premium feature; without the right the toggle is blocked by a small lock overlay.
Basic conditions (always visible):
Essentials:
- Unlock At – “Available from this date” (date/time with time zone).
- Lock After – “Unavailable after this date”.
- Required Points – points needed to earn the achievement.
Common conditions:
- Photo Uploads – uploads required.
- Likes Received – likes received.
- Min Completed Tasks – minimum number of completed tasks.
- Max Completed Tasks – the achievement is unavailable after this many tasks.
- Likes Given – likes given.
- Media Shares – media shared.
- Media Downloads – media downloaded.
Required Tasks:
- Multi-select “Select tasks that must be completed” (with task thumbnails). Only in advanced mode does each chosen task additionally show Minimum Contributions Per Task – how many times the task must be completed.
Advanced conditions (advanced mode only):
Advanced Points & Achievements:
- Max Points – the achievement is unavailable above this threshold.
- Min Achievements – minimum number of achievements already earned.
- Min Unique Tasks – number of different tasks solved.
- Required Achievements – multi-select of dependent achievements that must be earned first.
User Engagement:
- Max Images Uploaded – limit for advanced users.
- Min Shares – minimum number of users invited.
- Min Album Contributions – total contributions to albums.
- Required Albums – multi-select of albums.
- Required Invitations – multi-select of invitation codes (with role badge Viewer/Contributor/Moderator/Admin/Owner). Only guests with these codes can earn the achievement. Only active invitations are shown.
Saving and cancelling
Section titled “Saving and cancelling”At the bottom you find Cancel and Create Achievement (new) or Save Changes (edit). During image upload you see “Uploading…” with progress (cancellable), then “Saving…”. After saving the dialog closes and the list refreshes.
Importing presets (Import Presets)
Section titled “Importing presets (Import Presets)”Via Import Presets you open the “Achievement Templates” dialog with ready-made achievements (premium).
-
Find presets with the “Search achievements…” field. A chip shows “x selected”.
-
Presets are grouped into categories as collapsible accordions. Each category has Select All and Deselect All; an achievement can appear in several categories. Each preset shows its image, name, description and a condition summary.
-
Click Import Selected at the bottom (disabled until you select at least one) or Cancel.
Already imported achievements are excluded. Once everything is imported, “No achievements are left to import.” appears.
How it all fits together
Section titled “How it all fits together”-
Enable achievements. For achievements to appear in guest profiles, switch them on under Features.
-
Create matching tasks. Many conditions (Required Tasks, Min/Max Completed Tasks) refer to tasks you create in the Tasks manager.
-
Redeem real rewards. If an achievement has a real reward, you verify and log redemptions in Reward tracking.
-
Award manually. Achievements without a condition (manual warning) are awarded directly via Registered users.
To see how your guests experience achievements: Points & rewards and Redeeming real rewards.
Troubleshooting
Section titled “Troubleshooting”- Achievement doesn’t appear in a guest profile – enable achievements under Features; the yellow alert in the tab points this out.
- A guest never unlocks the achievement – likely no condition is set (manual warning). Add a condition or award the achievement manually via Registered users.
- Reward section or advanced toggle locked – the relevant premium feature is not included in your plan (see Pricing & upgrade).
- Stock used up – the remaining stock shows as an icon in the list; tracking and redemption run through Reward tracking.
- Limit reached – the
x/limitcounter in the header warns from 75% and 90%. - Conflicting conditions – combinations like Max lower than Min, or a lock date before the unlock date, are not strictly validated. Set values deliberately so the achievement stays reachable.
Best practices
Section titled “Best practices”- Use short, meaningful names and a motivating description – the guest sees both when unlocking.
- Upload a square badge at ~500 × 500 px or use a template, otherwise the trophy placeholder appears.
- Start with one clear condition (e.g. “Photo Uploads” = 5) rather than many at once.
- For real rewards: write precise redemption instructions in “Reward Description” and set a realistic “Reward Inventory”; then verify redemptions in reward tracking.
- Set time windows (Unlock At / Lock After) deliberately, e.g. for an “Early Bird” achievement.
- Arrange achievements logically via Reorder (easy → hard) and use the “Natural (by conditions)” sort to review them.