Inviting guests
An event lives through its guests. This page teaches you step by step how to share and control access to your gallery – from a quick QR code and link (the default code) to finely granular invitation codes with their own role, expiration and usage limit.
Reaching the “Manage Invitations” area
Section titled “Reaching the “Manage Invitations” area”-
Open the admin area via the profile menu in the top right (entry Management → Admin portal).
-
In the left sidebar, category Management, click “Protection” (lock icon). Direct route:
/admin/manage-invitations. -
The page is titled “Manage Invitations” (envelope icon) with the subtitle “Add, view, and manage invitations for your gallery”. By default it opens in simple mode.
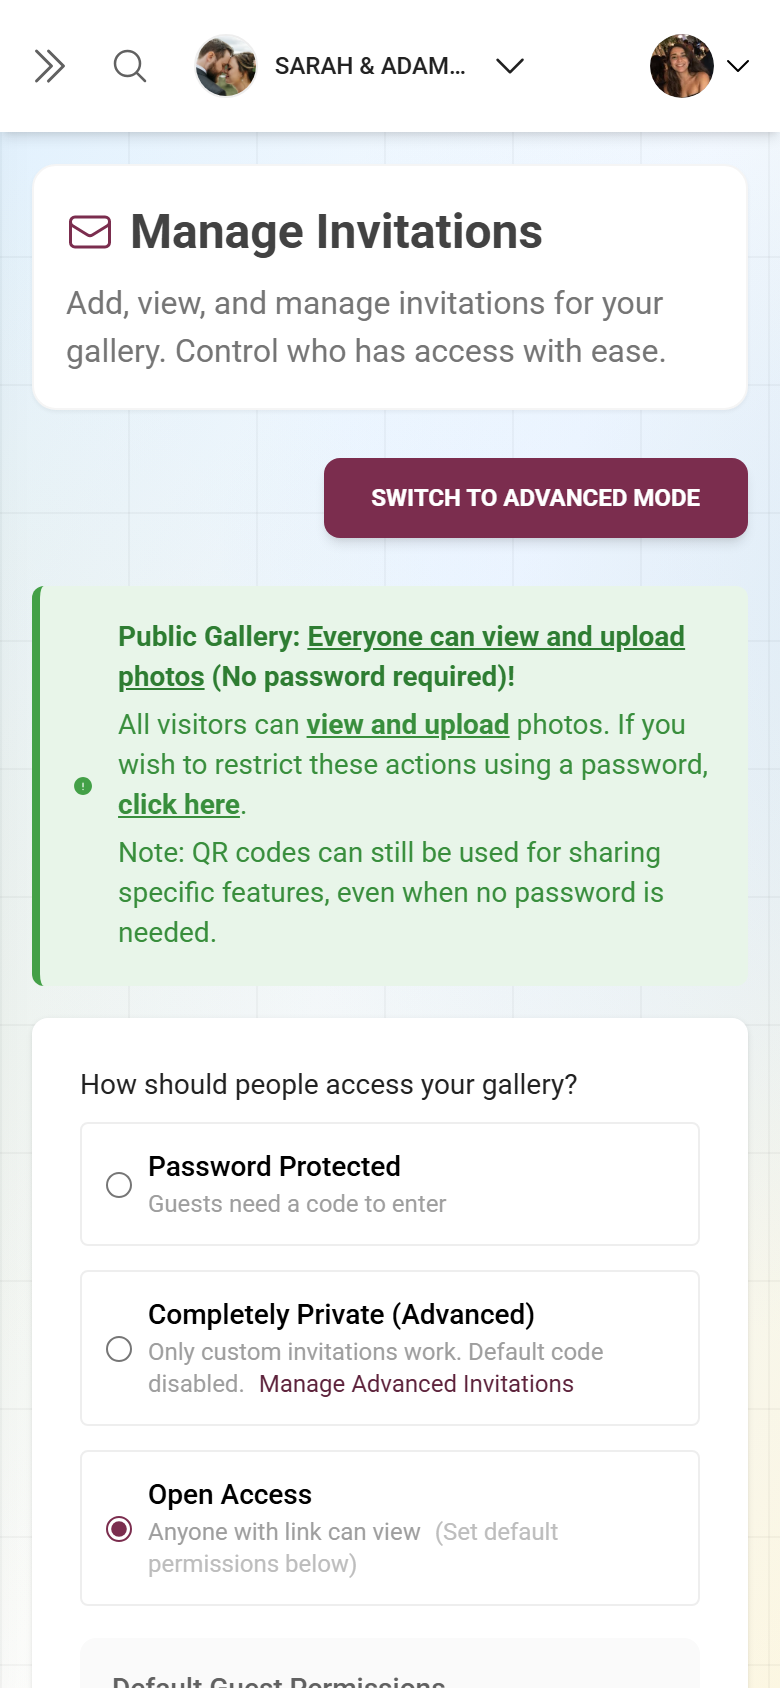
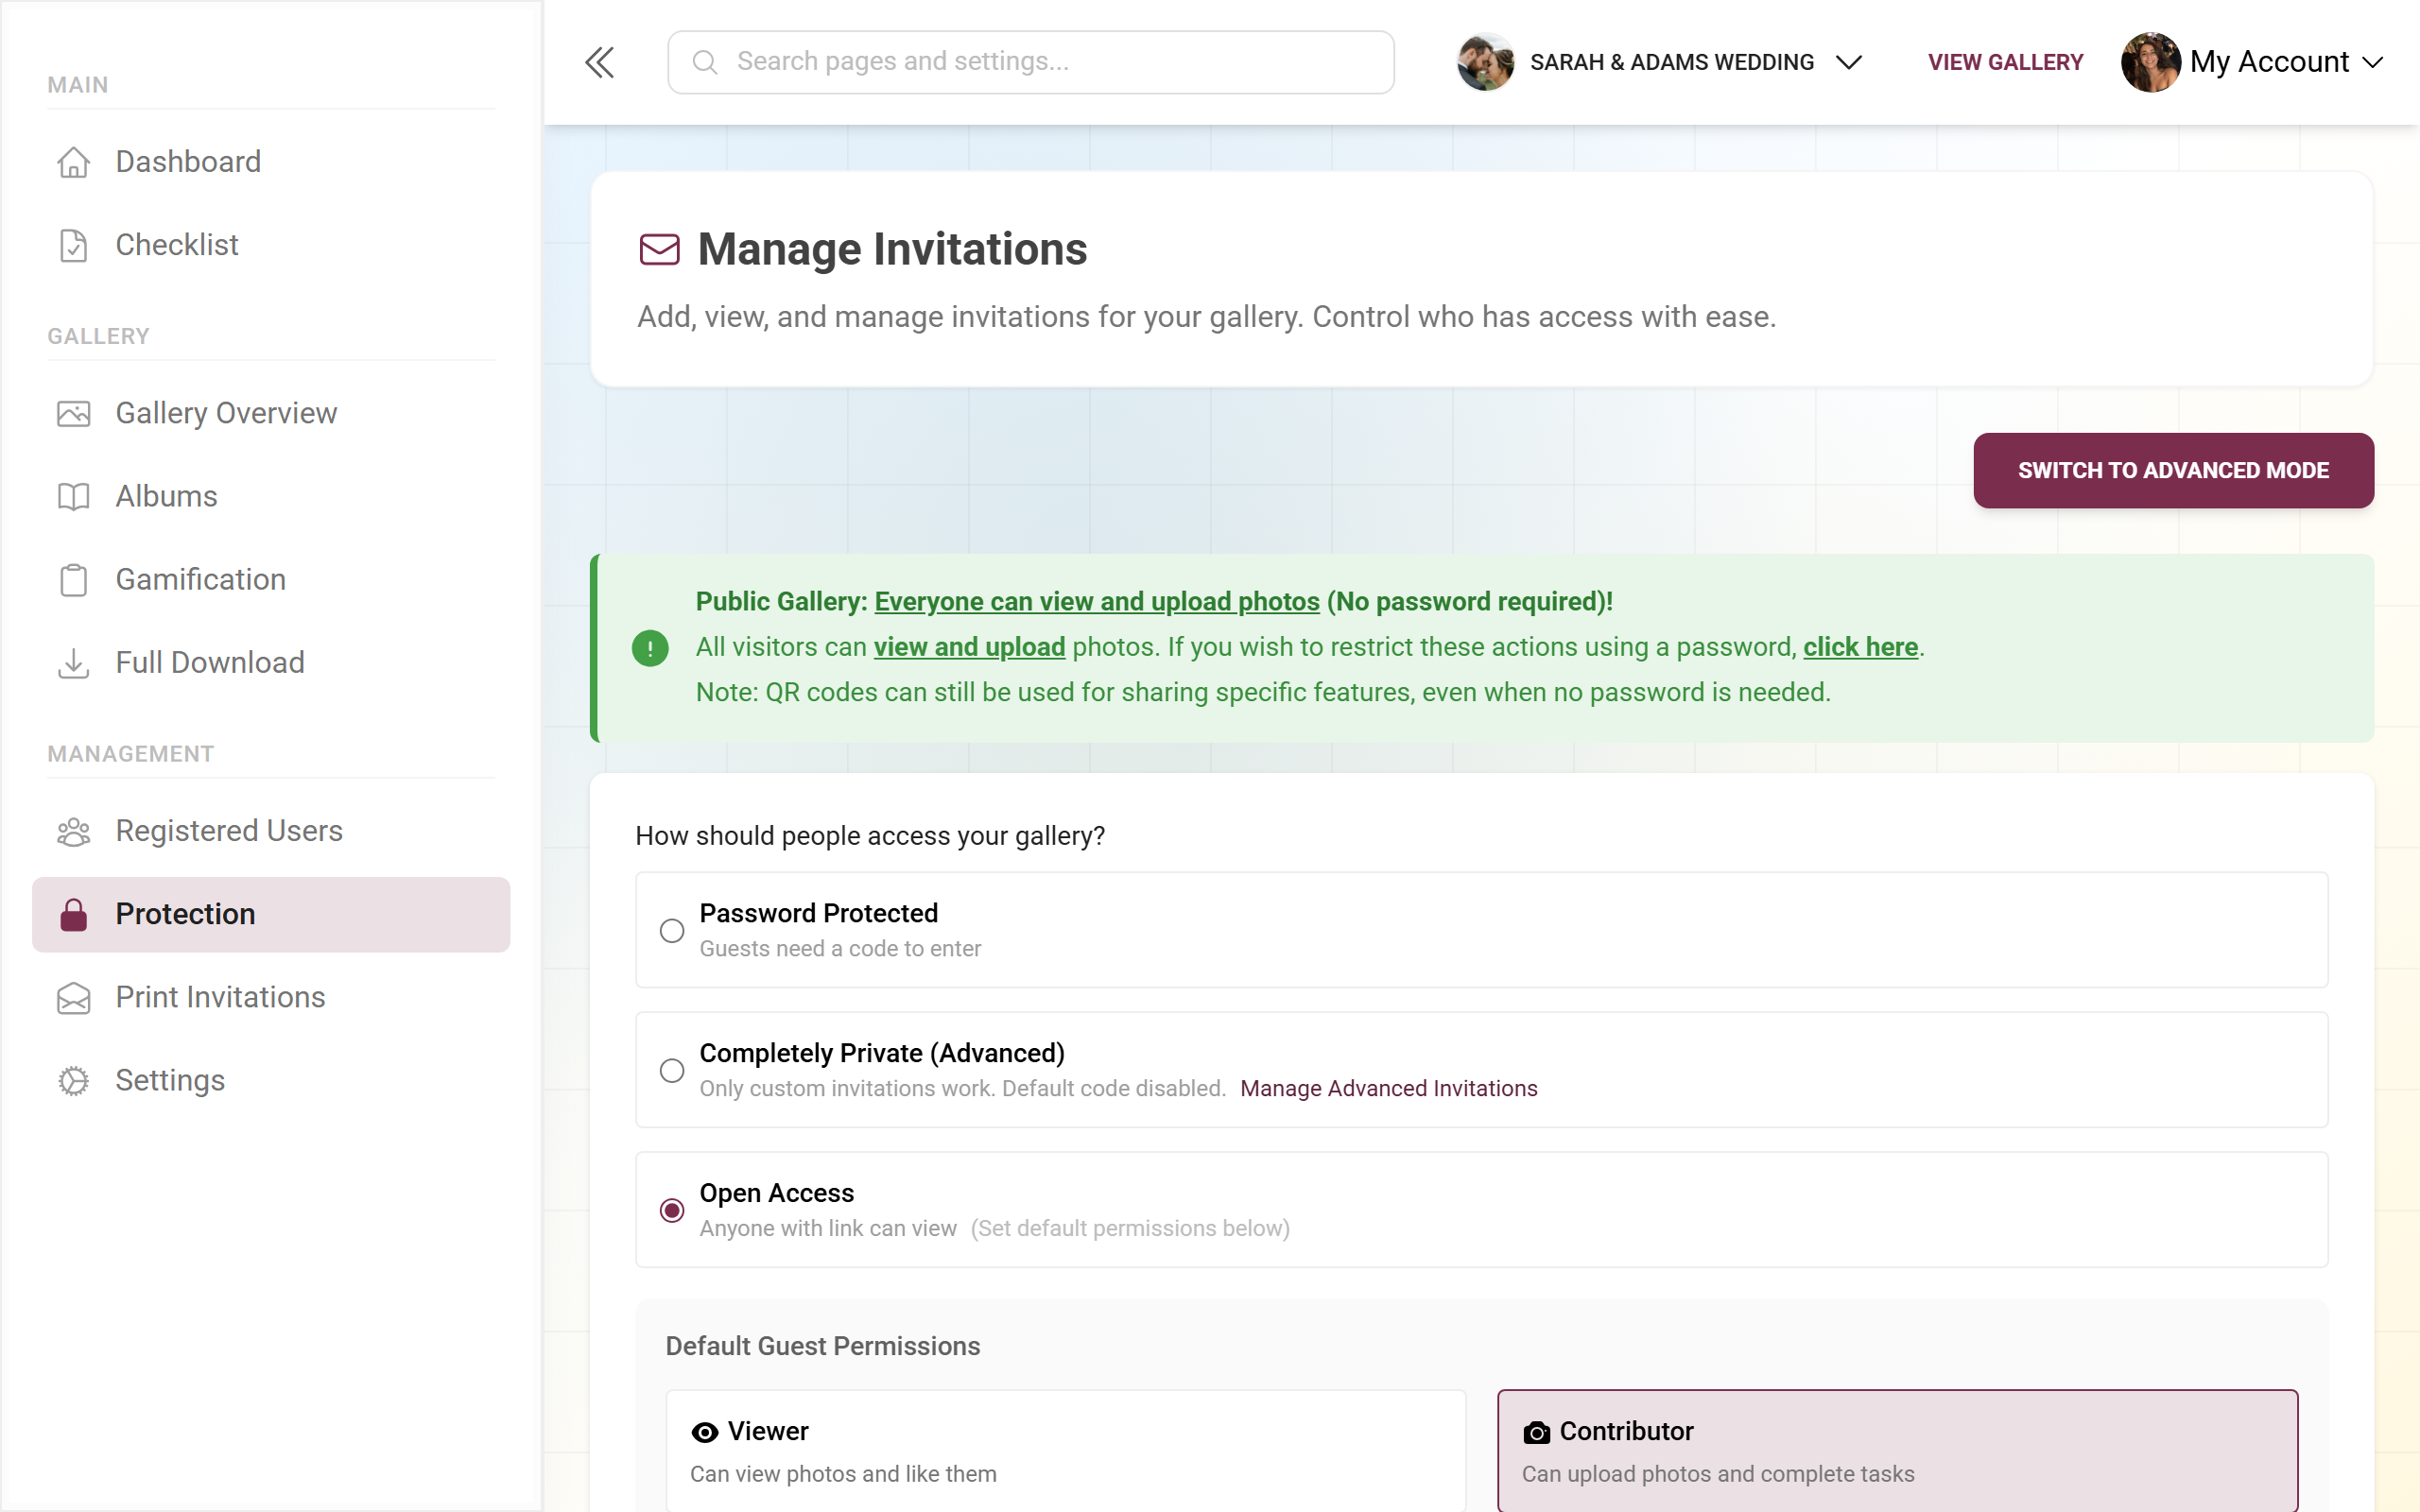
The “Protection” area (route /admin/manage-invitations) in simple mode – set default access, code and QR code here.
Reading the info banner at the top
Section titled “Reading the info banner at the top”At the very top, the area shows exactly one coloured info banner reflecting your current access mode:
- Green – Public gallery: “Everyone can view and upload photos (No password required)!” Anyone with the link gets in. QR codes still work.
- Blue – Password-protected: “A code is required to view or upload.” No code, no access.
- Purple – Completely private: “Completely Private Mode Active” – only your own invitation codes grant access, the default code is disabled. In this mode the toggle is hidden and the area runs forced into advanced mode. The “click here” link takes you to Privacy & moderation to change the mode.
Simple mode: default access, code & QR
Section titled “Simple mode: default access, code & QR”Simple mode is the fast path: one card with the access settings and, below it, a bar for sharing and saving.
Choosing the access mode
Section titled “Choosing the access mode”Under the question “How should people access your gallery?” you pick one of three options:
-
“Password Protected” – “Guests need a code to enter”. Two fields fold out:
- “Default Invitation Code” (placeholder “e.g., wedding-2024”). The “Random” button generates a readable code such as
happy-eagle-123. This code is embedded in the simple invite links and QR codes. - Checkbox “Include default invitation code in QR code” – when active, the code is baked into the QR code so guests join without typing.
- “Default Invitation Code” (placeholder “e.g., wedding-2024”). The “Random” button generates a readable code such as
-
“Completely Private (Advanced)” – “Only custom invitations work. Default code disabled.” An info box “Maximum Privacy Mode” appears with the button “Manage Advanced Invitations”, which opens advanced mode.
-
“Open Access” – “Anyone with link can view”. Below it, the card “Default Guest Permissions” appears with two cards:
- “Viewer” (eye icon) – “Can view photos and like them”.
- “Contributor” (camera icon) – “Can upload photos and complete tasks”.
Saving & sharing
Section titled “Saving & sharing”The bar below the settings offers:
- “Get Shareable Link” (green) – opens a window with the QR code and link containing the default code. (Hidden in “Completely Private”.)
- “Save & Activate” – first opens the confirmation dialog “Save Changes?” with the note “Password changes will update all printed codes and links. Old passwords stop working.” Only after you confirm is it saved.
Save behaviour and edge cases
Section titled “Save behaviour and edge cases”- Changes to the default code, role and protection settings are saved together.
- In “Completely Private” mode the default code is not saved – only custom codes count.
- If you leave the page with unsaved changes, a dialog appears: “You have unsaved changes … Would you like to save them before leaving?”
- Success and errors are shown as a short message (toast).
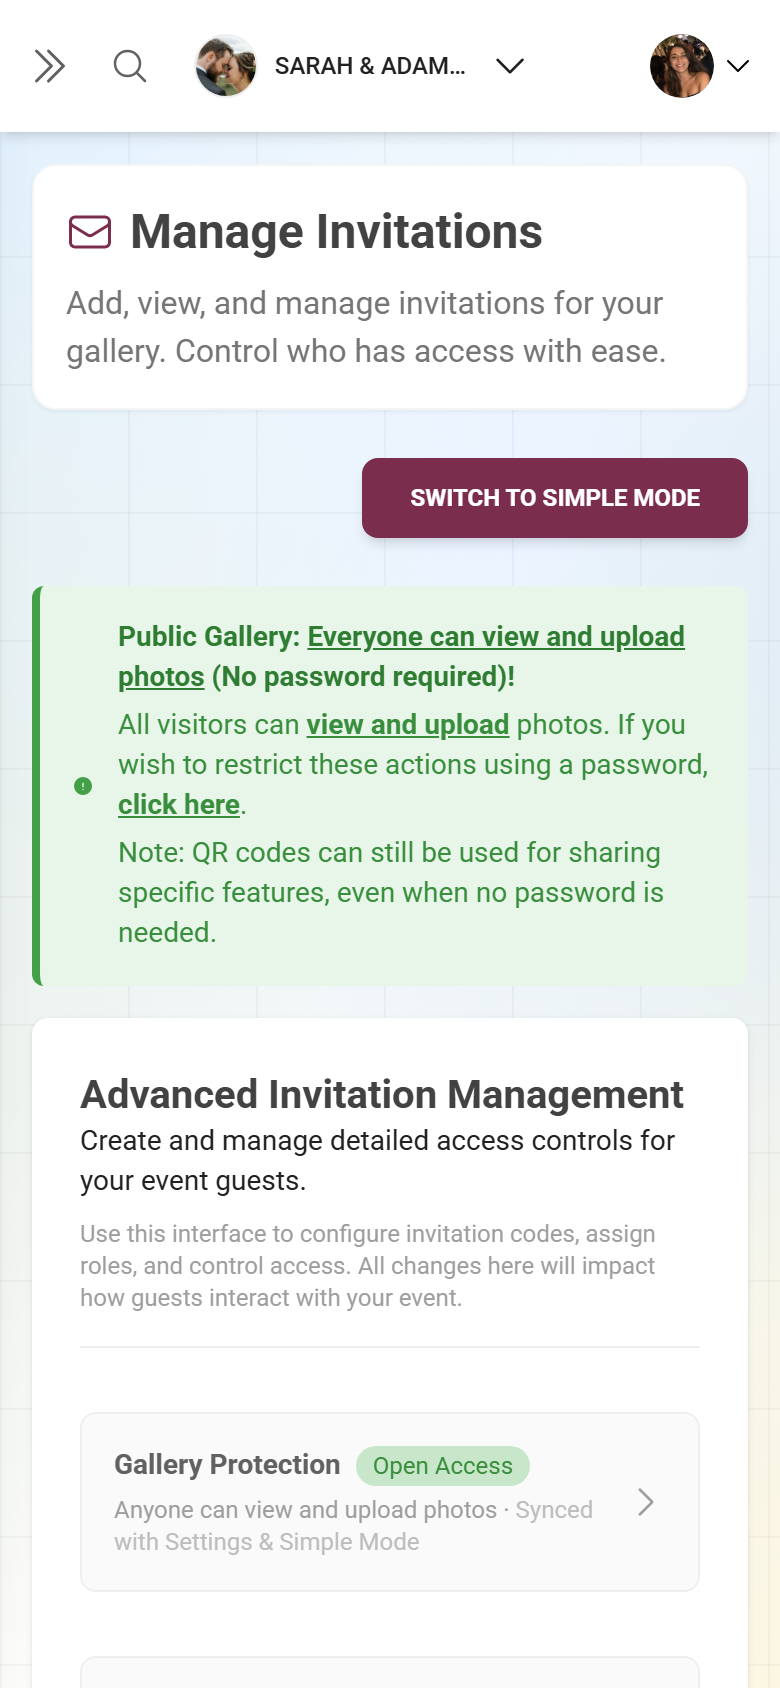
Switching to advanced mode
Section titled “Switching to advanced mode”In the top right you switch with “Switch to Advanced Mode” to advanced invitation management (and back with “Switch to Simple Mode”).
In “Completely Private” mode advanced mode is forced and the toggle is hidden entirely.
Advanced mode: invitations in detail
Section titled “Advanced mode: invitations in detail”Advanced mode is headed “Advanced Invitation Management” and consists of two collapsible sections.
Section “Gallery Protection”
Section titled “Section “Gallery Protection””A collapsible header with a mode badge (“Completely Private” / “Password Protected” / “Open Access”) and the note “Synced with Settings & Simple Mode”. Expanded, it contains the same access-settings card as simple mode plus the button “Save Protection Settings” – again with the “Save Changes?” confirmation. This lets you change the base protection from advanced mode too.
Section “Custom Invitations”
Section titled “Section “Custom Invitations””The core. A collapsible block with counter badges “N active” / “N inactive”.
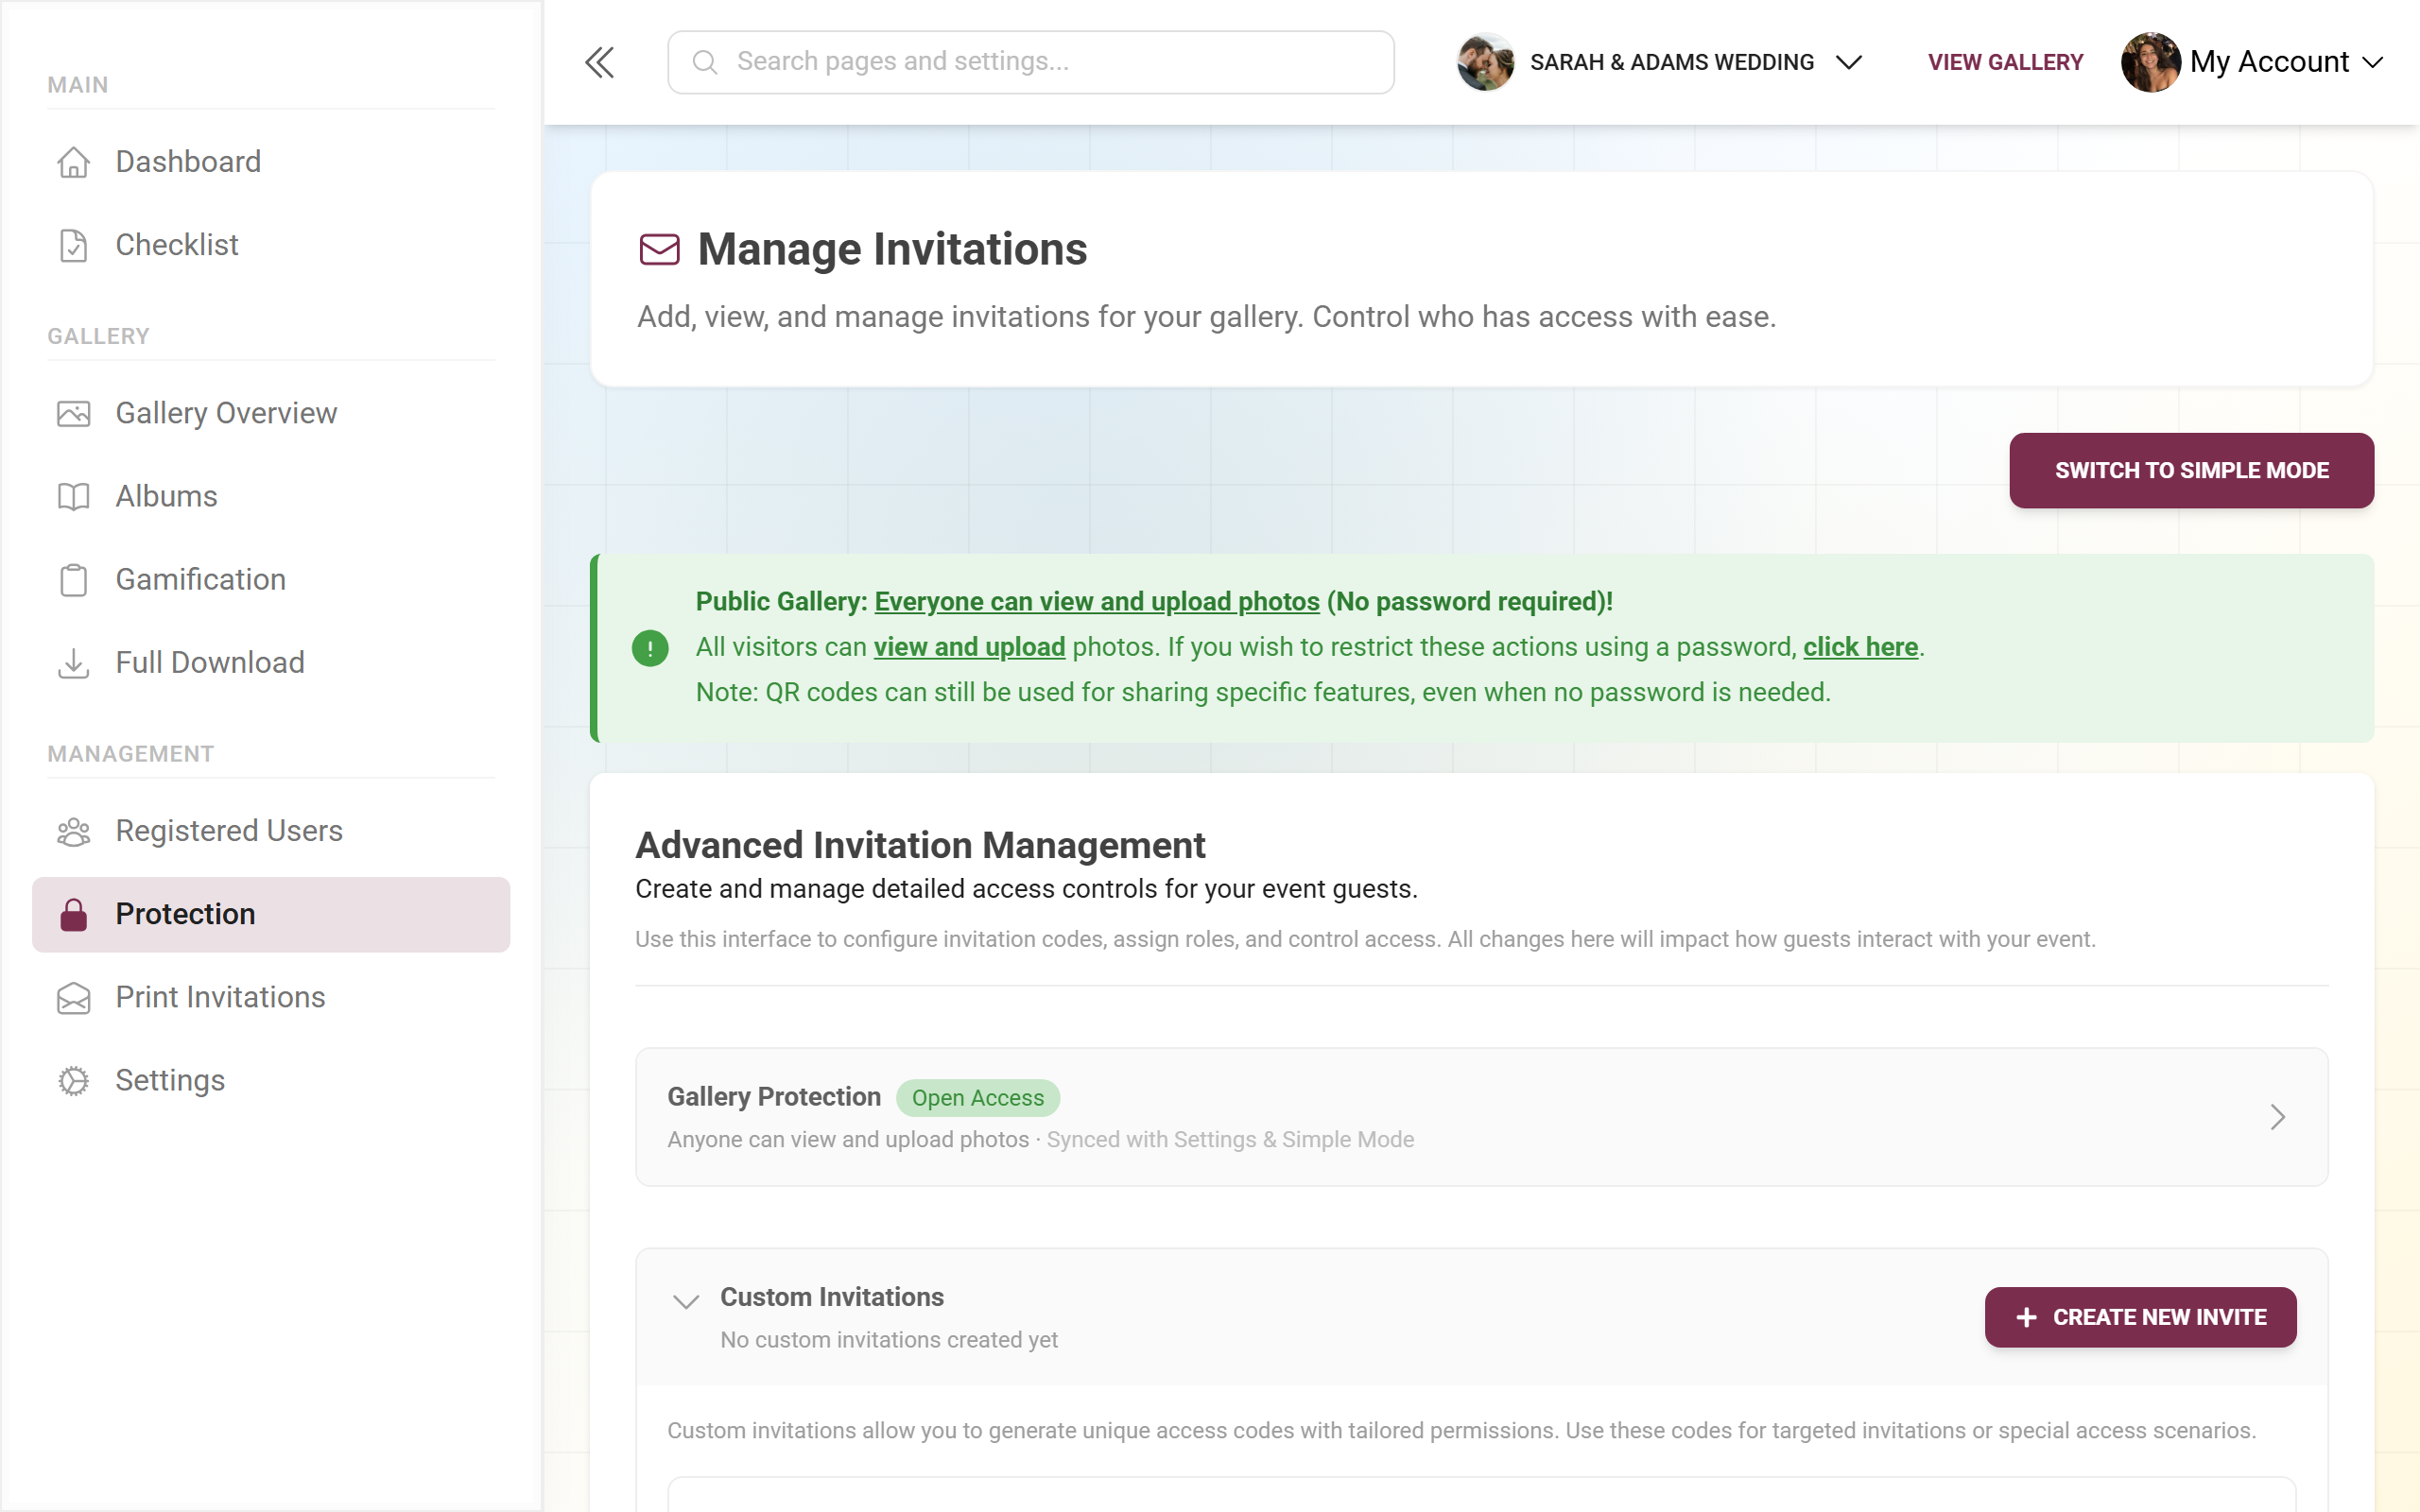
Empty state: “No Custom Invites Yet” with the button “Create Your First Invite”.
Action bar (with codes):
- Metrics “N Total Invites”, “N Active”, “N Inactive”.
- Search field “Search invites…” – searches code and description.
- Button “Filters” opens a dropdown:
- Filter by Role: chips “All Roles”, “Viewer”, “Contributor”. (Only these two roles are available as filter chips.)
- Filter by Status: “All”, “Active”, “Inactive”.
- Sort By: “Date Created”, “Usage Count”, “Role” (a click toggles between ascending and descending).
- Button “Create New Invite” top right (and again in the quick-actions bar below).
- Bulk actions appear as soon as you select codes via checkbox: “Activate Selected”, “Deactivate Selected”, “Delete Selected” (with a confirmation).
The table has these columns:
- Selection checkbox (header: select all).
- Code & Status: the code (monospace) with a copy button, a status chip “Active” / “Inactive” and a QR button (“View QR Code”).
- Description: the internal description and the creation date.
- Role: a role chip with icon and colour (Viewer = eye, Contributor = camera, Moderator = wrench, Admin = gear).
- Usage: “used / maximum” with a progress bar; a “Limit reached” badge when the limit is exhausted.
- Actions: a three-dot menu with “Edit Invite”, “Deactivate/Activate”, “Use within Template”, “Share Invite”, “Delete Invite”.
If active filters show “No matching invites found”, reset everything with “Clear All Filters”.
The “Create New Invite” / “Edit Invite” dialog
Section titled “The “Create New Invite” / “Edit Invite” dialog”Via “Create New Invite” (or “Create Your First Invite”, or editing a row) the dialog opens with the title “Create New Invite” or “Edit Invite”. It has six numbered sections:
-
1. Access Level Configuration (badge “Most Important”). In the dropdown “Select a role” you choose:
- Viewer – “Can view photos and like them”.
- Contributor – “Can upload photos, complete tasks, and participate in challenges”.
- Moderator – “Approve/reject content and manage basic event settings”.
- Admin – “Full configuration access and user management capabilities”.
- Owner – “Full access and ultimate control over the event”.
For Moderator, Admin or Owner a red security note appears: for privileged roles it is recommended to set the usage limit to 1.
-
2. Invite Code Setup (key icon). Text field (placeholder “Custom code (leave blank to auto-generate)”) with a “Generate” button. Leave it blank and a code like
happy-eagle-123is generated automatically. -
3. Invite Details. A text area for an internal description – visible to admins only, not to guests. Use it descriptively, e.g. “Photographer” or “Catering staff”.
-
4. Access Settings. Two toggles:
- “Enabled” – “When enabled, new users can register using this invite code.” (Allow new sign-ups with this code.)
- “Active” – “When active, users who previously used this code can still access the event.” (Those who already joined keep their access.)
-
5. Expiration Settings (calendar icon). A date/time field. Leaving it blank means no expiration; the time is in your local timezone.
-
6. Usage Limits. A number field (placeholder “0 = unlimited uses”). For privileged roles a red box “Security Recommendation” appears and the limit is set to 1 automatically.
Saving: at the bottom the buttons “Cancel” and “Create Invite” or “Update Access Code” (loading state “Saving…”). If you pick a privileged role with a limit other than 1 and save, a security warning appears first that you must confirm.
Role gating for admins and moderators
Section titled “Role gating for admins and moderators”- Only roles you are allowed to grant are selectable. Non-grantable roles appear disabled with the suffix “(Owner only)”.
- Event admins can create codes up to and including Moderator – a note explains: “Event admins can create Moderator and lower invites. Only owners can create Admin or Owner invites.”
- Existing Admin or Owner codes can only be edited by the owner; otherwise the save button is disabled and a red box explains why.
Assigning a code directly to a guest
Section titled “Assigning a code directly to a guest”From Registered users you can assign an existing code to an already-registered guest. The “Add Invitation Code” dialog offers:
- Search “Search invitation codes…”, sorting (code A–Z/Z–A, least/most used, by role) and role filter chips.
- An info banner “New invitation codes cannot be created here.” with a link “Manage Invitations” – here you only assign, not create.
- If the code has a higher role, a box “Role will be updated” notes that the guest’s role is raised automatically. For an equal or lower role it stays unchanged.
- Only active, non-expired and non-exhausted codes are offered. Role gating applies here too.
Printing a code on QR cards
Section titled “Printing a code on QR cards”Via “Use within Template” in the row or context menu you jump into the template manager with exactly this code, to use it on QR cards or posters. More about this under QR cards & posters.
Troubleshooting
Section titled “Troubleshooting”- “Switch to Advanced Mode” is greyed out → the premium feature is missing. See Pricing & upgrade.
- Toggle missing / always advanced mode → “Completely Private” mode is active. Change it under Privacy & moderation.
- Old QR code / link no longer works → the default code was changed (see the warning above).
- A code does not work → check: “Enabled” off? “Active” off? Expiration date passed? Usage limit reached (“Limit reached”)?
- Role not selectable / “(Owner only)” → your role is not allowed to grant that role.
- “New invitation codes cannot be created here” → create the code first under “Manage Invitations”.
Best-practice tips
Section titled “Best-practice tips”What comes next
Section titled “What comes next”Which role fits which job, and how co-hosts take a bigger event off your shoulders, is covered under Roles & permissions. From the guest side, joining is described under Joining an event.