Backing up all photos
Once your event is over, you’ll want all the photos saved safely – a backup before the storage period ends. PhotoGala packs the entire gallery into one or more ZIP archives server-side. You can choose between a simple one-click download and an advanced download with seven configuration steps (folder structure, file names, filters, recycle bin and more).
How to reach the download area
Section titled “How to reach the download area”-
In the top right, use the profile / event menu to switch into the admin area.
-
In the left sidebar, click Full Download (down-arrow icon).

The download page: stat tiles at the top, the big download button, and the note about the 1 GB split. -
The page is titled Photo Download. In the top right you’ll find the toggle Advanced Options (advanced download) or Back to Simple Download (return to the simple view).
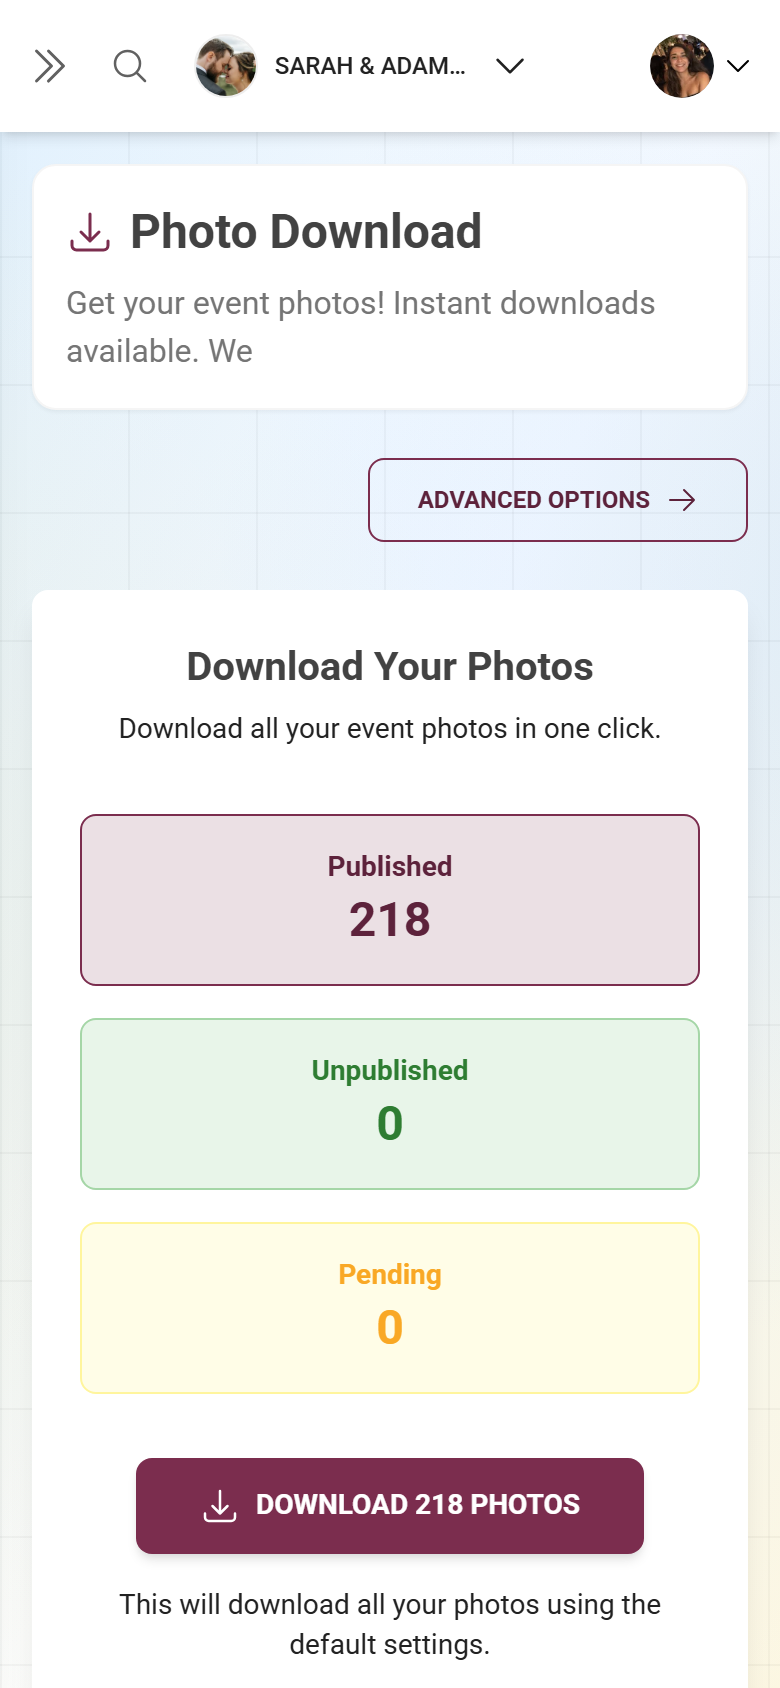
Part A – Simple download (default)
Section titled “Part A – Simple download (default)”The default view is the fastest route to a backup: one click and the entire gallery is packed with the default settings.
The three stat tiles
Section titled “The three stat tiles”At the top you see three counters showing what will be included:
- Published – the published photos, visible to guests.
- Unpublished – photos that aren’t published (internal only).
- Pending – photos still waiting for your approval (moderation).
The simple download includes all three statuses – nothing is left out.
Download with one click
Section titled “Download with one click”-
Under the heading Download Your Photos sits the big button Download N Photos – N is the sum of published, unpublished and pending photos.
-
Click the button. PhotoGala starts packing with the default settings: split by status is on (photos go into folders by status), and archives are split automatically at 1 GB.
-
The screen switches to the progress screen (see Part B).
No photos available
Section titled “No photos available”If there are no photos in the gallery yet, the page shows the card No Photos Available instead of the button, noting there’s nothing to download right now. As soon as guests upload, the button appears.
Part B – The progress and result screen
Section titled “Part B – The progress and result screen”Whether simple or advanced: once a download has been requested, this screen replaces the configuration. Progress comes in live over a WebSocket connection – you don’t need to reload the page.
- In progress – heading Download in Progress with a progress bar and Progress: N%. Text: “We’re gathering your photos. This may take a few minutes for large collections.” Use Cancel Download Request to stop.
- Complete – heading Download Complete with a green box Download Ready and the list Available Files:. For a single file the link reads Download (ZIP); for multiple parts File Part N (ZIP) – download every part (each part is up to 1 GB; large videos may create bigger files). Use Delete Generated ZIP & Start New Download to remove the generated archive and start a fresh download.
- Failed – heading Download Failed with an error message. Use Clear Failed Request & Start Over to reset and begin again.
Share the ZIP publicly
Section titled “Share the ZIP publicly”Once the download is finished, a sharing area appears at the bottom of the result screen:
-
Turn on the Share download publicly toggle. Now anyone with the event link can download the finished files – without logging in.
-
The link is valid for 30 days. Under Shareable link: a field with the public download URL appears alongside a Copy link button (after clicking: Link copied!).
-
Below it you’ll see Available until DATE (expiry) and Downloaded N time(s) (how often the link was used).
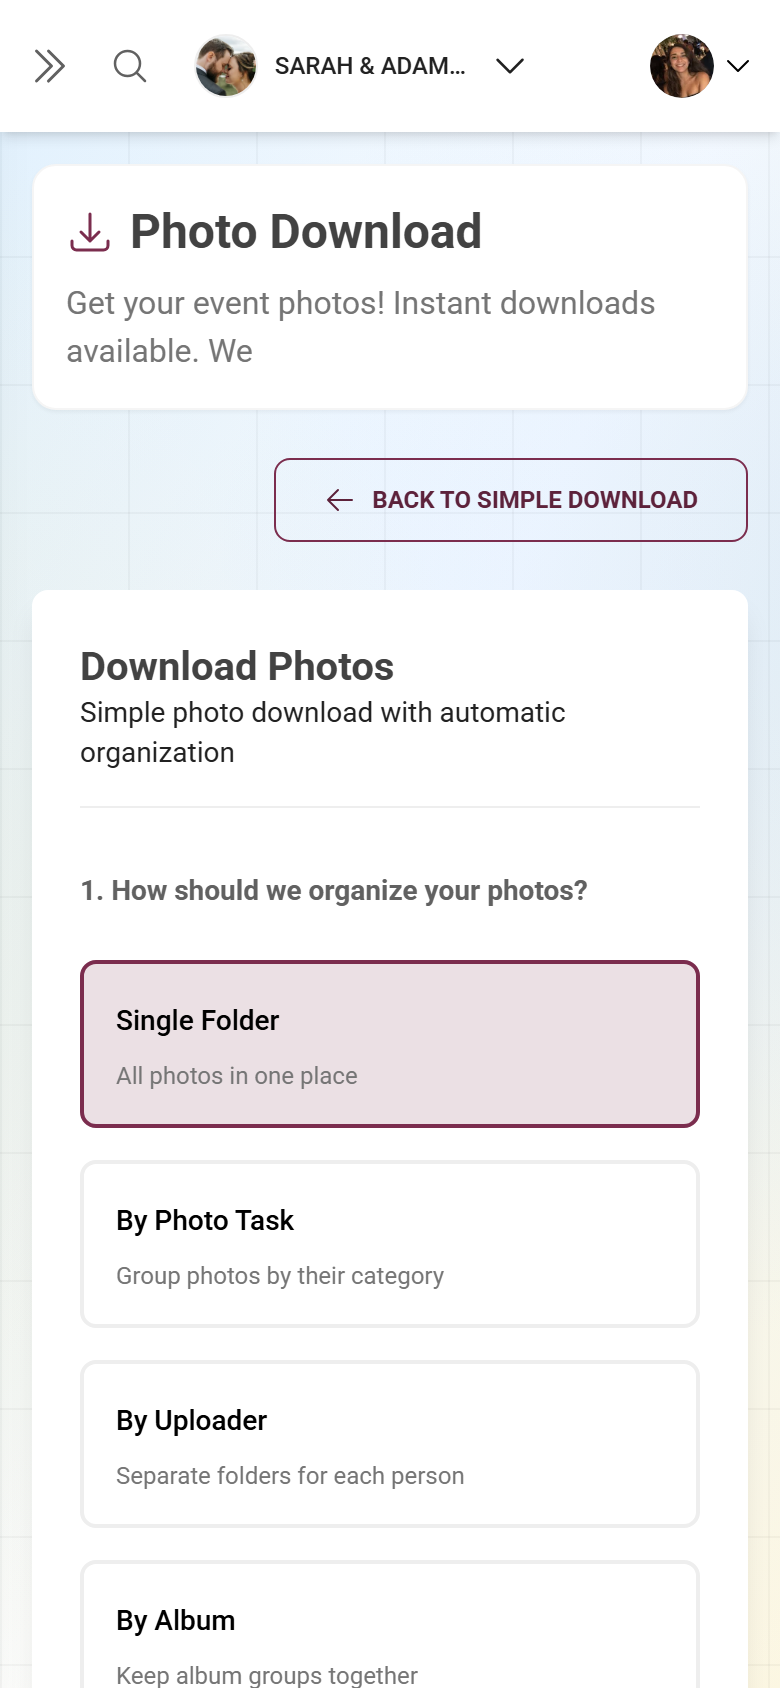
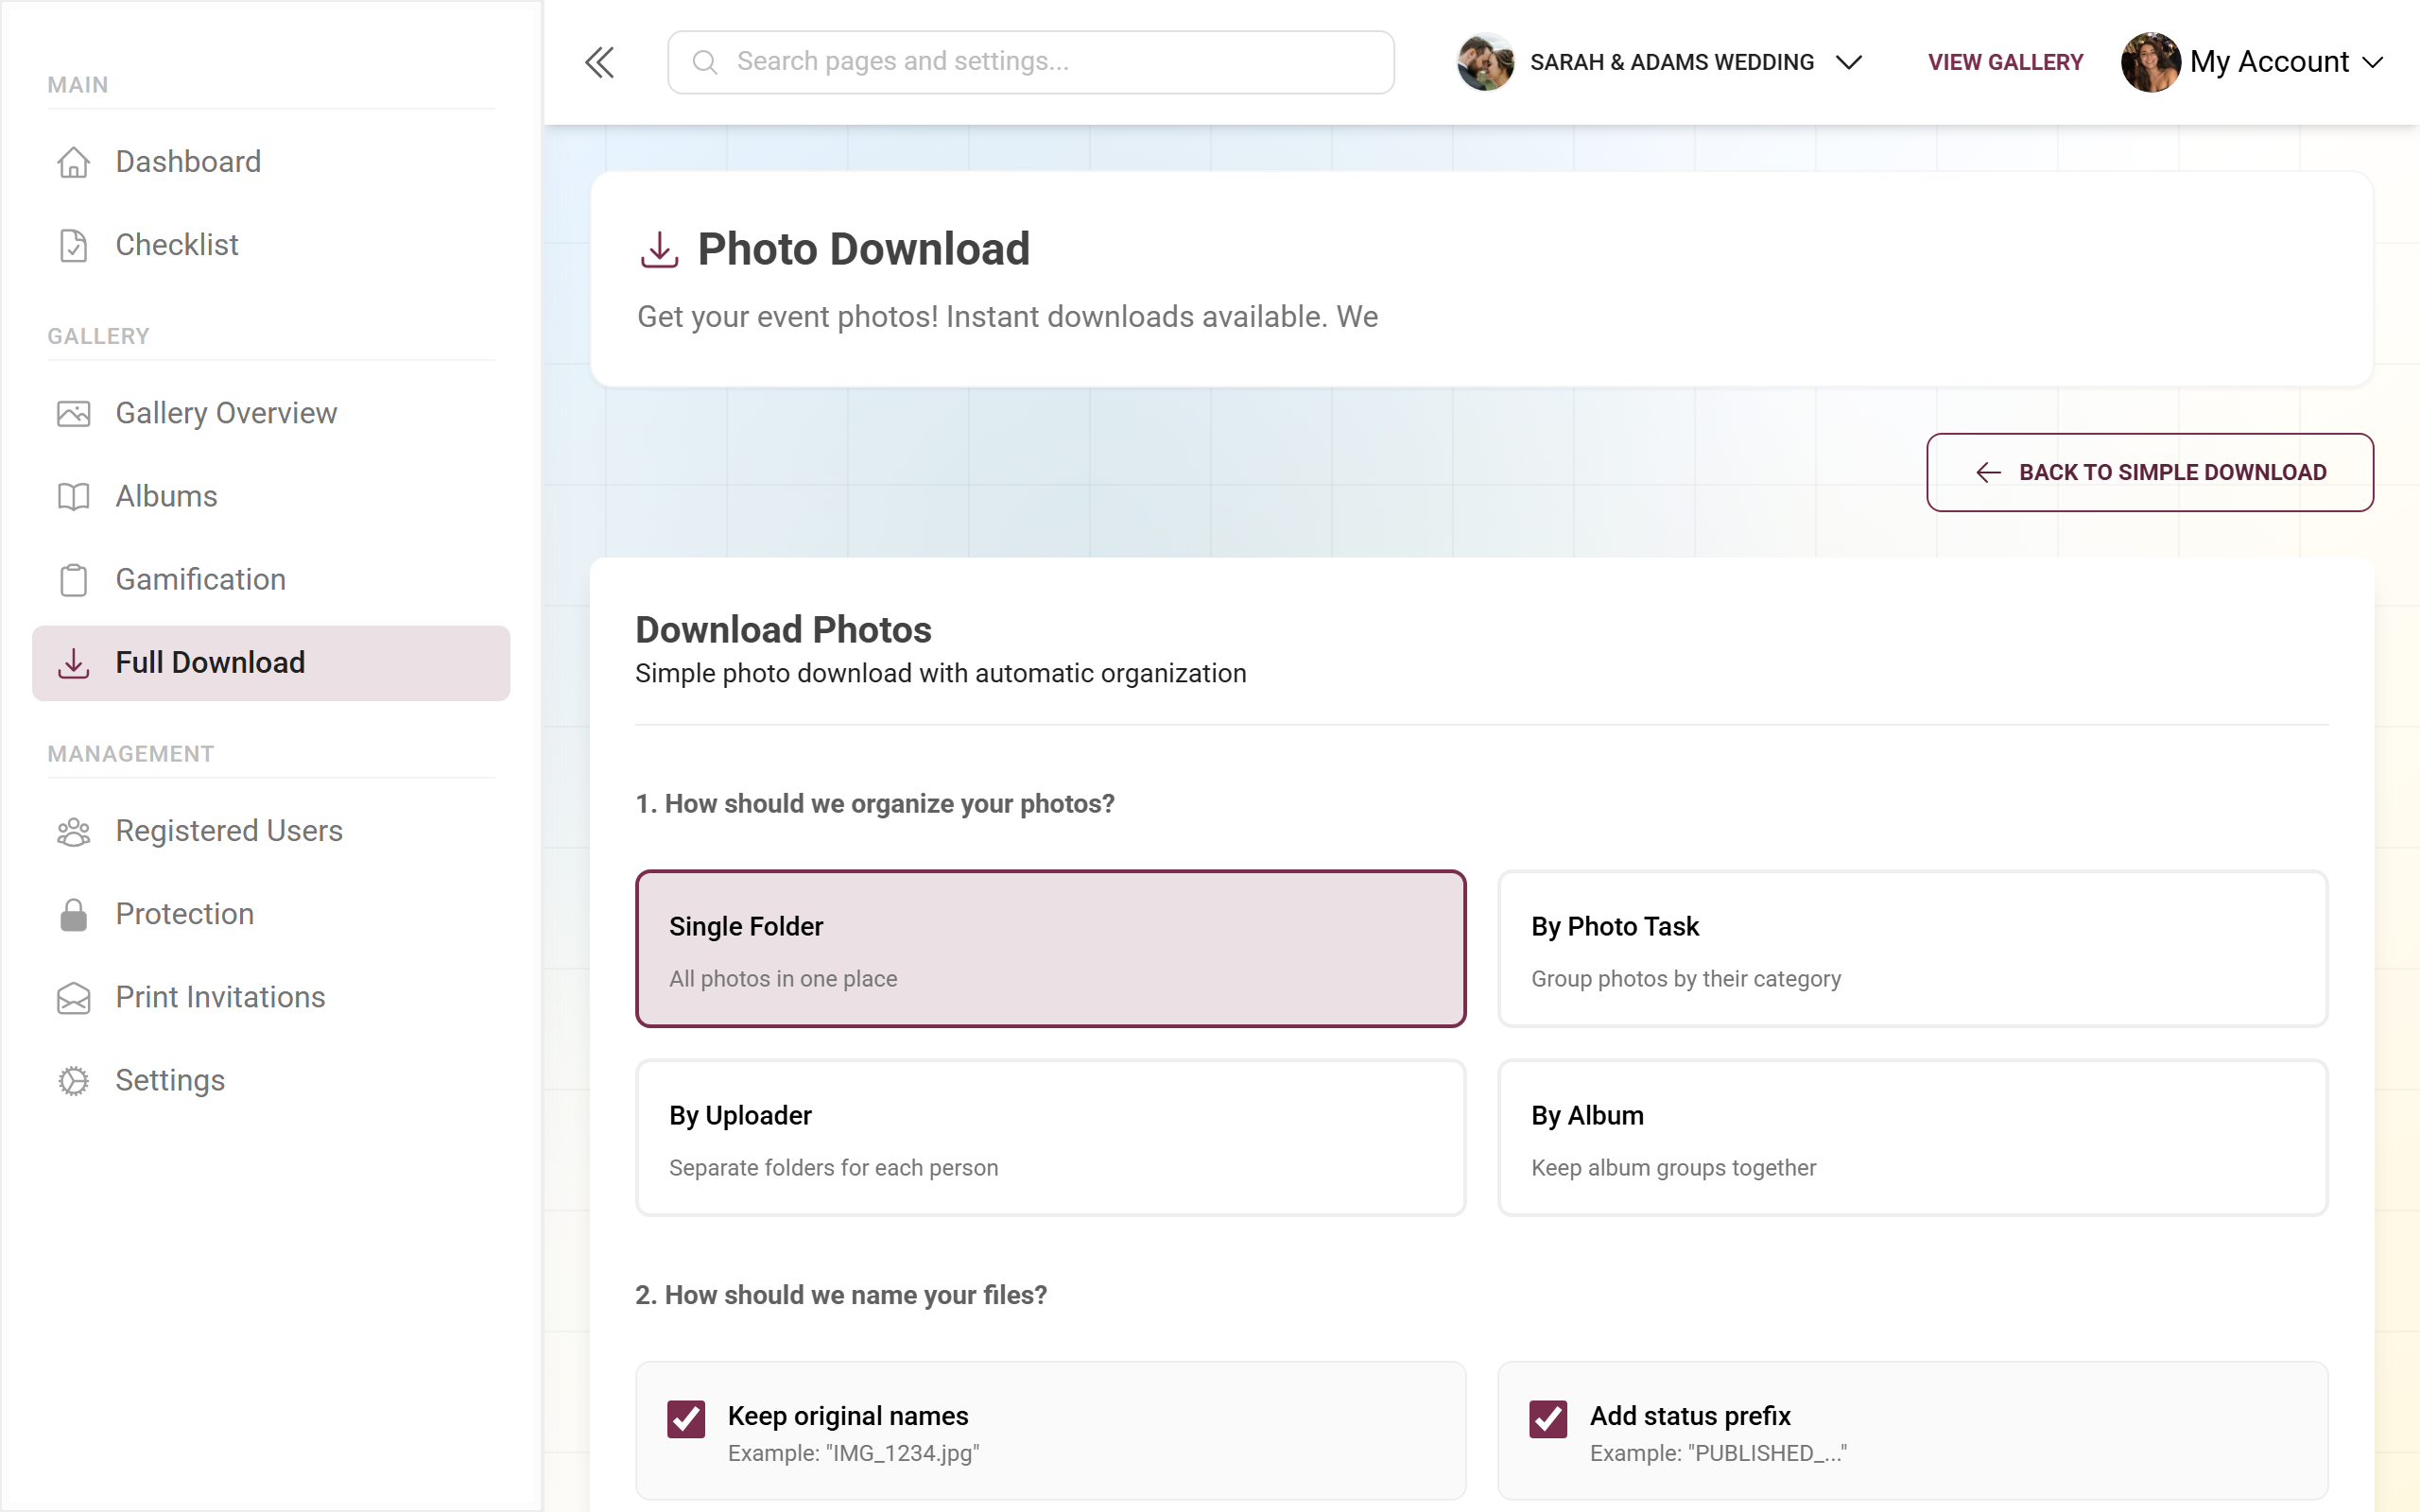
Part C – Advanced download
Section titled “Part C – Advanced download”Click Advanced Options in the top right to switch to advanced mode (route with ?mode=advanced). Here you control exactly what and how things are packed in seven numbered steps. Every setting is reflected immediately in the live preview (step 7).
1. How should we organize your photos?
Section titled “1. How should we organize your photos?”Pick one of four folder structures (default: Single Folder):
- Single Folder – all photos in one place.
- By Photo Task – grouped by photo task/category (see Managing tasks).
- By Uploader – a separate folder per person.
- By Album – albums stay together (see Managing albums).
2. How should we name your files?
Section titled “2. How should we name your files?”Four combinable checkboxes (default: original name + status prefix on):
- Keep original names – the original file name, e.g.
IMG_1234.jpg. - Add status prefix – prepend the status, e.g.
PUBLISHED_…. - Add like count – prepend the number of likes, e.g.
150-likes_…. - Add uploader name – prepend the uploader’s name, e.g.
john-doe_….
Under Preview filename: you see a live example file name from your combination (order: likes_nickname_status_original.jpg).
3. Generate description files?
Section titled “3. Generate description files?”The checkbox Generate description text files for images with user captions creates a .txt file next to each photo that has a caption – handy if you want to keep guests’ comments.
4. Include deleted photos from the recycle bin?
Section titled “4. Include deleted photos from the recycle bin?”Three selection cards (default: Exclude Deleted), each with a small tree preview and a count:
- Exclude Deleted – active photos only.
- Include Deleted – active plus deleted photos.
- Only Deleted – the contents of the recycle bin only.
For what the recycle bin can otherwise do, see Recycle bin.
5. Which photos do you want?
Section titled “5. Which photos do you want?”Three checkboxes with live counters (default: only Published on):
- Published – “N ready photos”.
- Unpublished – “N hidden photos”.
- Pending Approval – “N waiting photos”.
The counter on the download button below updates live from these checkboxes and the recycle-bin filter.
6. Split by publishing status?
Section titled “6. Split by publishing status?”The checkbox Create separate folders for each status (default on) sorts photos into Published, Pending and Unpublished folders.
7. Download structure preview
Section titled “7. Download structure preview”An interactive, expandable folder tree (root: photos-download.zip) shows you live how the archive will look with your settings. Click folders to expand and collapse them. The legend below explains the colors: status folder (yellow), grouping folder (brand color), photo file (green), description file (only when step 3 is active) and deleted folder (only when step 4 ≠ “Exclude”).
Starting the advanced download
Section titled “Starting the advanced download”-
Check the preview. The button Download N Photos shows how many files will be packed with the current filters.
-
If no files remain with your filters, the button is disabled and you see “There are no downloadable files with the current filters!” – then loosen the filters.
-
Click Download N Photos. The note “ZIP files are automatically split at 1GB. Large videos may create bigger files.” reminds you of the 1 GB split.
-
The progress screen follows (Part B). The Selected Download Settings box summarizes your choices (organization, filename format, included photos, description files Yes/No, recycle bin, split by status). The note “Settings cannot be changed while a download is in progress…” means: while a download is running the settings are locked – cancel first, then reconfigure.
New-photos reminder
Section titled “New-photos reminder”If you’ve downloaded before and new photos have arrived since, a banner appears at the top with the number of new photos since your last download – plus a detail line with the current counts (published / pending / unpublished). Use it as a reminder to refresh your backup after new uploads.
Edge cases & troubleshooting
Section titled “Edge cases & troubleshooting”- Feature not in your plan: on non-branded events the page shows an upgrade prompt; on branded (white-label) events the menu item is hidden and a direct visit redirects to the dashboard. Fix: upgrade your plan, see Plans & upgrade.
- 0 photos / 0 filtered files: “No Photos Available” or “no downloadable files with the current filters” – wait for uploads or loosen the filters in advanced mode.
- Download hangs or takes long: large collections take time; progress arrives live via WebSocket, and you’re notified by email. If needed, stop with Cancel Download Request.
- Failed: reset with Clear Failed Request & Start Over; reduce the scope or filters if necessary.
- New photos after the backup: the new-photos banner reminds you – just run the download again.
- Multiple ZIP parts: large galleries are split at 1 GB – download every “File Part N”. Large videos create bigger parts.
Best-practice tips
Section titled “Best-practice tips”- Back up in good time: download the backup before your event’s storage period ends (terms in the glossary).
- Full backup in advanced mode: tick all three statuses and, if needed, “Include Deleted”; “Keep original names” for unchanged file names.
- Per-guest attribution matters? Use “By Uploader” and/or “Add uploader name”.
- Enable public sharing only deliberately – the link grants access without a login and expires after about 30 days.
Related pages
Section titled “Related pages”- Downloading photos (guests) and Select & download
- Slideshow – save individual photos straight from the slideshow
- Recycle bin · Managing albums · Managing tasks
- Plans & upgrade · Glossary