The guest list is the control center of your planning: every guest in one table – who accepted, who eats what, who would like to sit next to whom, who sits where.
You find it in the sidebar under Planning – either through its own entry, as soon as it is active and recently used, or through All Tools and the Guest List tile.
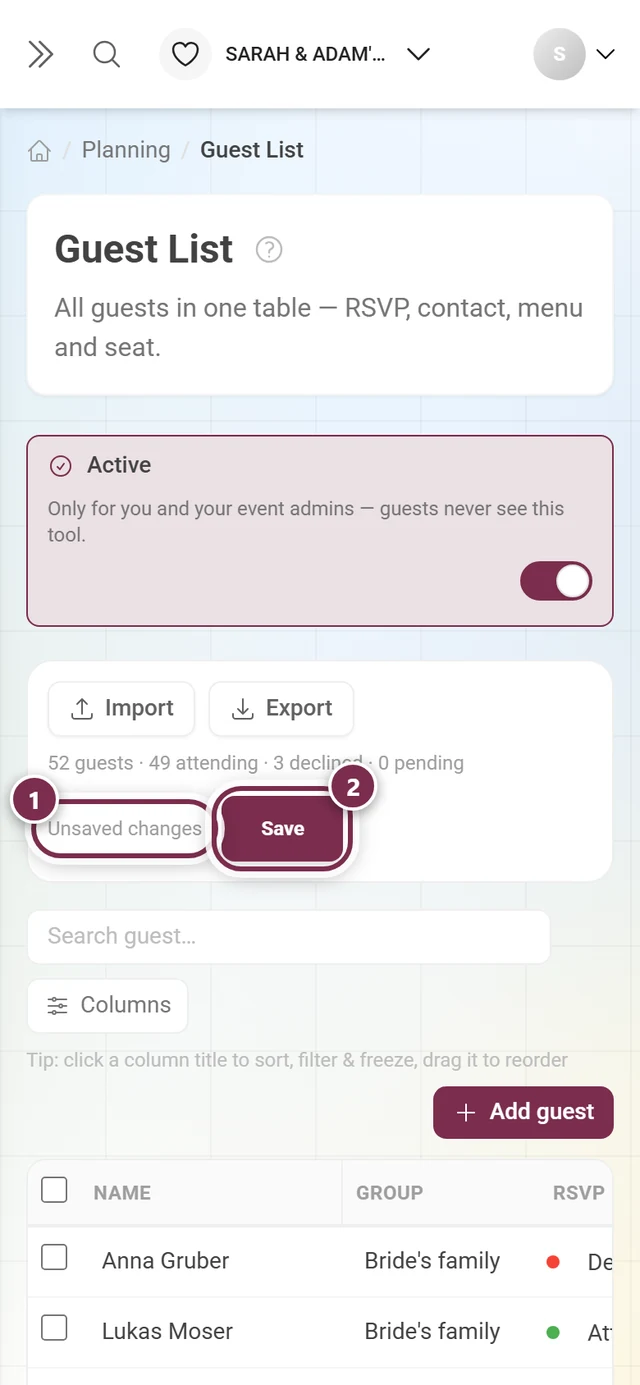
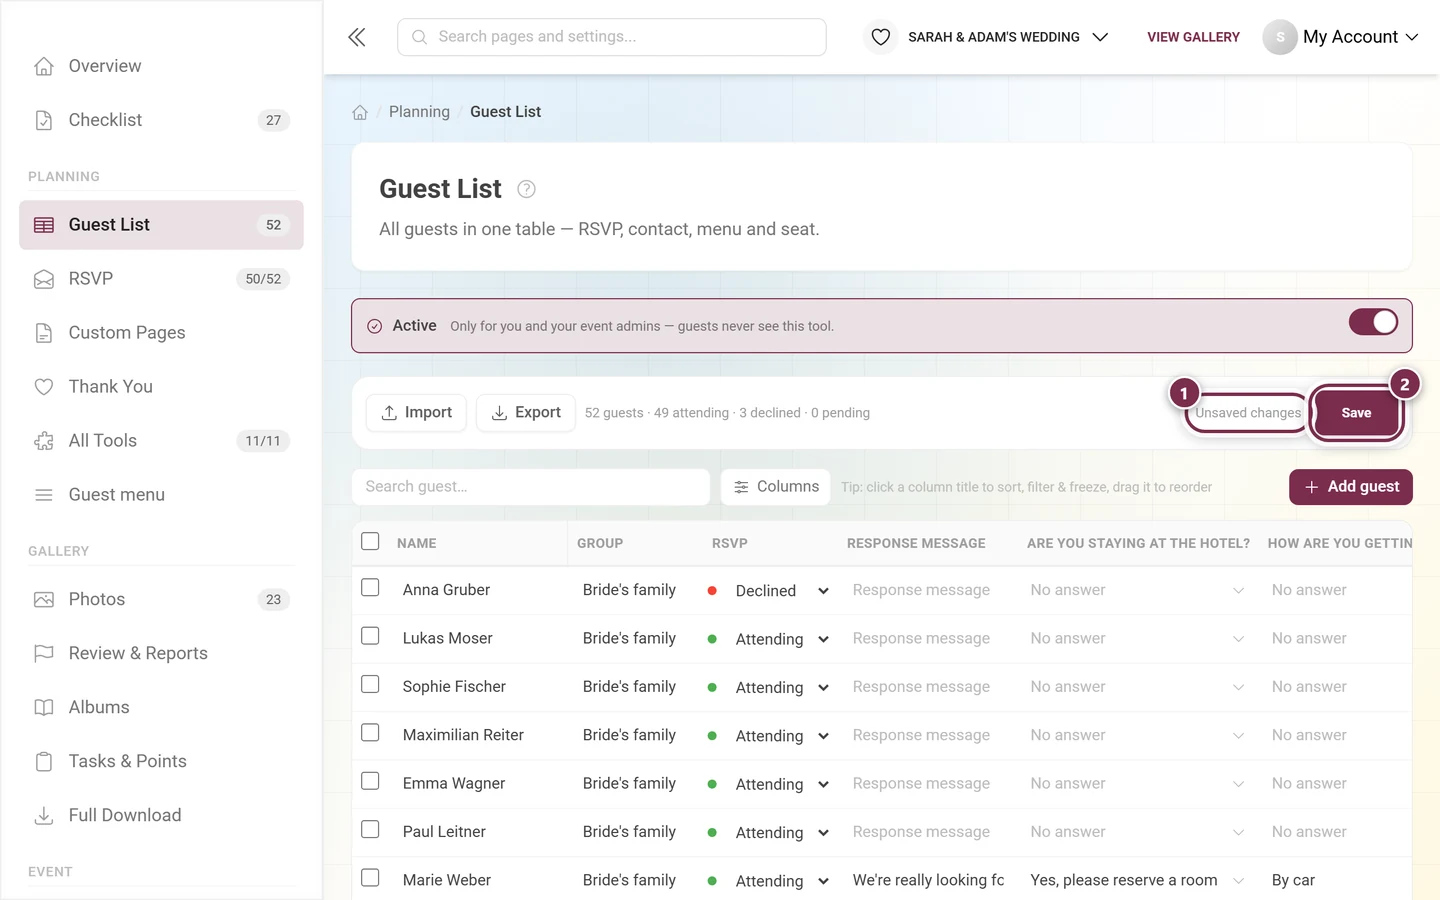
Above the table sits the action bar with Import, Export and a counter line showing where your planning stands: guests, attending, declined and pending. On the right is the Save button, preceded by Unsaved changes whenever something is open.
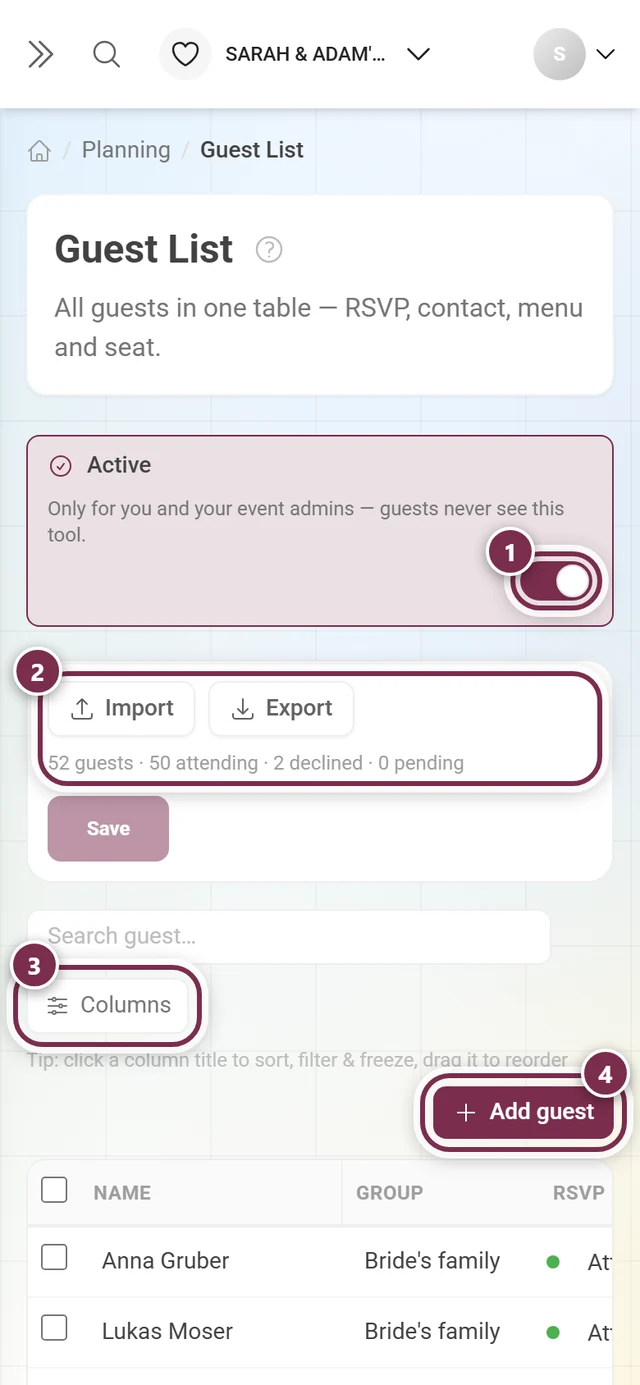
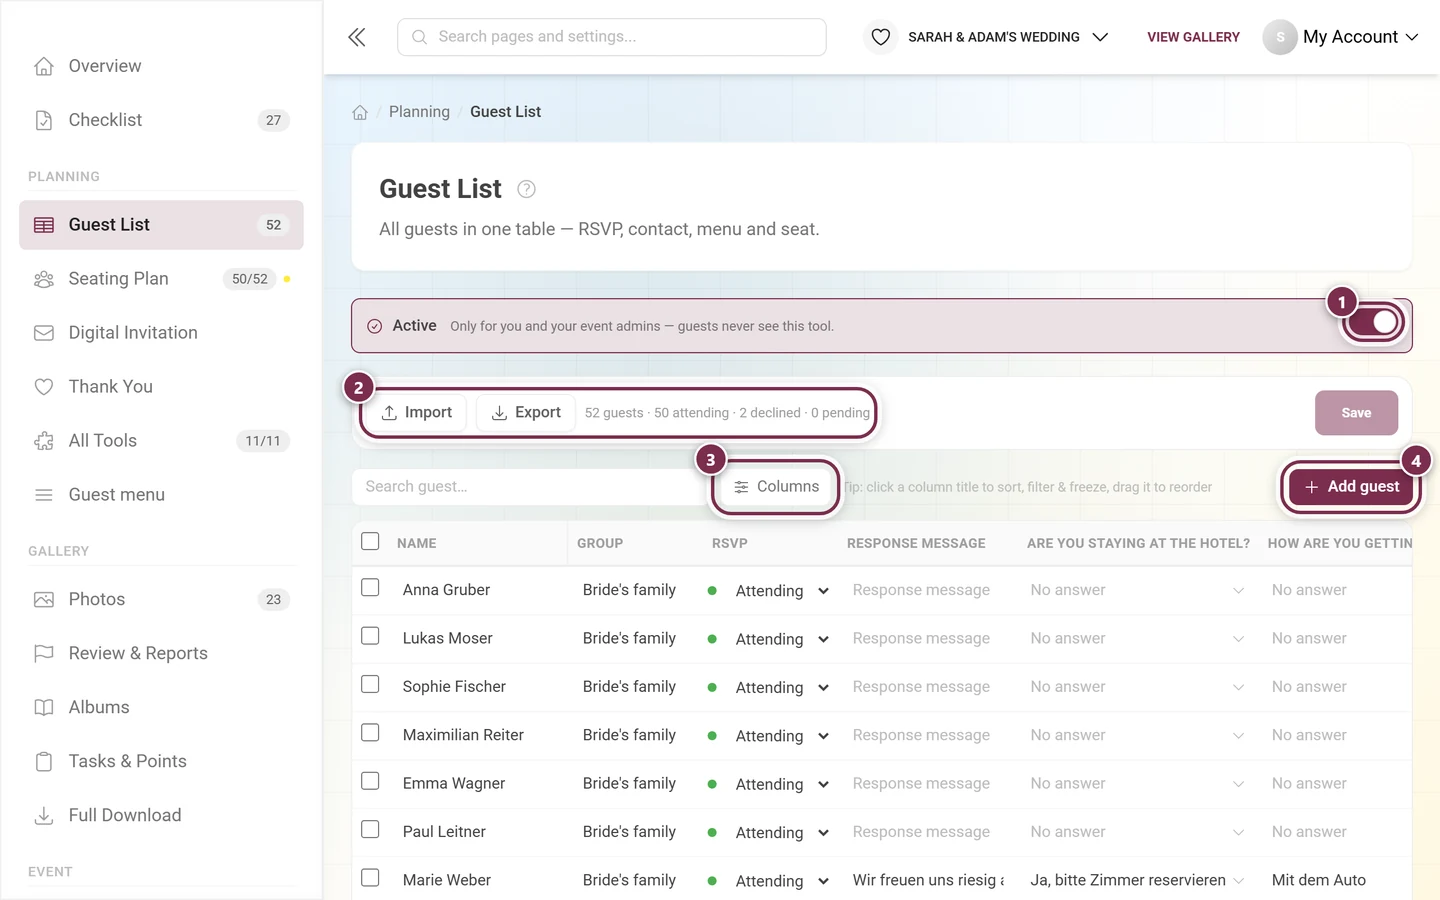
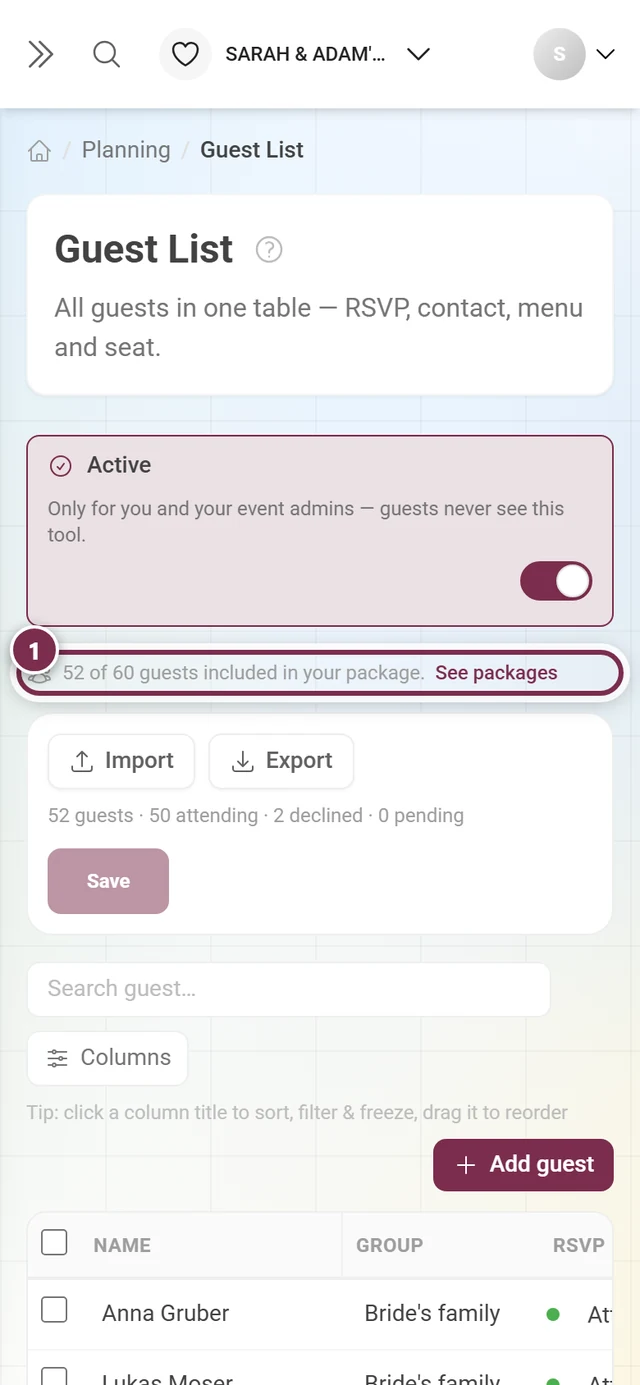
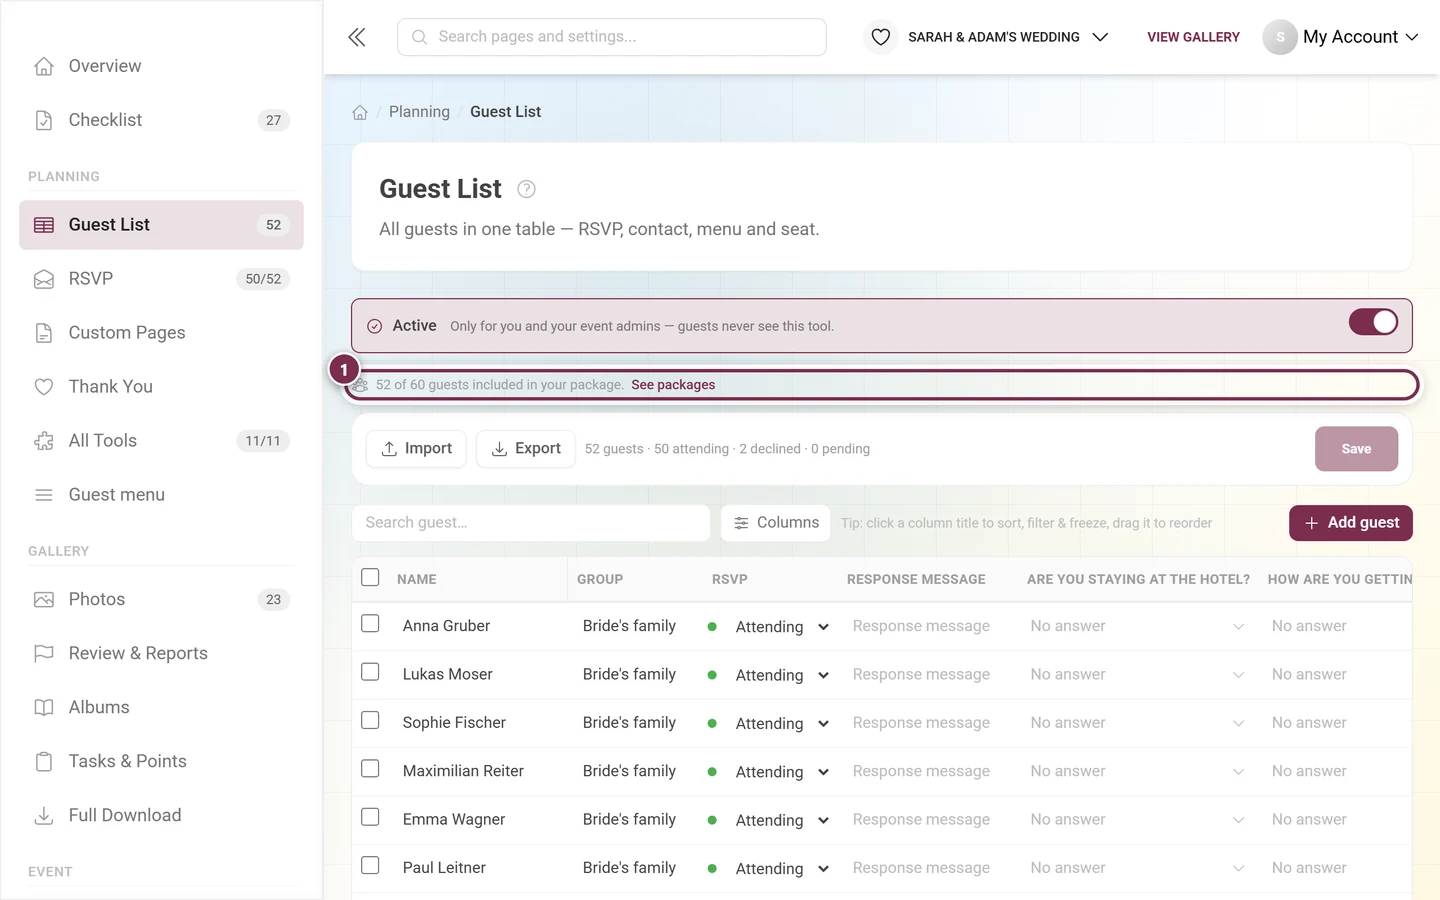
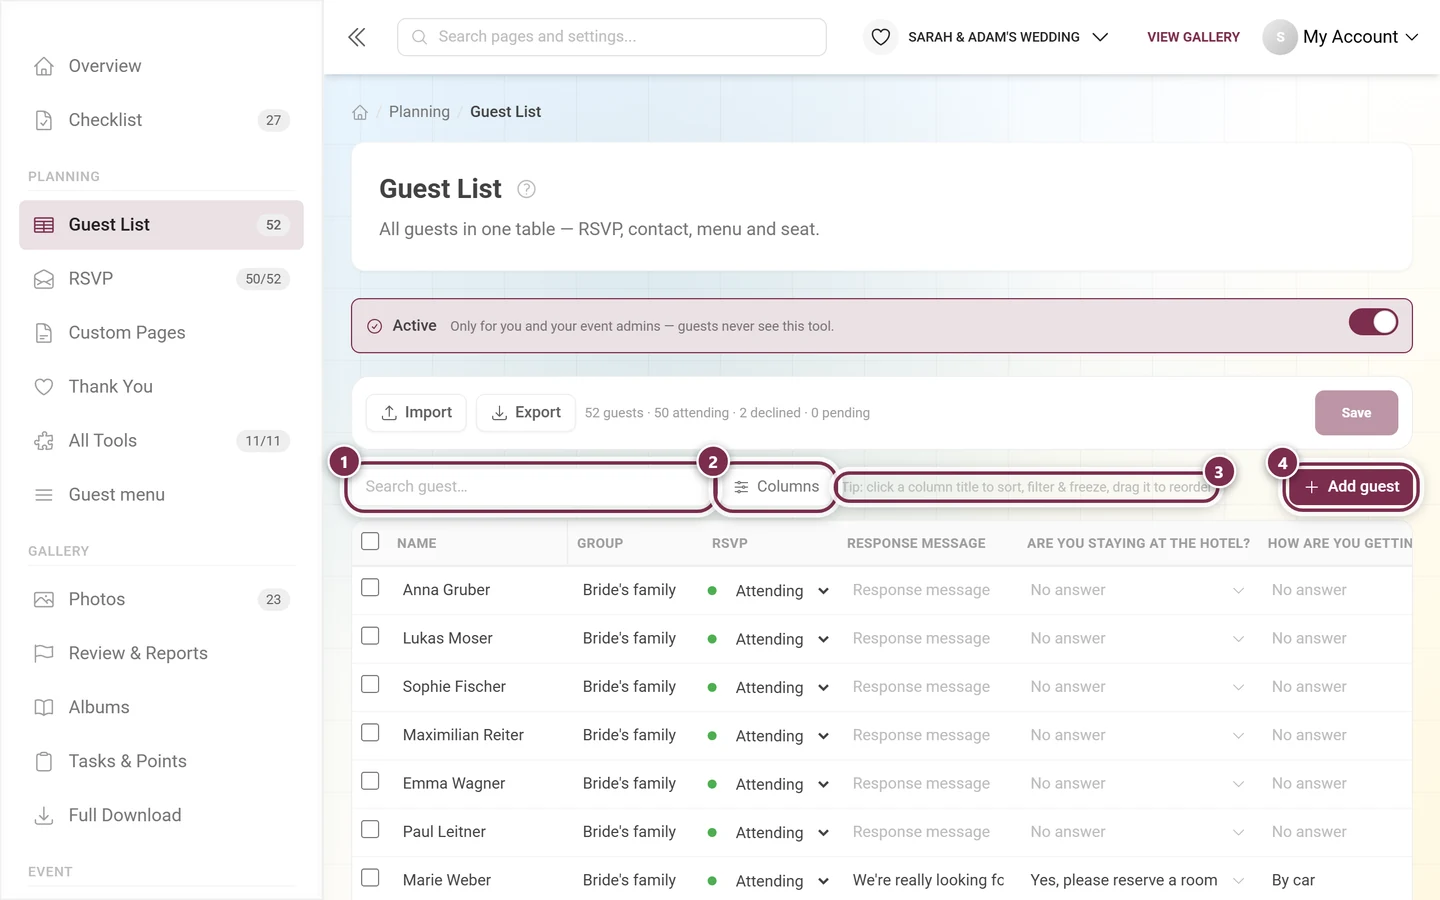
① The Active switch – the note in the same box is explicit: the guest list is for you and your event admins only, guests never see it. ② Import and Export, with the tally in the same block (“52 guests · 50 attending · 2 declined · 0 pending”). ③ Columns shows and hides columns. ④ Add guest creates a new row.
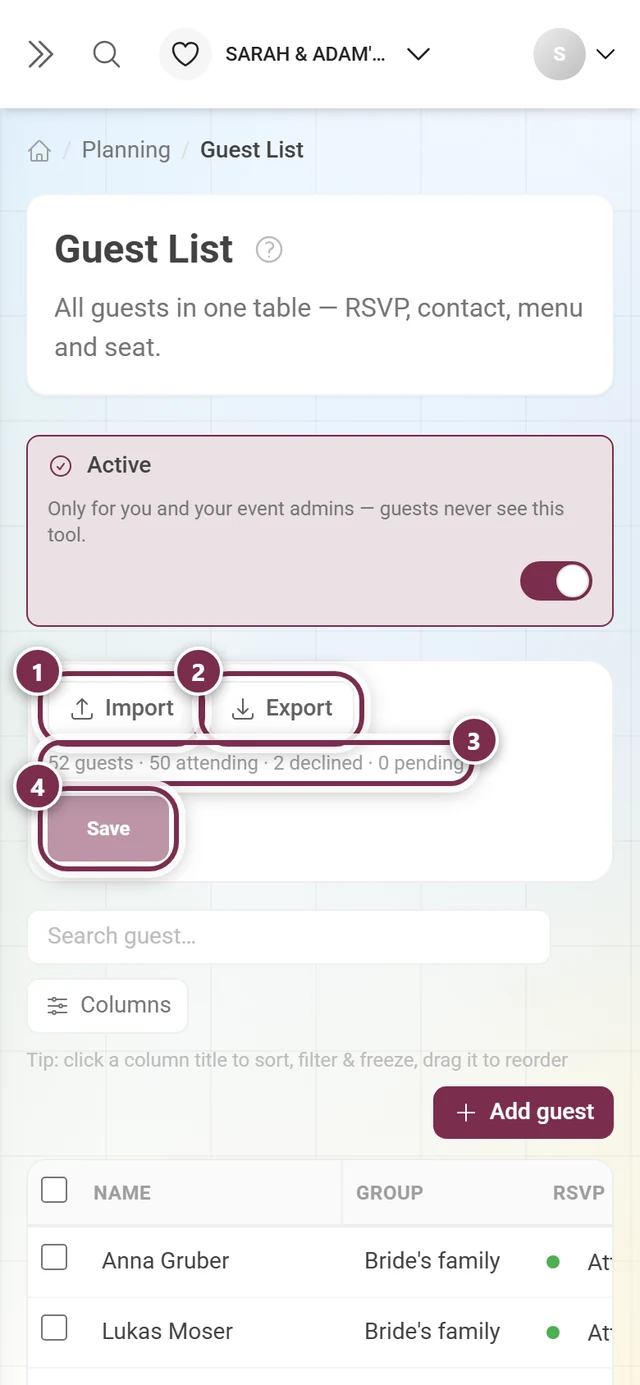
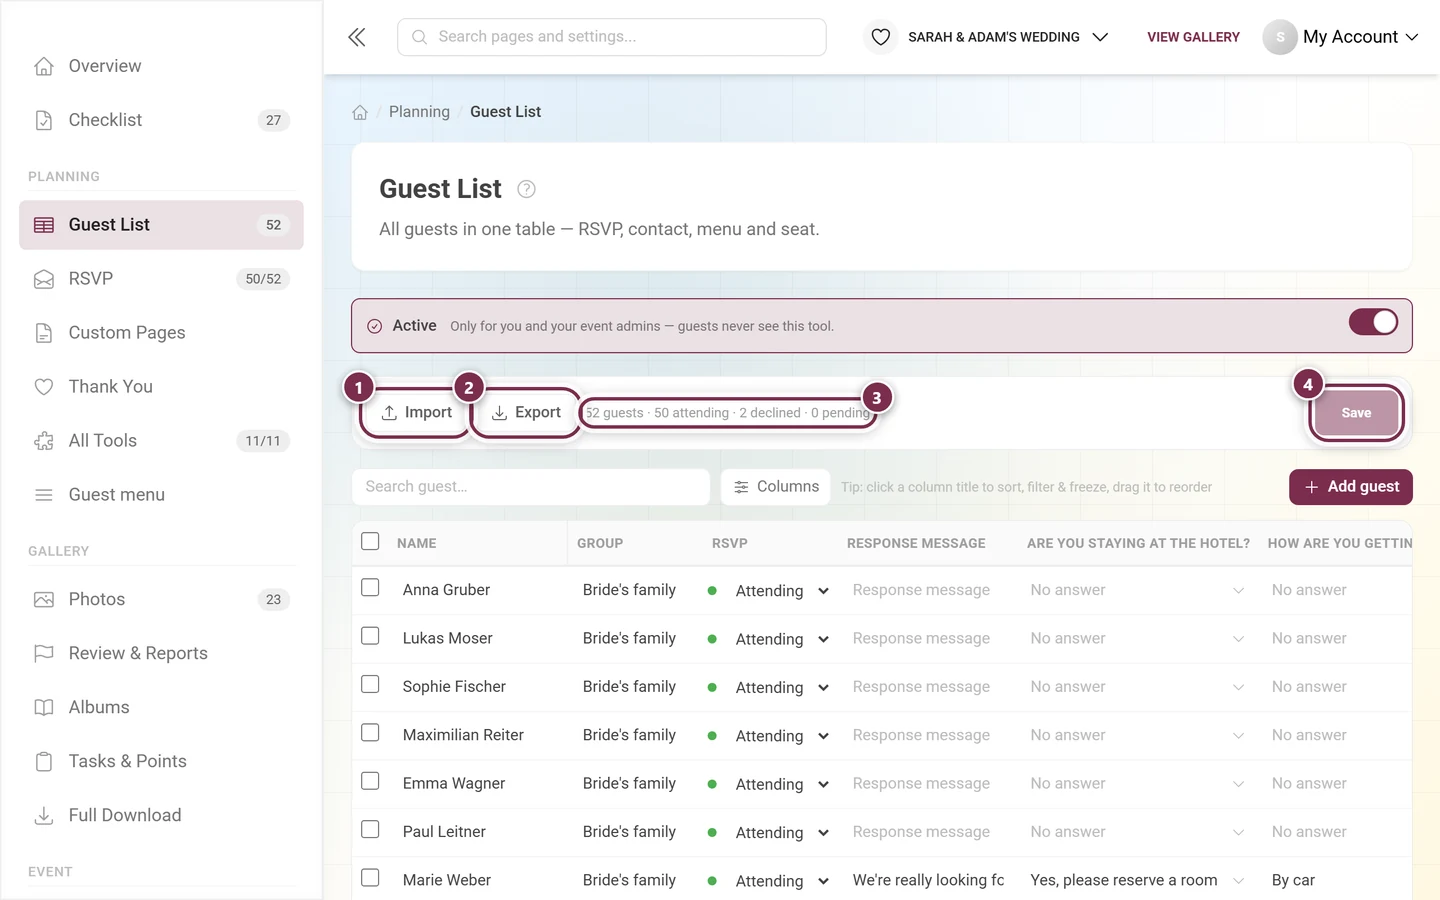
① Import reads an Excel, CSV or text file. ② Export hands the list back out as a file. ③ The tally “52 guests · 50 attending · 2 declined · 0 pending” always counts the whole list – search and filters never change these numbers. ④ Save stays grayed out while there is nothing to save.
The table does not save by itself. The moment you change something, Unsaved changes appears to the left of the button and Save becomes active.
① The note Unsaved changes appears as soon as you edit a cell, add a row or delete one. ② Save is dark now and writes everything down in one go. Leave the page before that and your input is gone. The tally counts along right away, by the way – it already reads “49 attending · 3 declined” although nothing has been saved yet.
① Shortly before the line, a slim band sits above the action bar: “52 of 60 guests included in your plan.” – with See plans next to it. You keep working exactly as before.
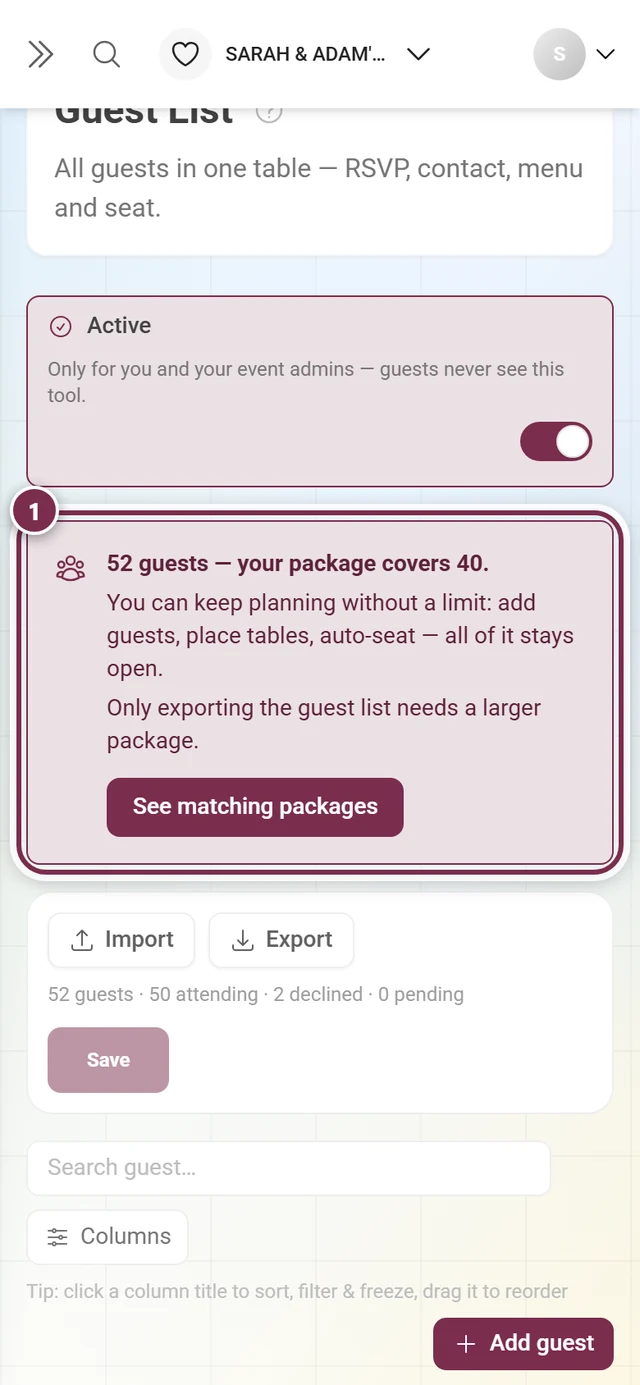
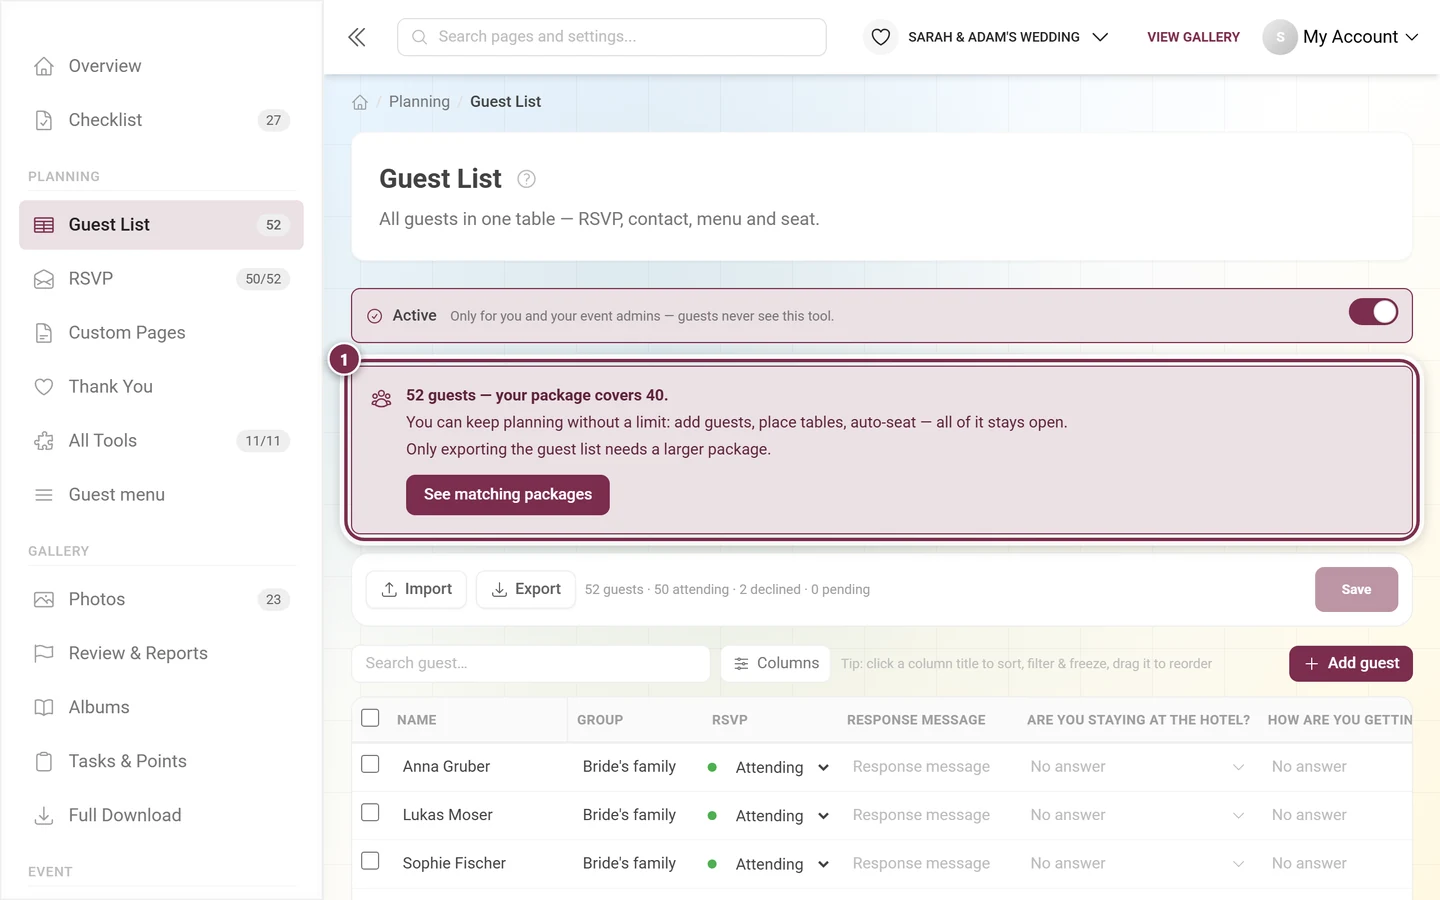
① Above the line the note grows into a box: “52 guests — your plan covers 40.” Below it stands what carries on regardless – adding guests, placing tables, seating automatically – and what does not: only the export of the guest list needs a bigger plan. The button below it – See matching plans – takes you straight to the matching plan.
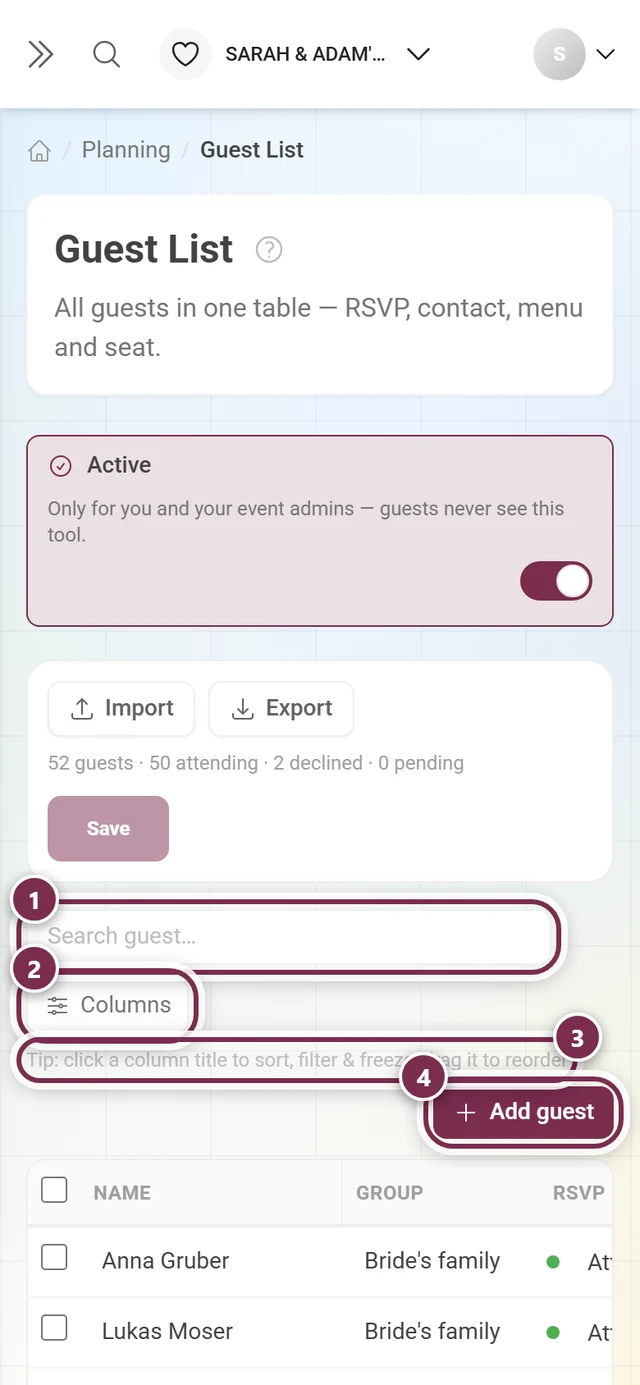
① Search guest… filters across all guests. ② Columns opens the Visible columns menu. ③ The tip sums up the handling: “Tip: click a column title to sort, filter & freeze, drag it to reorder”. ④ + Add guest appends an empty row.
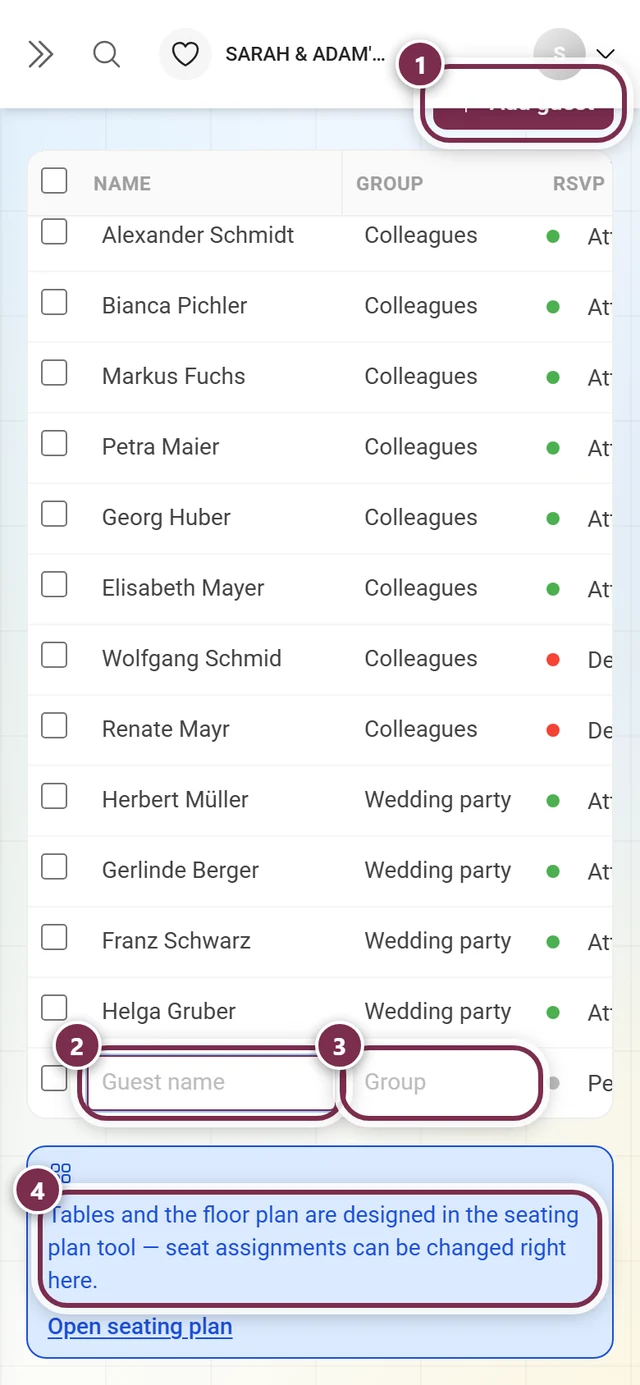
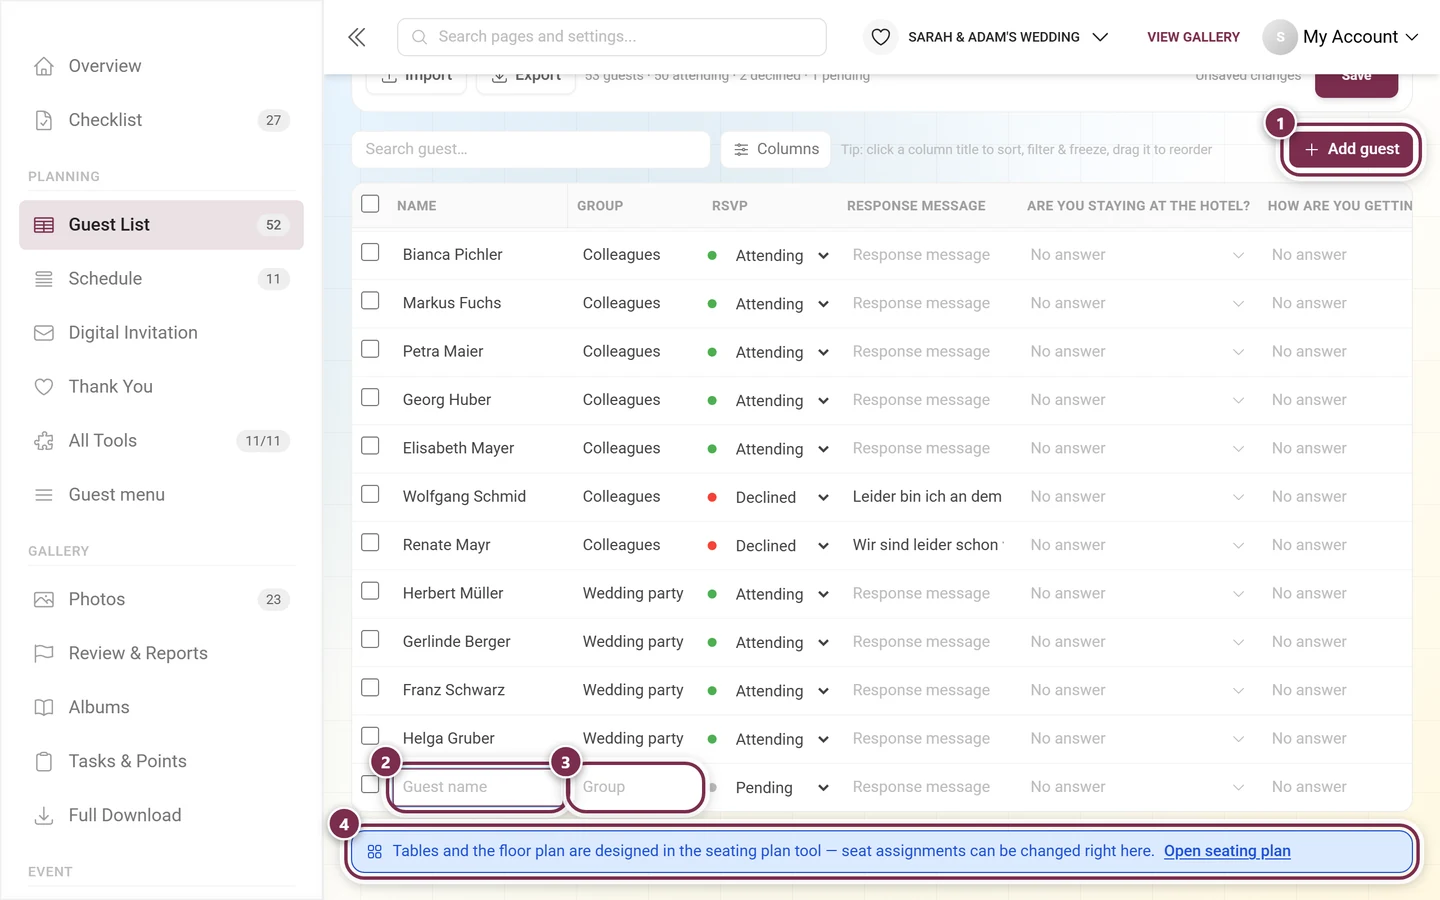
① Add guest appends an empty row at the end of the table – its RSVP starts on Pending, and the tally at the top jumps to 53 guests straight away. ② Type the name into Guest name, ③ the Group right next to it – the groups already in use are offered as suggestions. ④ Below the table you read where the seats come from: tables and the room layout are built in the seating plan.
Every cell is editable right in the row. Because the table is wider than the screen, the following shots walk through it piece by piece, from left to right.
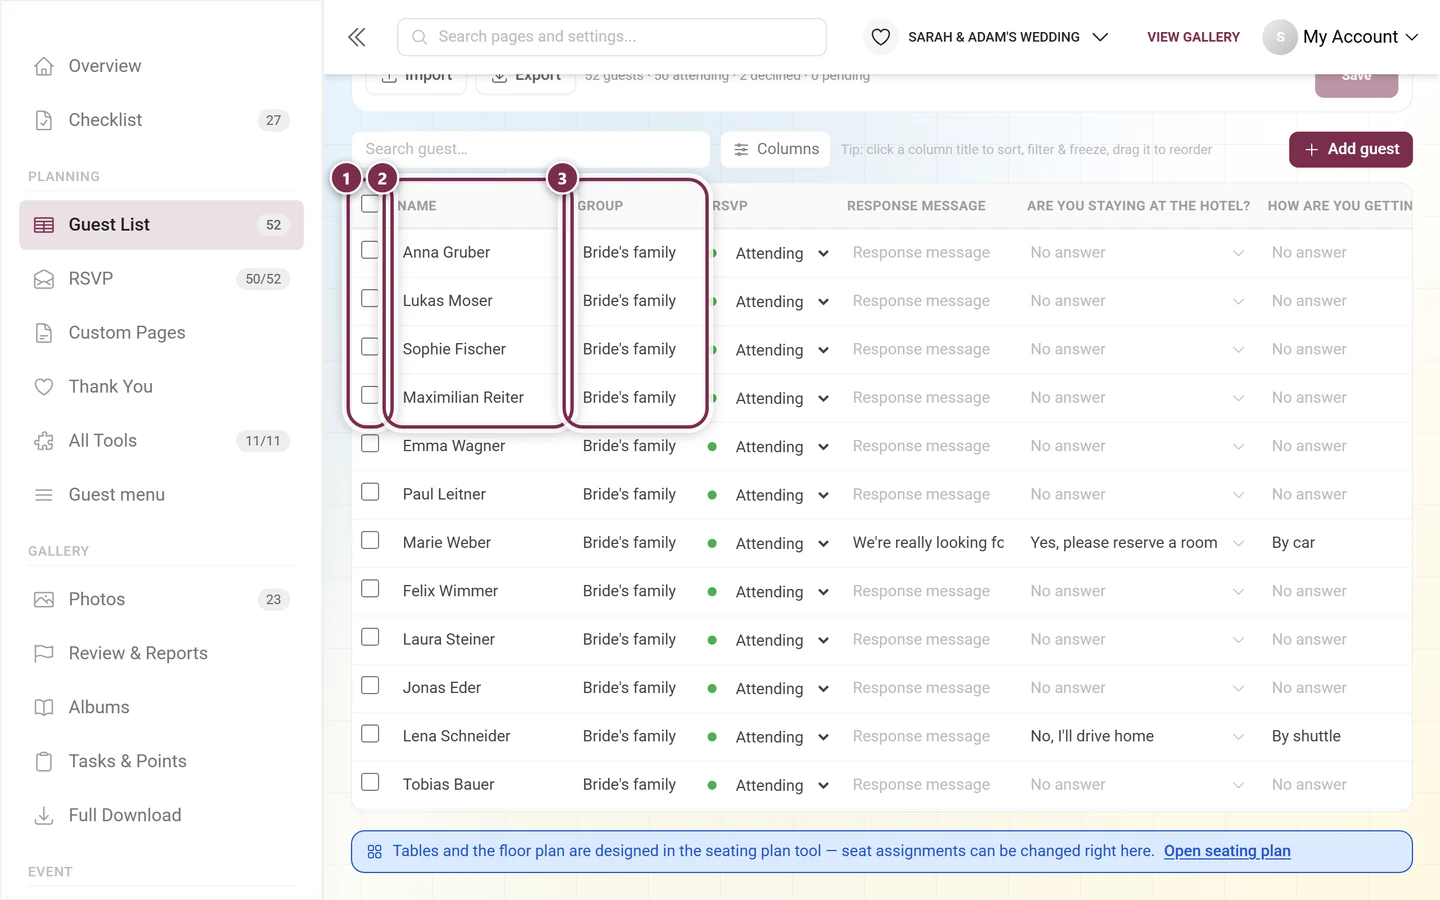
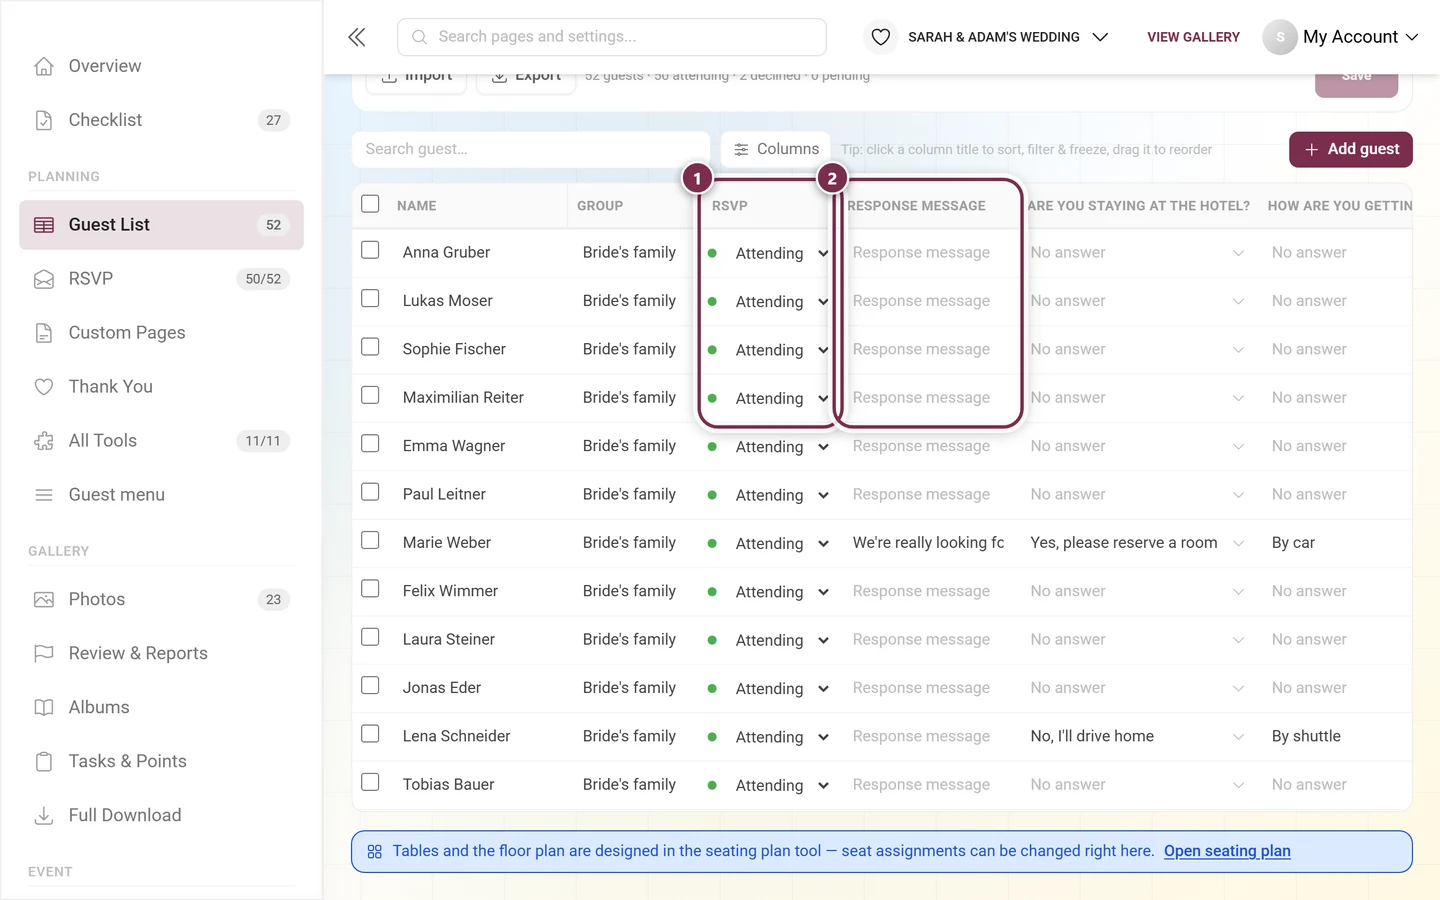
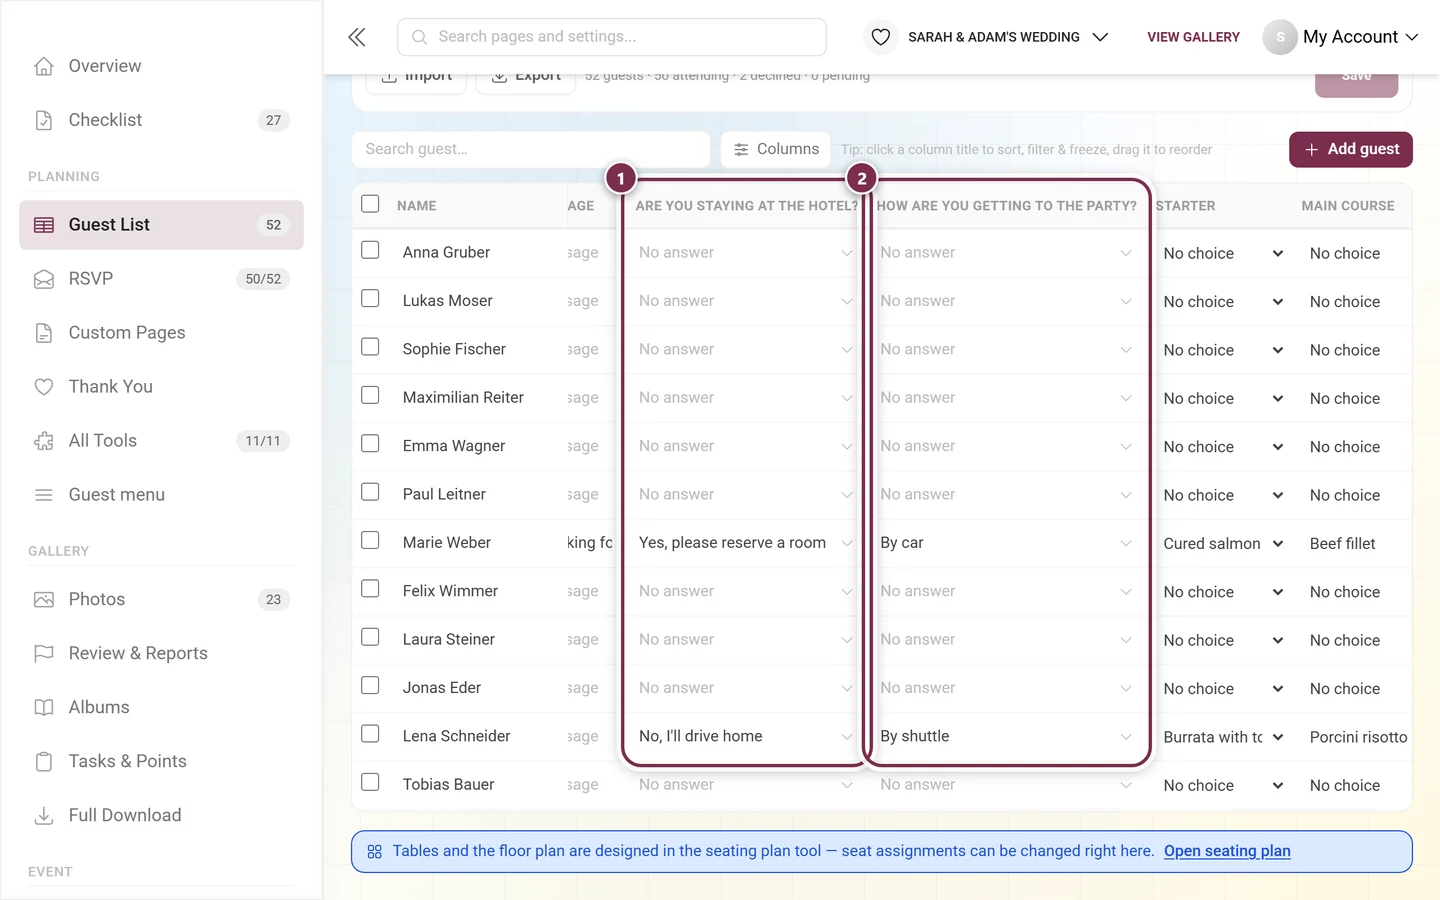
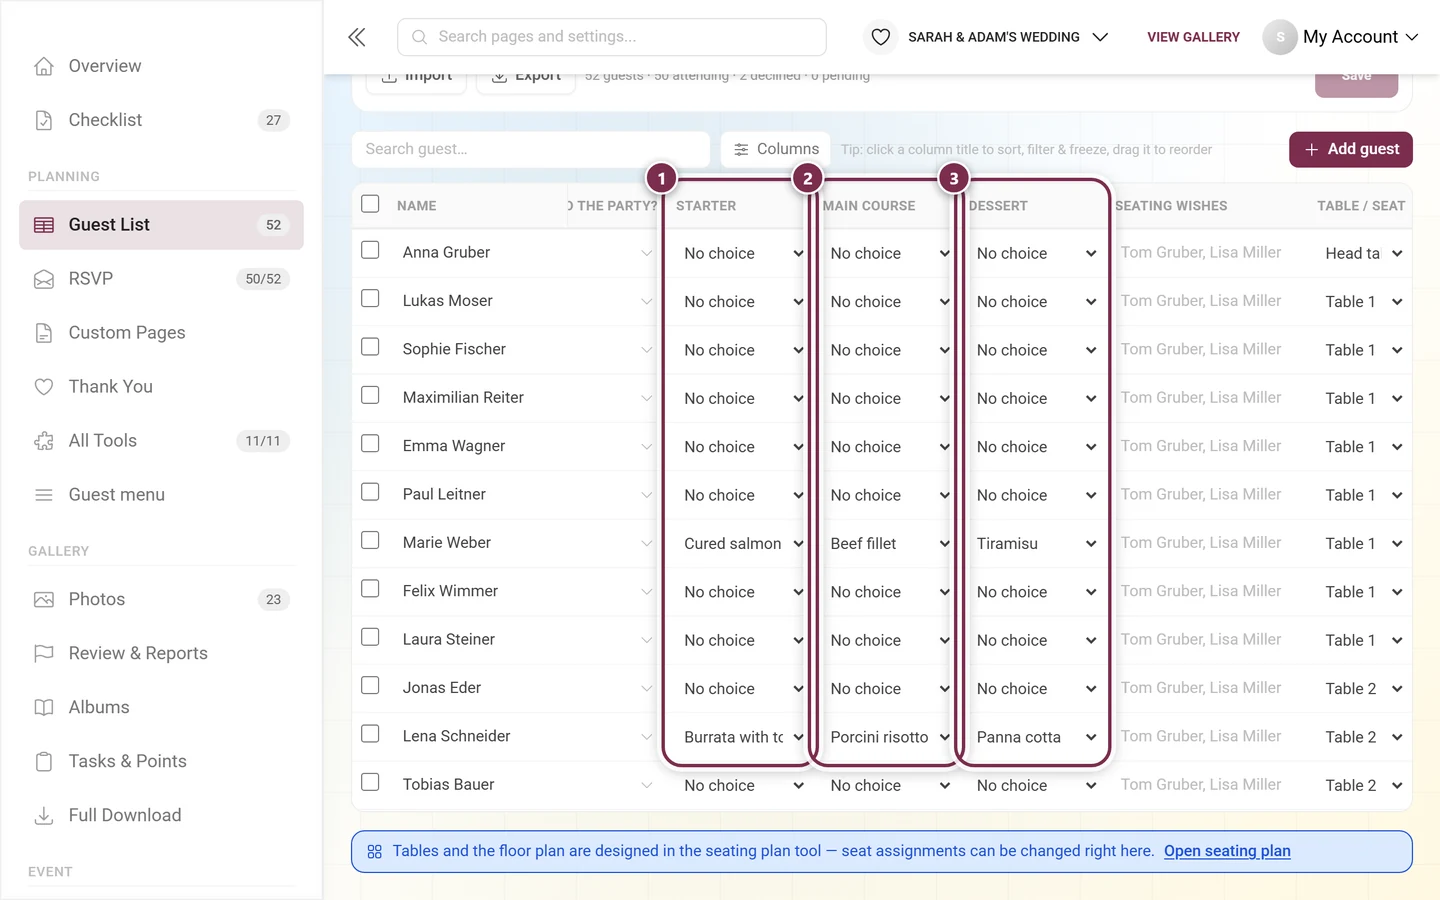
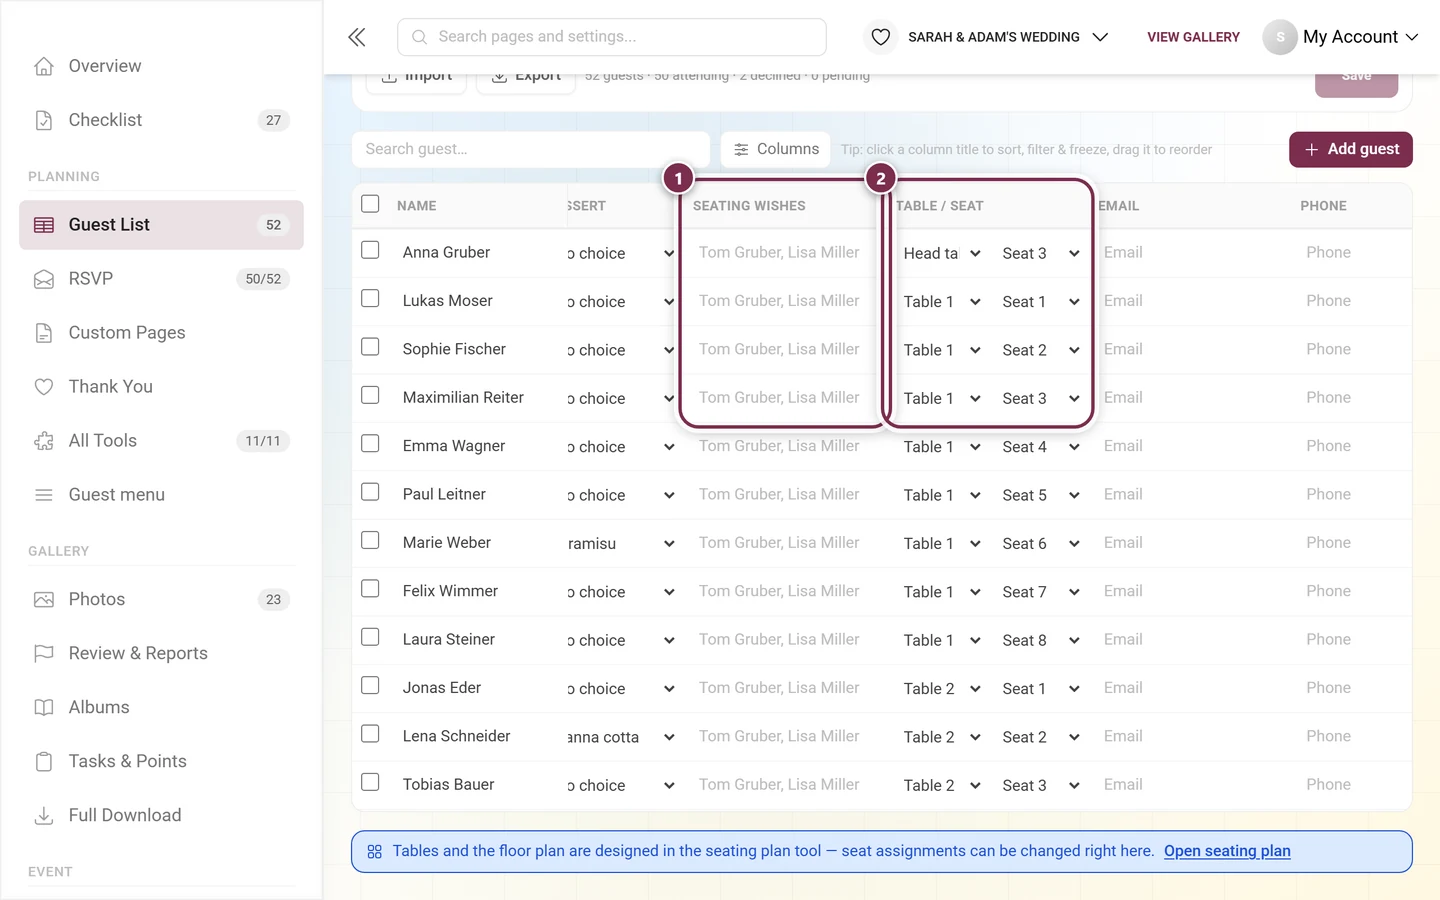
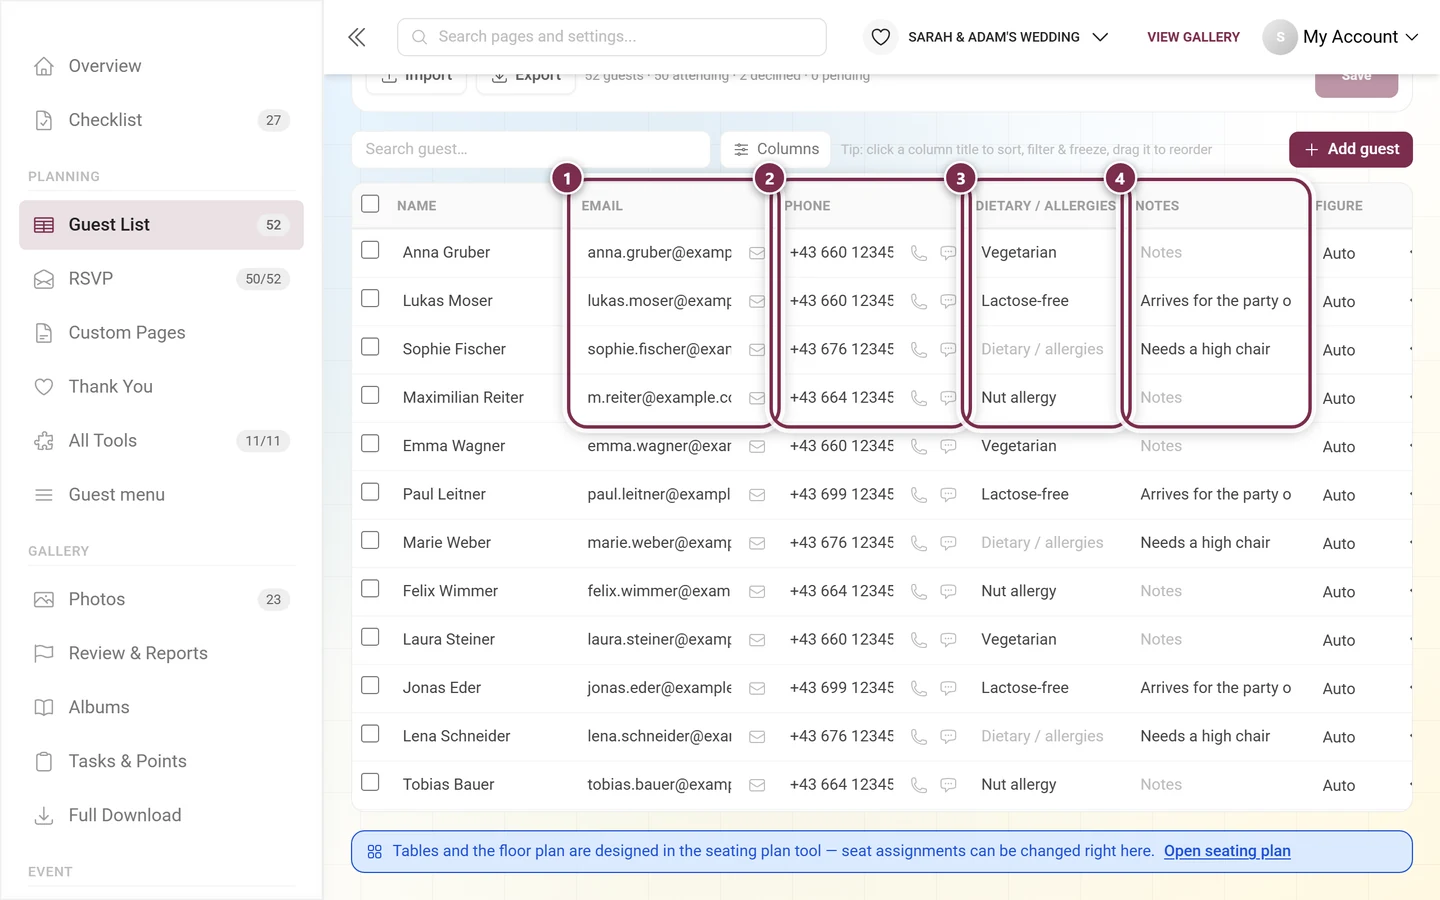
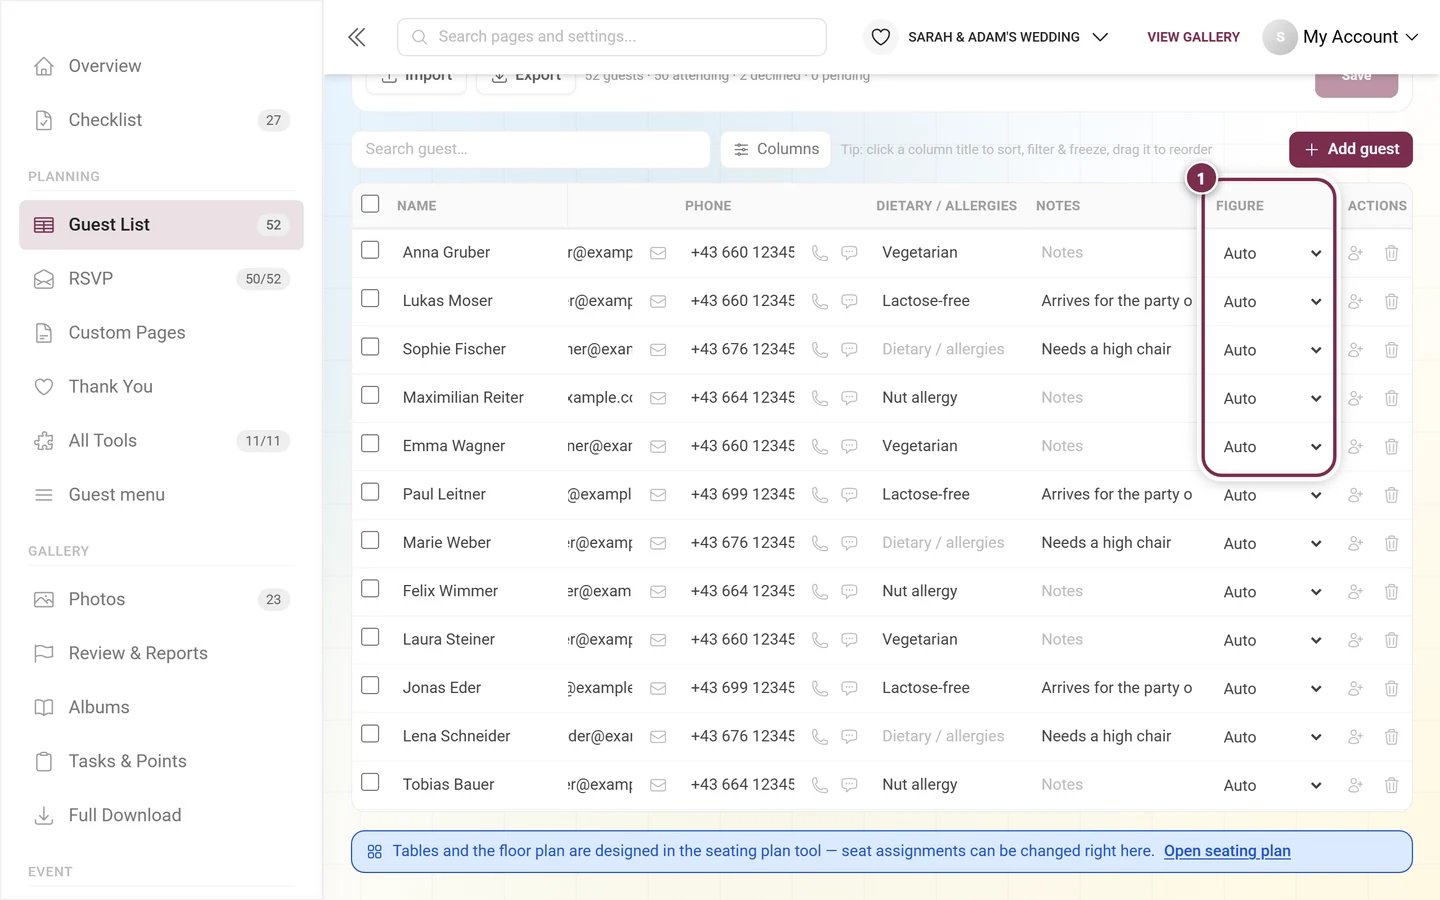
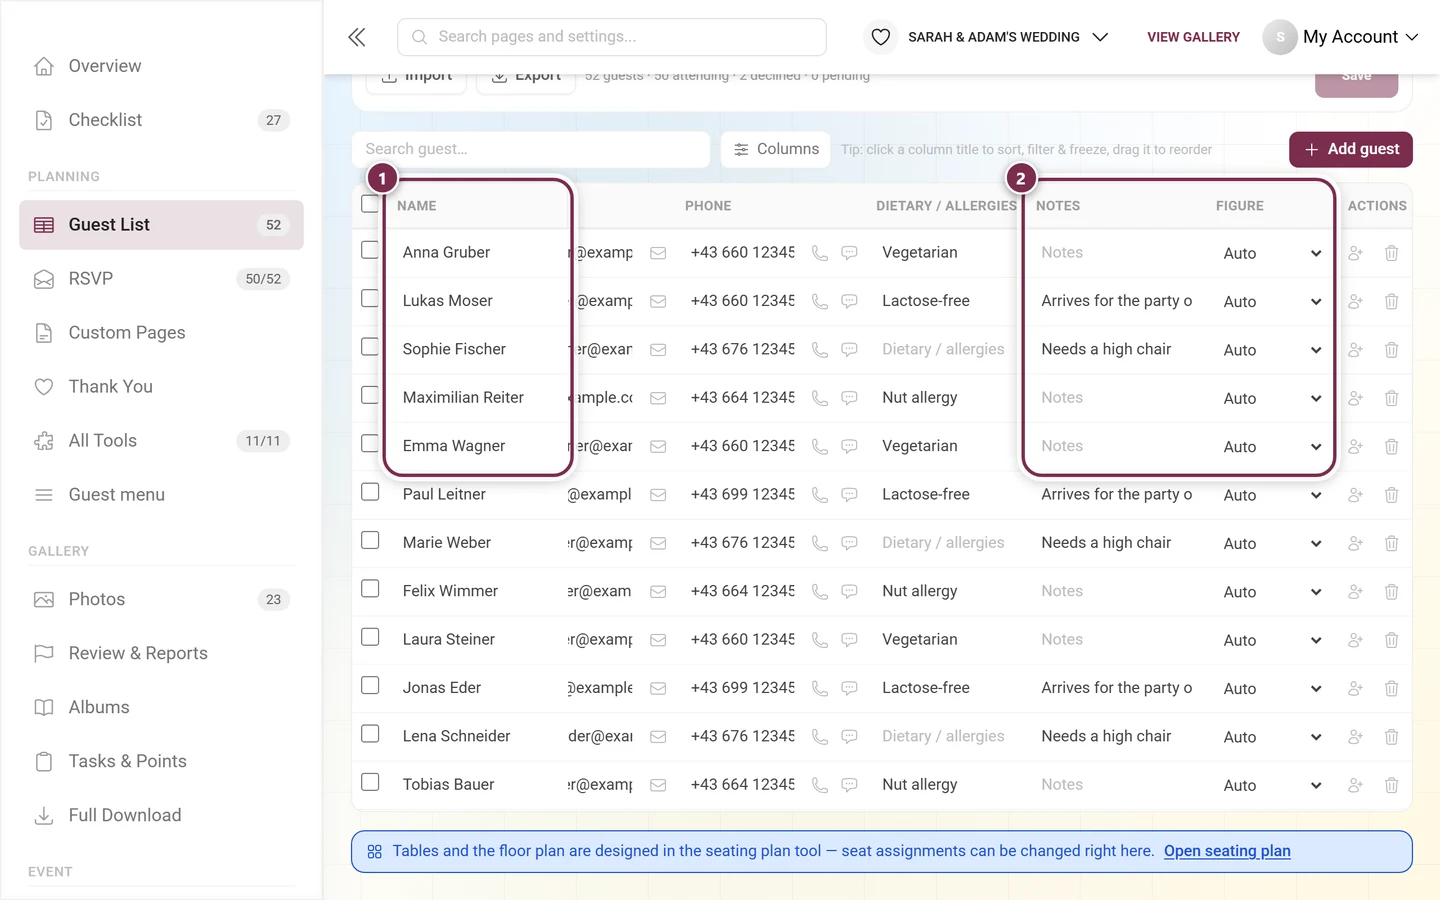
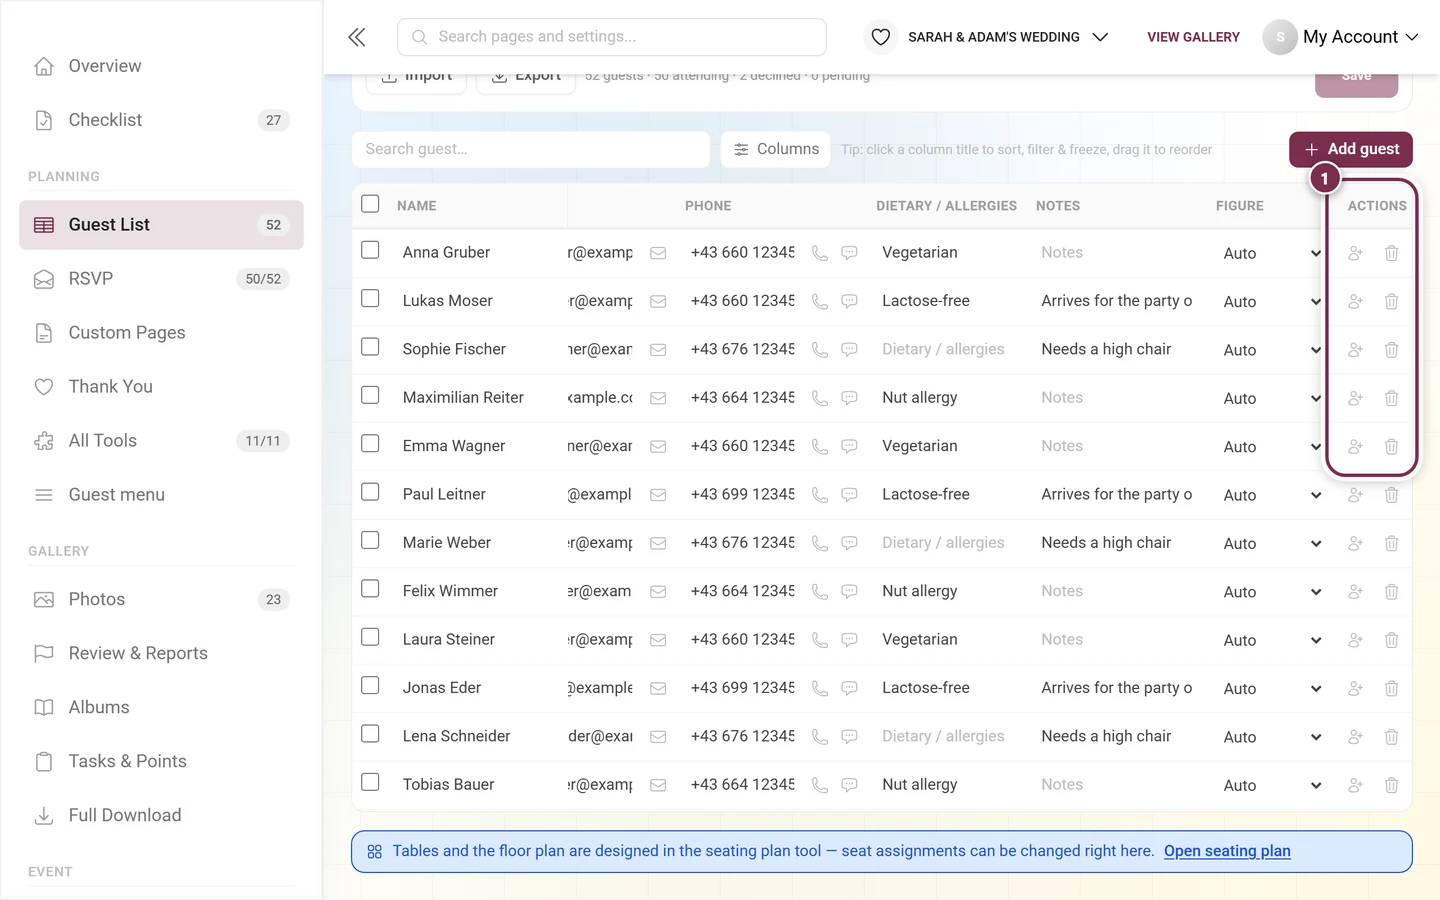
① Right at the front the tick boxes for bulk actions. ② Name – companions carry a small +1 in front of the name. ③ Group, in the example throughout “Bride’s family”; the groups already in use are offered as suggestions.① RSVP – Pending, Attending or Declined, with a colored dot and a dropdown right in the row. ② Response message – the message the guest left when replying. The highlighted rows show nothing but the gray placeholder Response message: those guests wrote nothing along with it.Every custom question from the RSVP tool automatically creates its own column. ① Are you staying at the hotel? ② How are you getting to the party? – the answers sit as a dropdown in the row, and whoever did not answer carries No answer.If your menu has courses, every course gets its own column: ① Starter ② Main course ③ Dessert. You pick the dish per cell; without a choice it reads No choice. Via + New dish… you create a new menu dish straight out of the row.① Seating wishes – the names this guest would like to sit next to, separated by commas. The highlighted guests only show the gray placeholder, they have none on file. ② Table / seat – two dropdowns with the assignment from the seating plan. Without an assignment it reads Unassigned.① Email – with the envelope icon for Send email next to it. ② Phone – with the handset and speech bubble for Call and Send SMS. ③ Dietary / allergies, in the example “Vegetarian”, “Lactose-free” and “Nut allergy”. ④ Notes – your own field for everything that fits nowhere else, here “Needs a high chair”.① Figure – Auto, Male, Female or Child. It only controls which figure the guest gets in the illustrated seating view. Auto derives it from the name and therefore sits on every guest until you change something.
Name – companions carry a small +1 in front of their name; behind it sits the note of who they belong to.
Group – free text with suggestions from the groups already in use (such as “Bride’s family”, “Colleagues”).
RSVP – Pending, Attending or Declined.
Response message – the message the guest left when replying.
One column per custom RSVP question – every question from the RSVP tool automatically creates its own column, including its answer options and the No answer entry.
One column per course – if your menu has courses, you pick the dish per course here. + New dish… creates a new menu dish straight from the row.
Seating wishes – the names this guest would like to sit next to. Separate several names with commas; the first word counts as the first name.
Table / seat – the seat assignment from the seating plan, editable right here: one dropdown for the table, one for the seat. Without an assignment it reads Unassigned. In the table dropdown, + New table creates a table on the spot; in the seat dropdown, + Add seat grows the table by one seat.
Email and phone – from the RSVP reply or entered by you.
Dietary / allergies – intolerances and dietary preferences.
Notes – your own field for everything else.
Your own columns – see below.
Figure – Auto, Male, Female or Child. This only controls which figure the guest gets in the illustrated seating view; Auto derives it from the name.
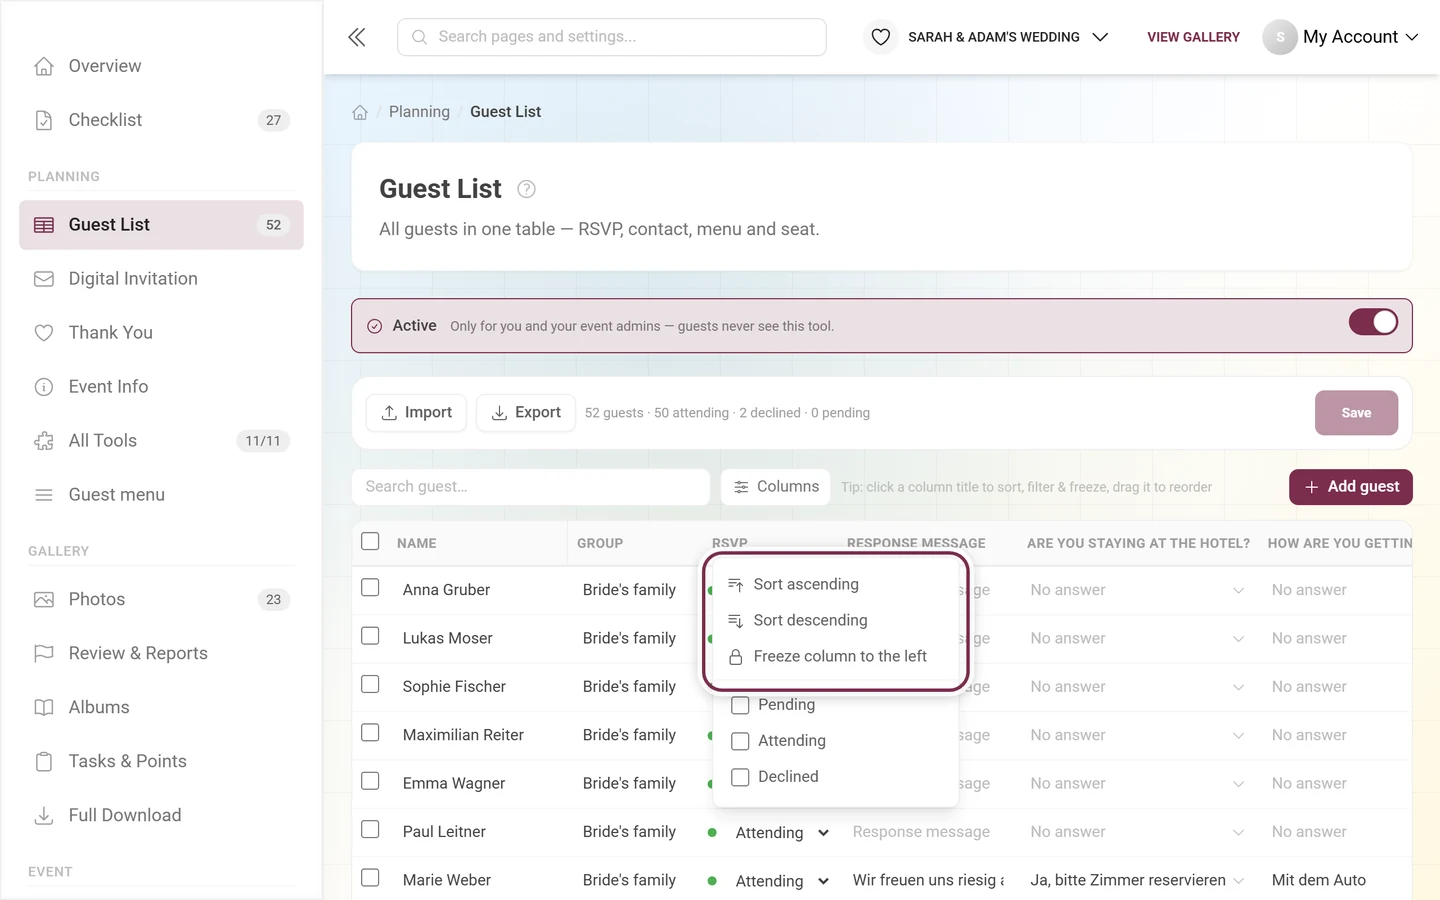
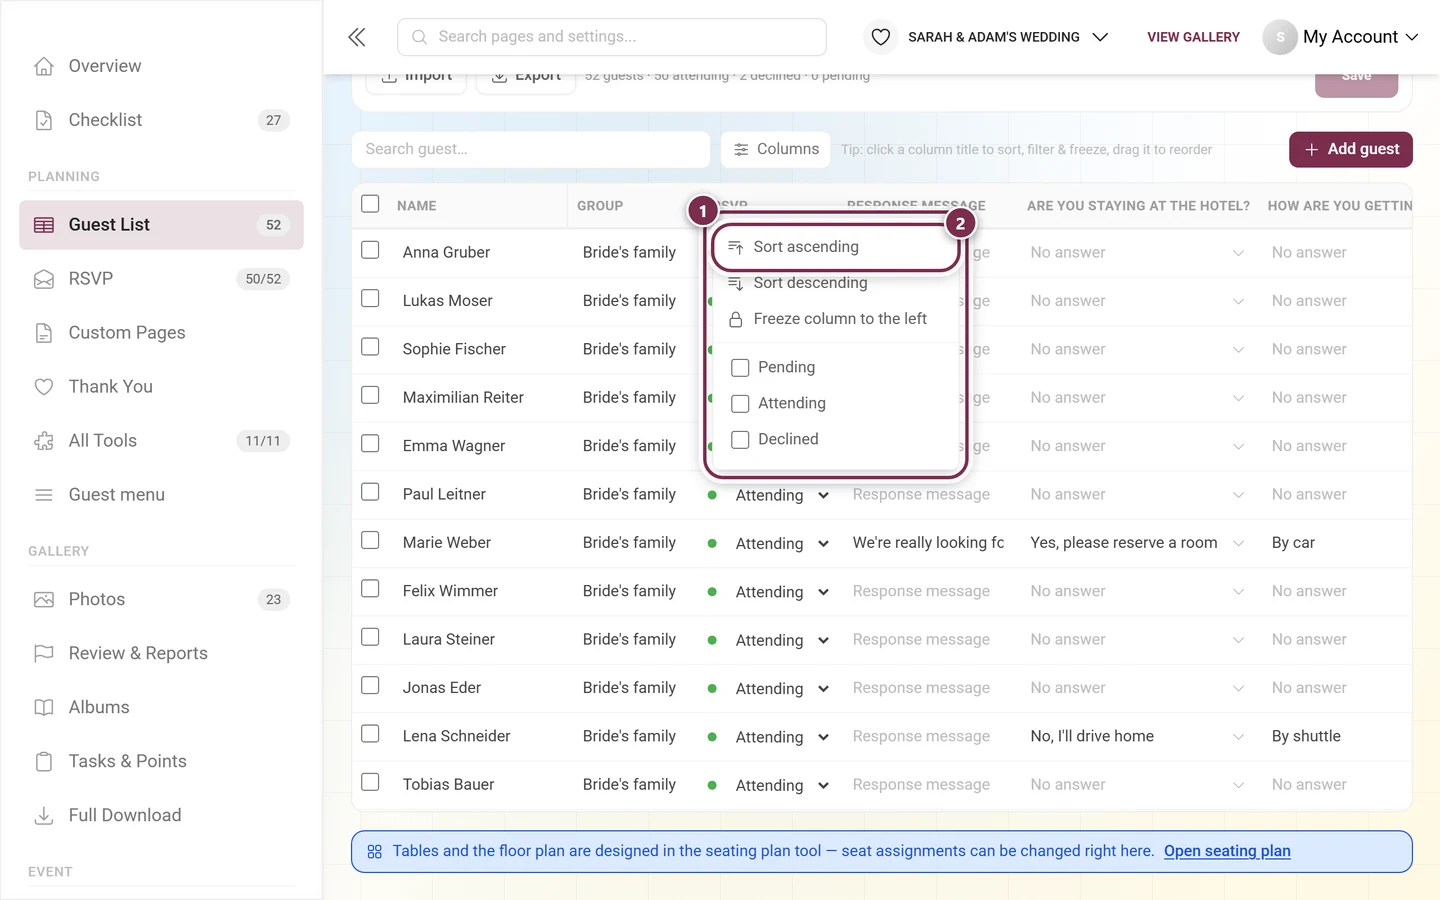
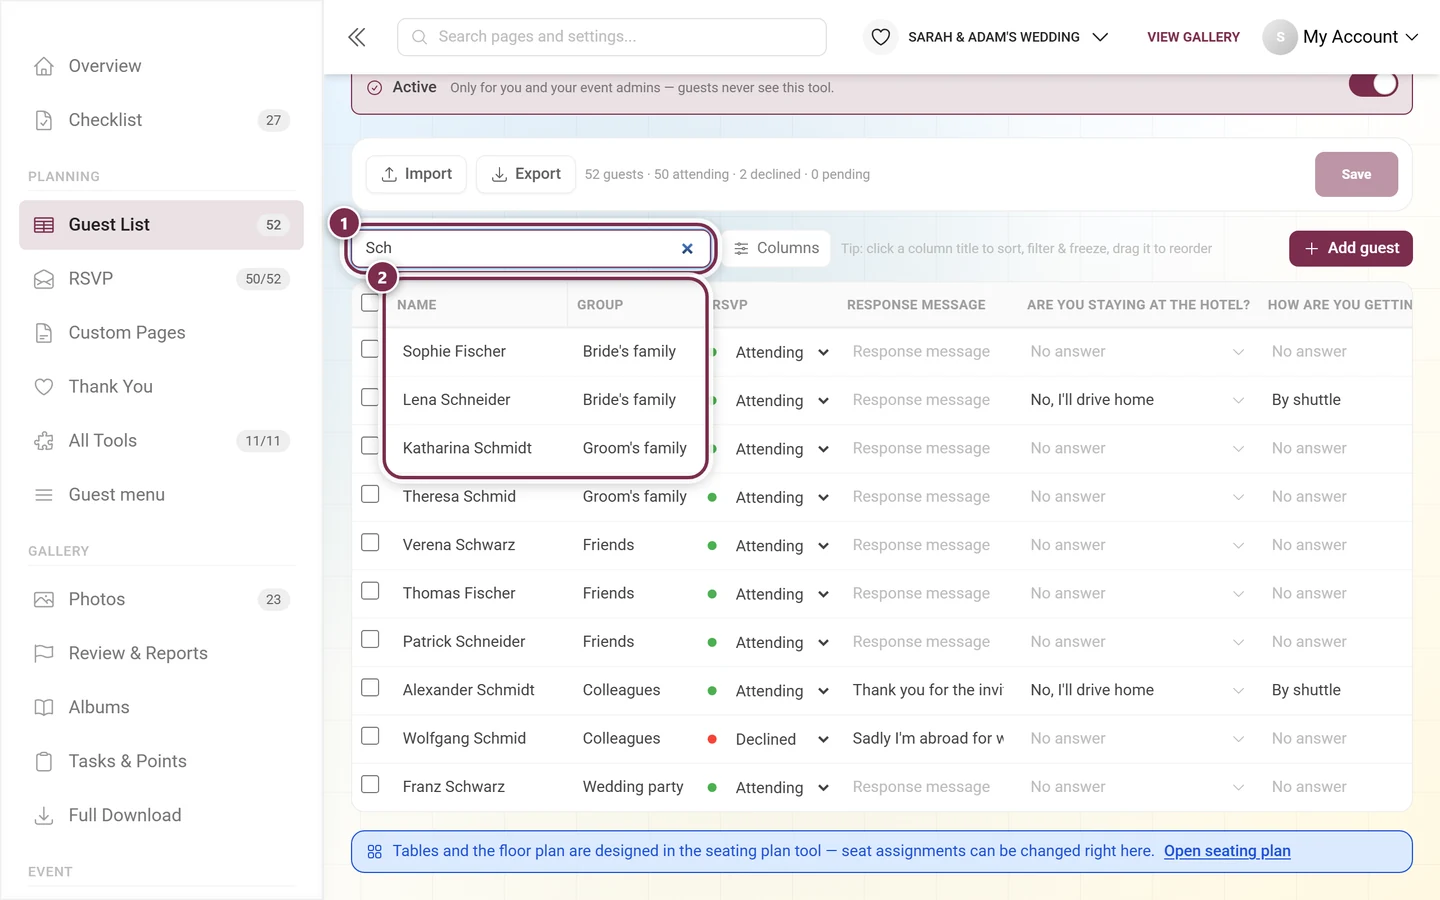
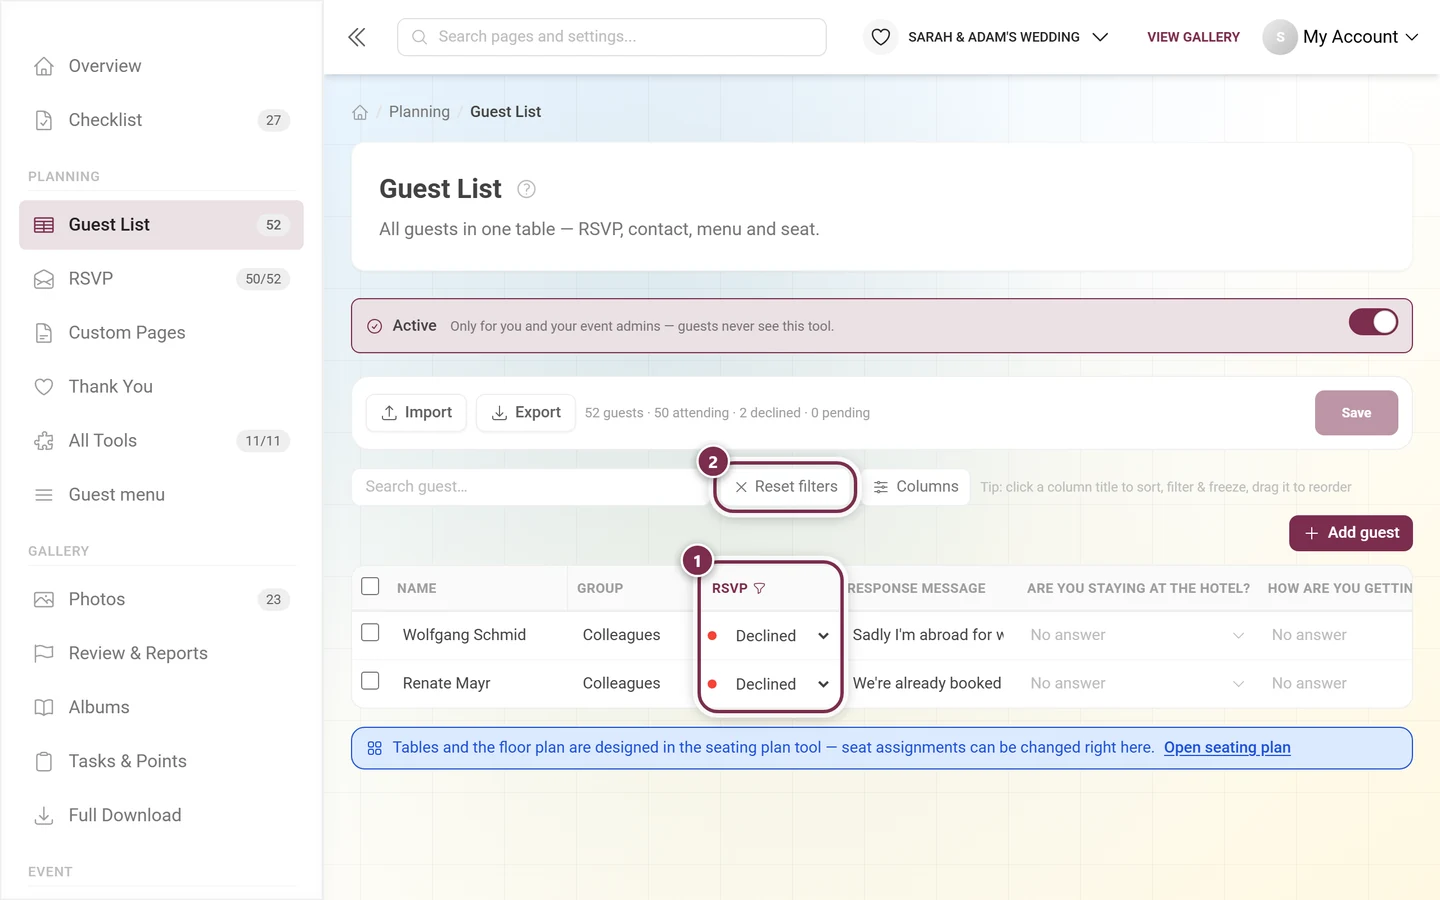
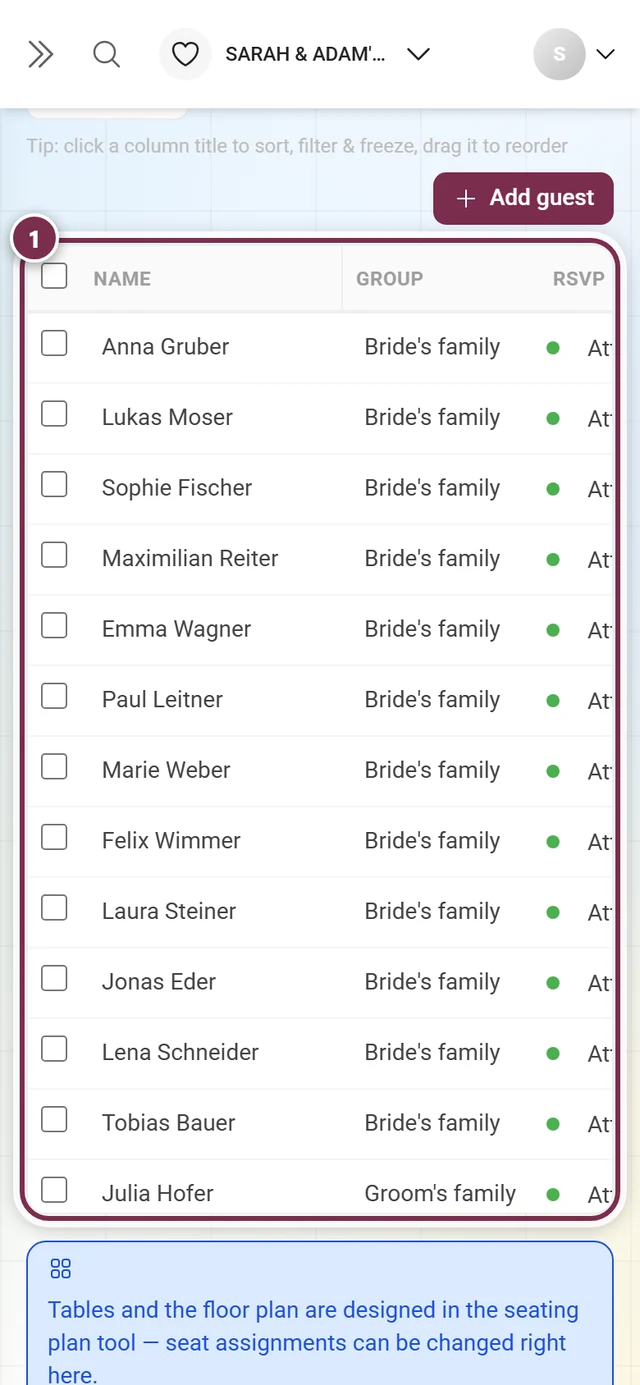
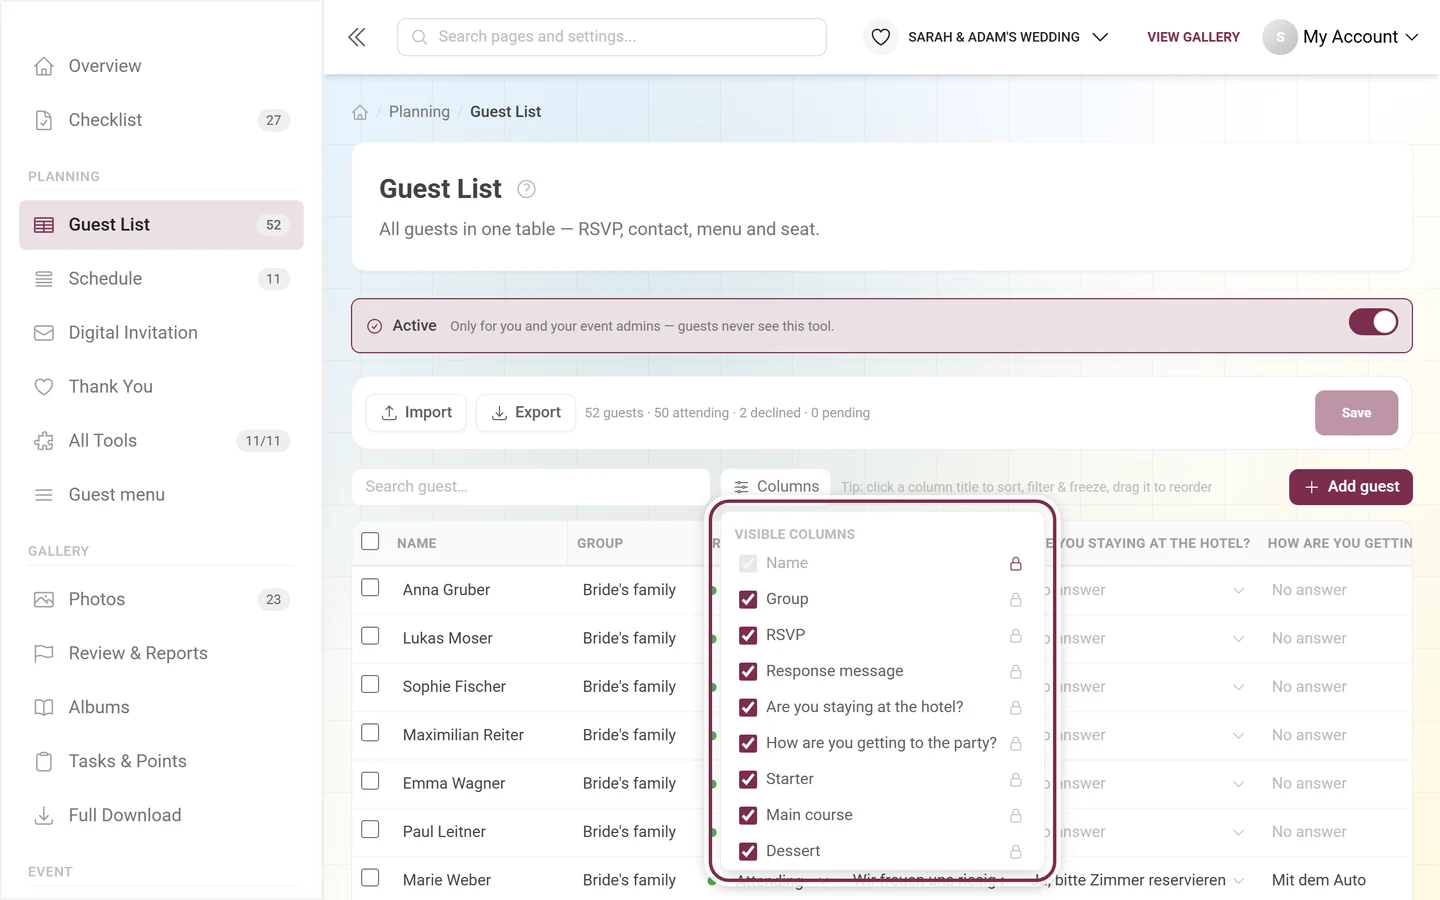
Clicking a column header — here RSVP — opens its own menu; highlighted are Sort ascending, Sort descending and Freeze column to the left. Right below sits the column filter, for RSVP the value list Pending, Attending, Declined. The same header can be dragged to move the column.① The same menu as a whole: the three commands on top, the filter below them. ② Sort ascending – if the column is already sorted, the menu offers Clear sorting in the very same spot.① “Sch” is typed into the search field; the × on the right empties it again. ② The table shows nothing but matches – Sophie Fischer, Lena Schneider, Katharina Schmidt and more. The tally at the top keeps counting the whole list, not the matches.① In the RSVP column the filter is set to Declined – the small funnel on the column title says so, and two rows remain (Wolfgang Schmid and Renate Mayr). ② As soon as any filter bites, Reset filters appears to the left of Columns and clears them all at once. Here too the tally at the top stays on the total.① The Name column is pinned via Freeze column to the left and stays put. ② The table is scrolled far to the right – Notes and Figure are already in view – and you still know in every row who it is about.① On the phone the table stays a table: the highlighted area scrolls sideways, showing Name, Group and the start of the next column. That is enough for checking and correcting on the go; the full overview belongs on the bigger screen.The Columns button above the table opens Visible columns: tick a column to show or hide it, use the lock to freeze it to the left. The menu is longer than the screenshot – Add your own column… and Reset layout sit at the very bottom.
Search guest… – the search field filters across all guests.
Clicking a column title opens that column’s menu: Sort ascending, Sort descending, Freeze column to the left and a filter. If the column is already sorted, Clear sorting joins them in the sorting spot. Text columns get a Contains… field, choice columns (group, RSVP, table, courses, figure, yes/no columns) get a checklist of values.
Dragging a column title reorders the column.
Reset filters clears every filter at once; Clear this column’s filter only that one.
Columns opens the Visible columns menu: tick or untick columns, jump into the column editor with Add your own column…, and put order and visibility back to default with Reset layout.
Order and hidden columns are remembered by your browser – they are your personal view and change nothing about the data. Search and filters change nothing either: they show fewer rows, they delete nothing.
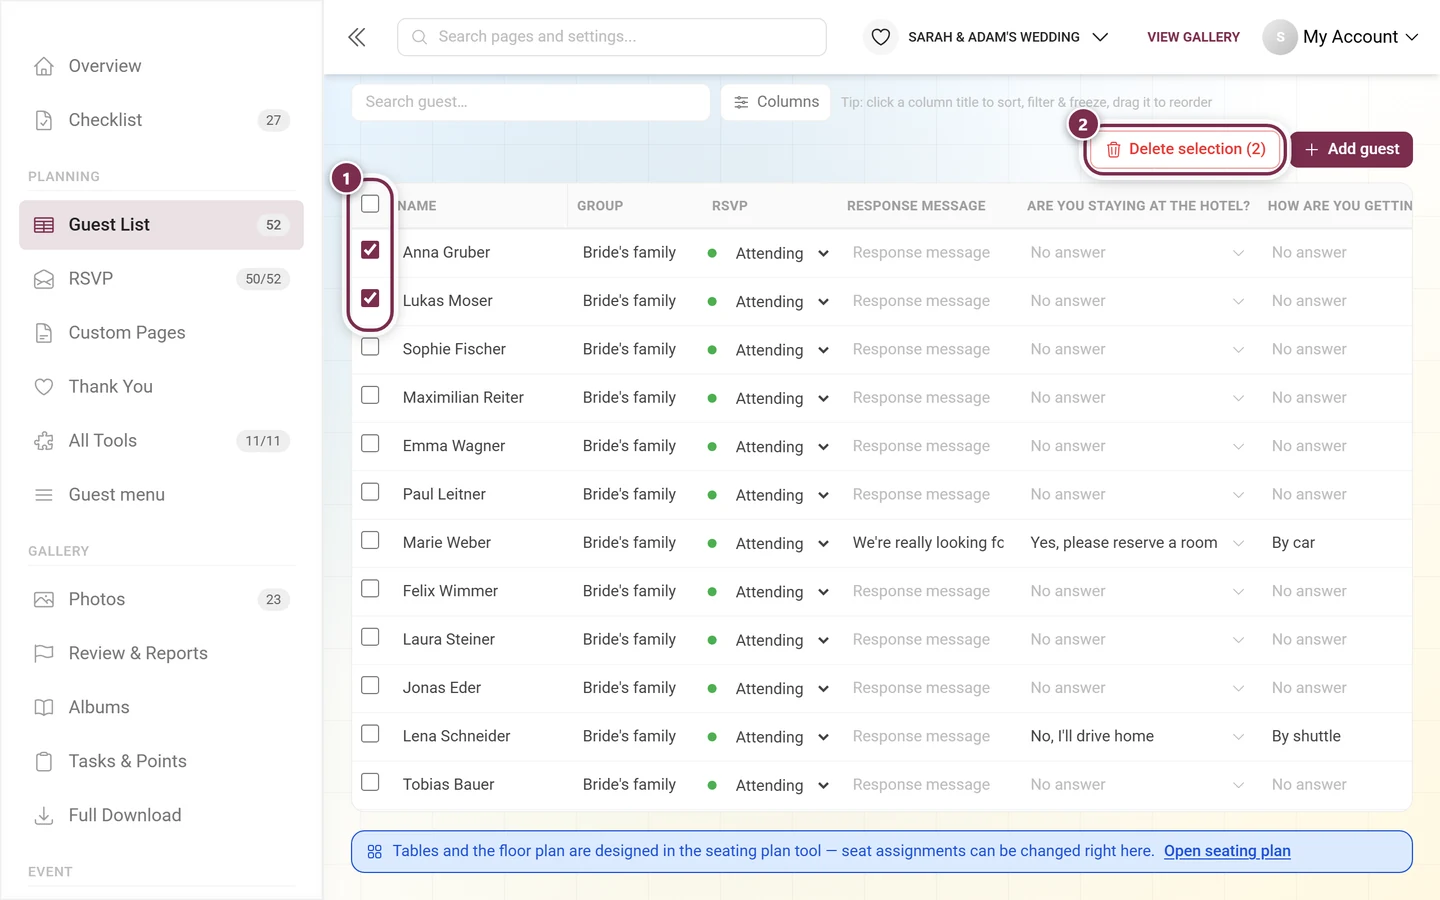
① At the far right every row carries the Actions column: the person-plus icon inserts a companion (+1) underneath that guest, the bin removes the guest. The icons sit there discreetly, but they are in every row.① The boxes at the very front select rows – the box in the column header takes every visible row at once. ② As soon as something is selected, Delete selection appears above the table with the count – here Delete selection (2) – and removes the marked guests together.
Add guest creates a new row. Pressing Enter in the name field jumps to the next row, or appends a new one on the last row.
The person icon at the end of the row inserts a companion (+1) underneath that guest.
The bin icon removes the guest. The checkbox at the front selects rows, and Delete selection removes them together.
Next to Email sits Send email, next to the phone number sit Call and Send SMS – one click opens your mail or phone app.
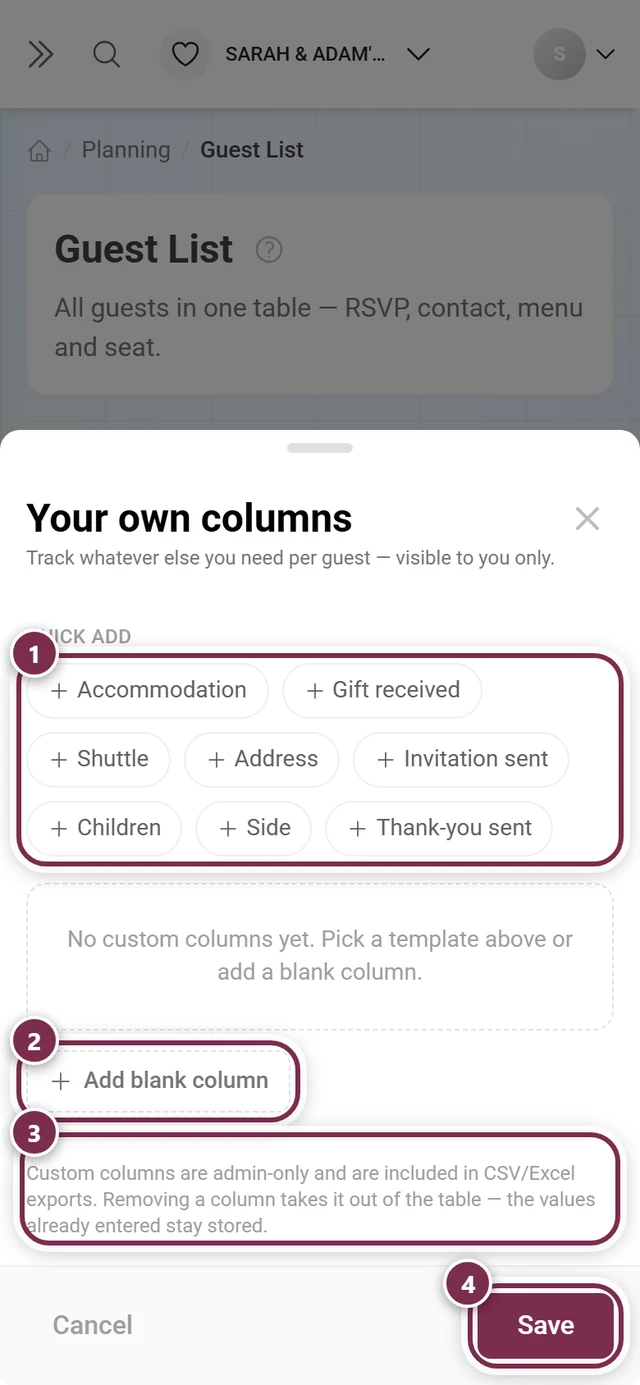
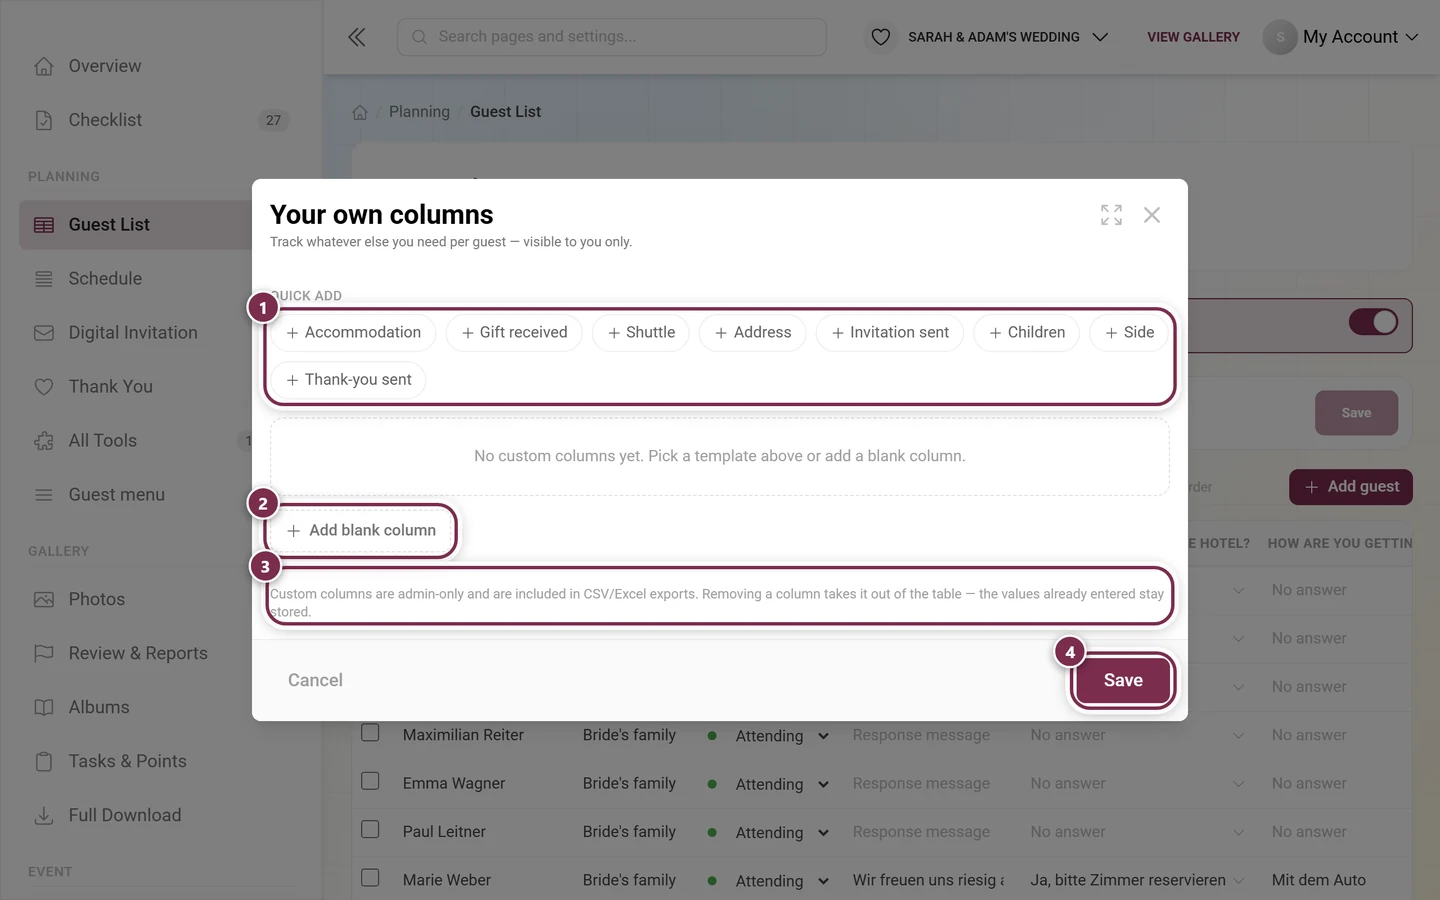
① Quick add creates a ready-made column with a matching type in one click – Accommodation, Gift received, Shuttle, Address, Invitation sent, Children, Side and Thank-you sent. ② Add blank column builds your own with a type you pick. ③ The note below is a reminder: your own columns are admin-only and end up in the CSV/Excel exports, and removing one only takes it out of the table – the values already entered stay stored. ④ Save puts them into the table.
If the default columns are not enough, add your own via Columns → Add your own column…. They are pure host bookkeeping: no guest is ever asked about them.
Quick add offers ready-made templates with a matching type: Accommodation, Gift received, Shuttle, Address, Invitation sent, Children, Side (with Bride, Groom, Both) and Thank-you sent.
Add blank column builds your own with one of these types:
Text – free text.
Number – also sorted numerically.
Choice – a list of options you maintain yourself.
Yes/No – a tick box.
Date – a date field.
The arrows reorder the columns, the bin icon removes one. If a column already holds entries, the editor tells you how many before it goes.
On multilingual events you maintain column names and options per language via the language bar.
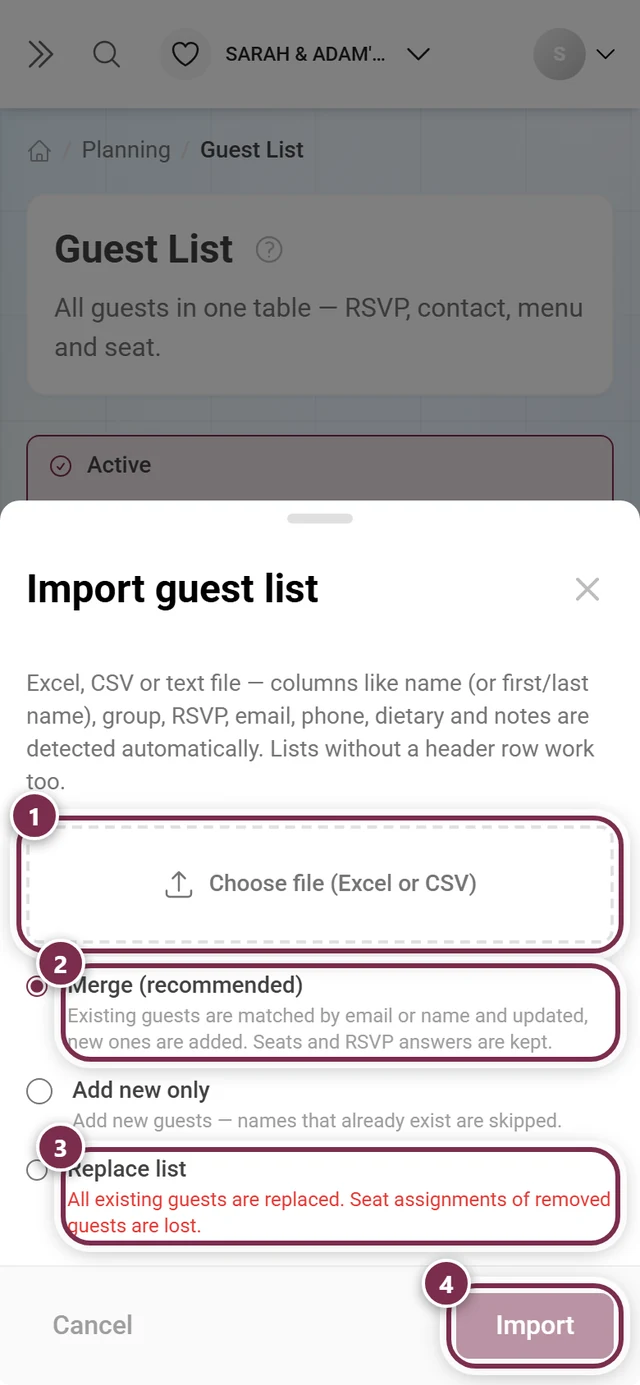
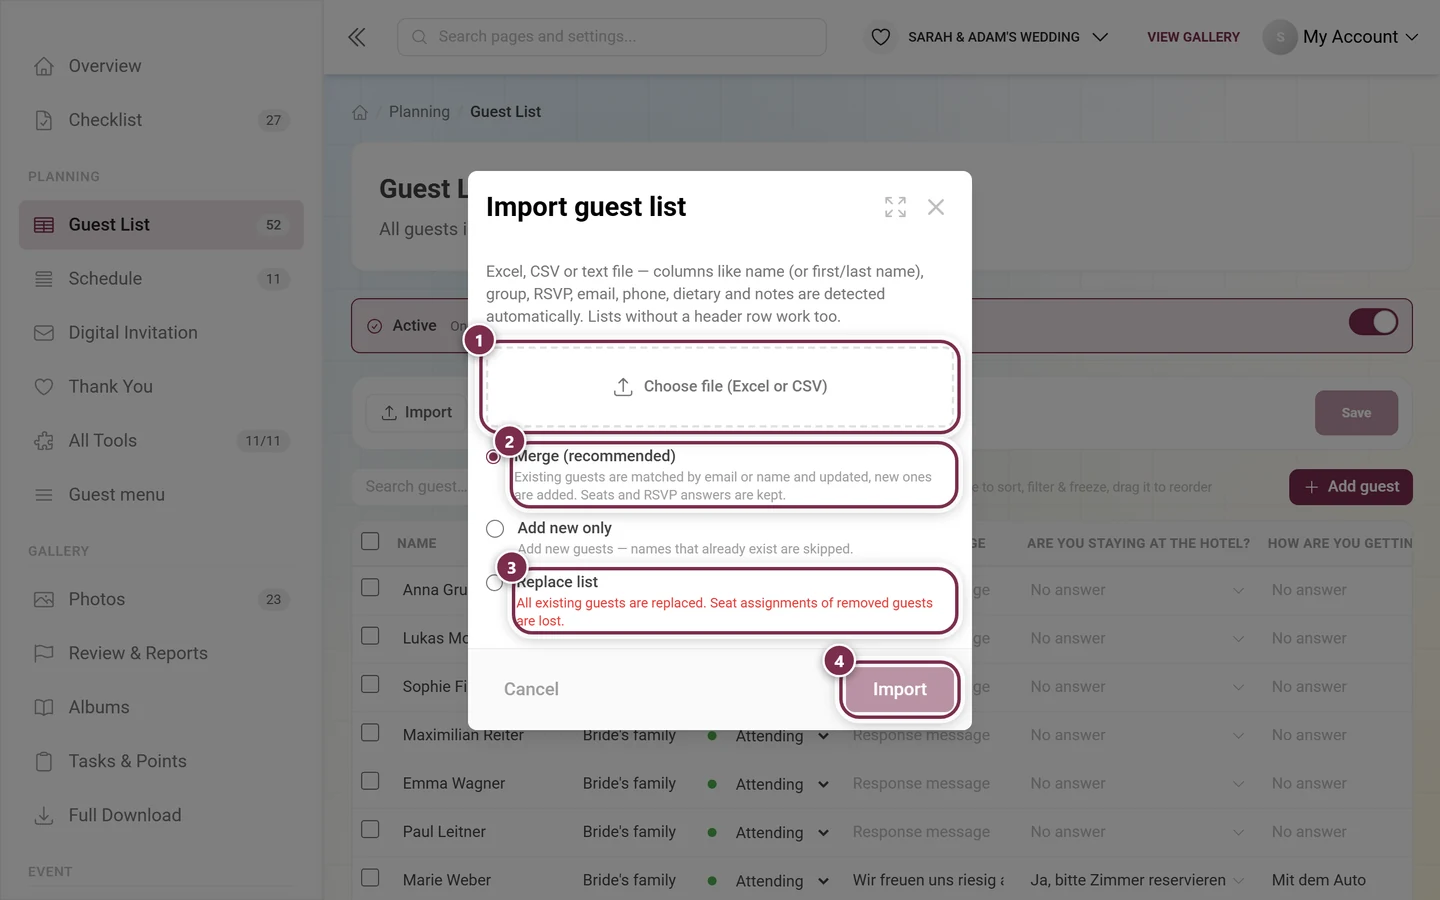
① Choose file (Excel or CSV) loads the list. ② Merge (recommended) matches existing guests by email or name and updates them; seats and RSVP answers are kept. Add new only sits between the two. ③ Replace list throws the existing list away – including the seat assignments of guests that disappear. ④ Import stays grayed out until a file is picked; after that it applies the guests to the editor – only Save writes them down.
If your guests already live in a list somewhere, you don’t have to retype them.
Open Import and load the file via Choose file (Excel or CSV). Excel, CSV and text files are read; columns like name (or first/last name), group, RSVP, email, phone, dietary and notes are detected automatically. Lists without a header row work too, and the names of your own columns are recognized as well.
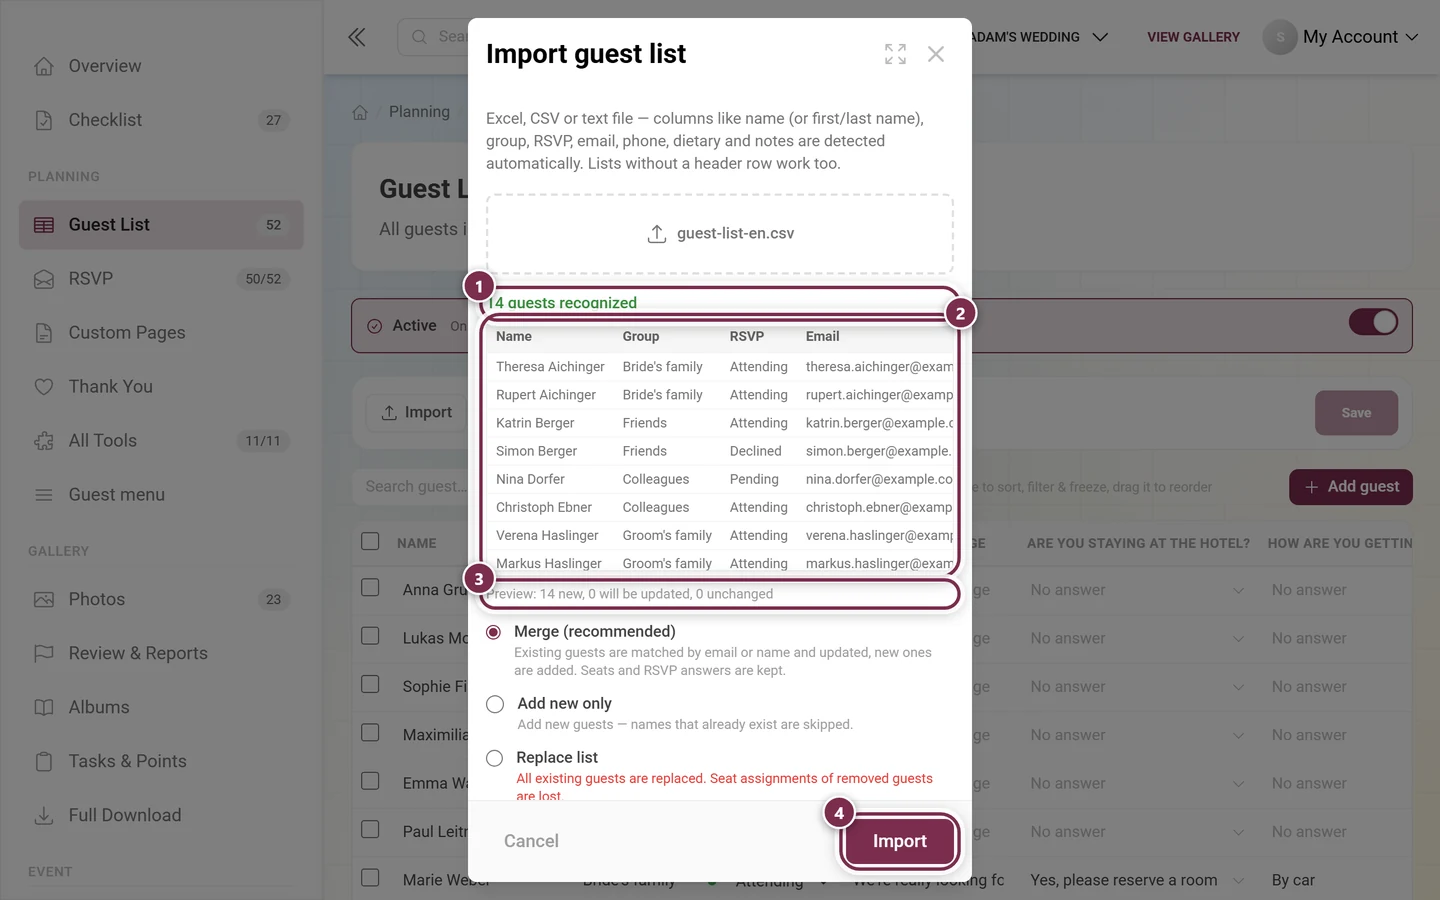
The dialog reports how many guests it recognized and shows a preview of the first rows. Rows without a name are skipped and reported separately.
Choose how the file combines with your existing list:
Merge (recommended) – existing guests are matched by email or name and updated, new ones are added. Seats and RSVP answers are kept. A preview line tells you upfront how many would be new, updated and unchanged.
Add new only – names that already exist are skipped.
Replace list – all existing guests are replaced. Seat assignments of removed guests are lost.
Import applies the guests to the editor. Only the Save button at the top writes them down.
This is the dialog once a file is picked – here guest-list-en.csv. ① The message 14 guests recognized. ② The preview of the first rows with the detected columns. ③ When merging, the line below works out in advance what will happen: Preview: 14 new, 0 will be updated, 0 unchanged. ④ Import is active now.
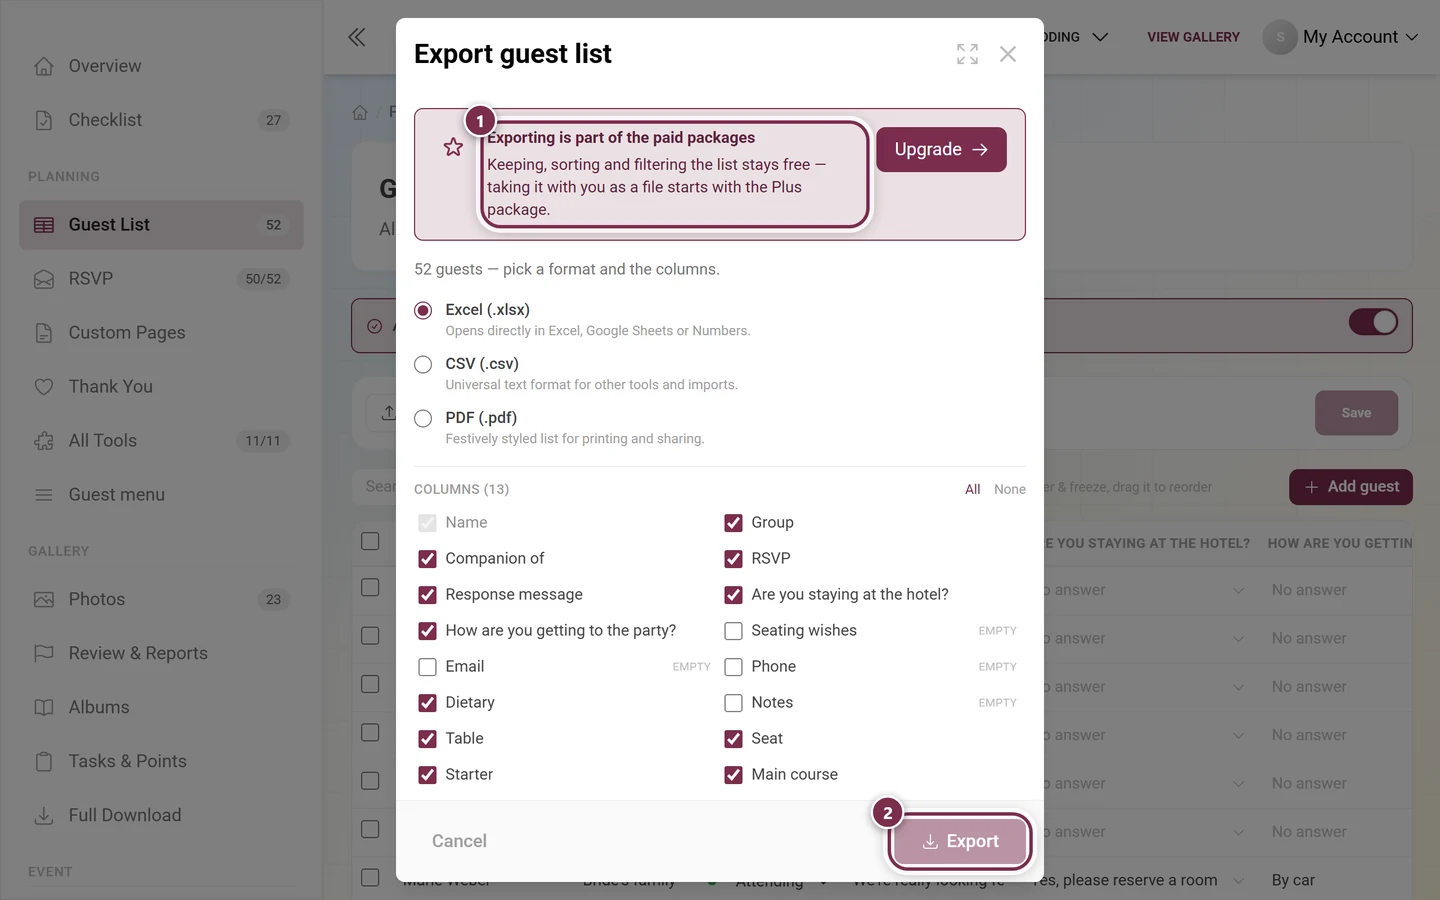
Export hands the list back out – handy for caterers, best men or place cards.
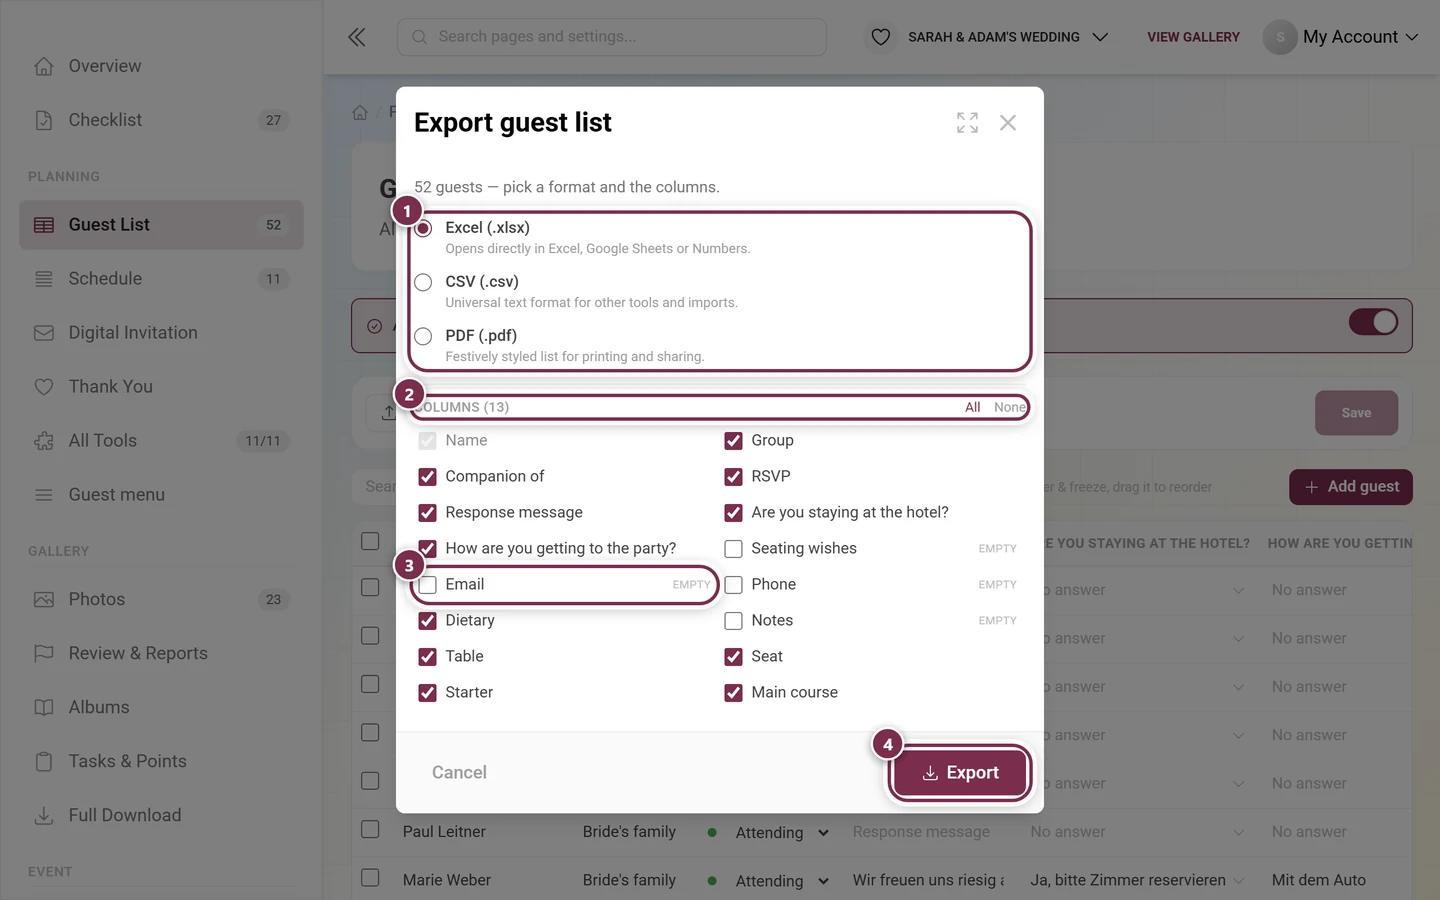
You pick a format and the columns:
Excel (.xlsx) – opens directly in Excel, Google Sheets or Numbers.
CSV (.csv) – universal text format for other tools and imports.
PDF (.pdf) – festively styled list for printing and sharing.
Below that you tick the columns. Preselected are all columns that actually hold values; empty ones are marked empty and start unticked. All and None set the whole list; the name column always stays in. Photogala remembers your pick for the next export.
① The three formats on top, Excel (.xlsx) is preselected. ② Below it Columns (13) with All and None on the right – Name always stays ticked. ③ Columns without values carry the empty marker and start unticked, here Email. ④ Export creates the file. Next to the standard columns you can also pick this event’s RSVP questions.① If your plan does not cover the export, the box Exporting is part of the paid plans sits at the top of the dialog: keeping, sorting and filtering the list stays free, taking it with you as a file starts with the Plus plan. The Upgrade button next to it leads to the plans. ② Export stays gray until then. Format and columns can still be set up in the meantime.
Depending on your pick, the export also carries Companion of, the seating wishes, your own columns, one column per RSVP question, and Table plus Seat as soon as a seating plan exists.
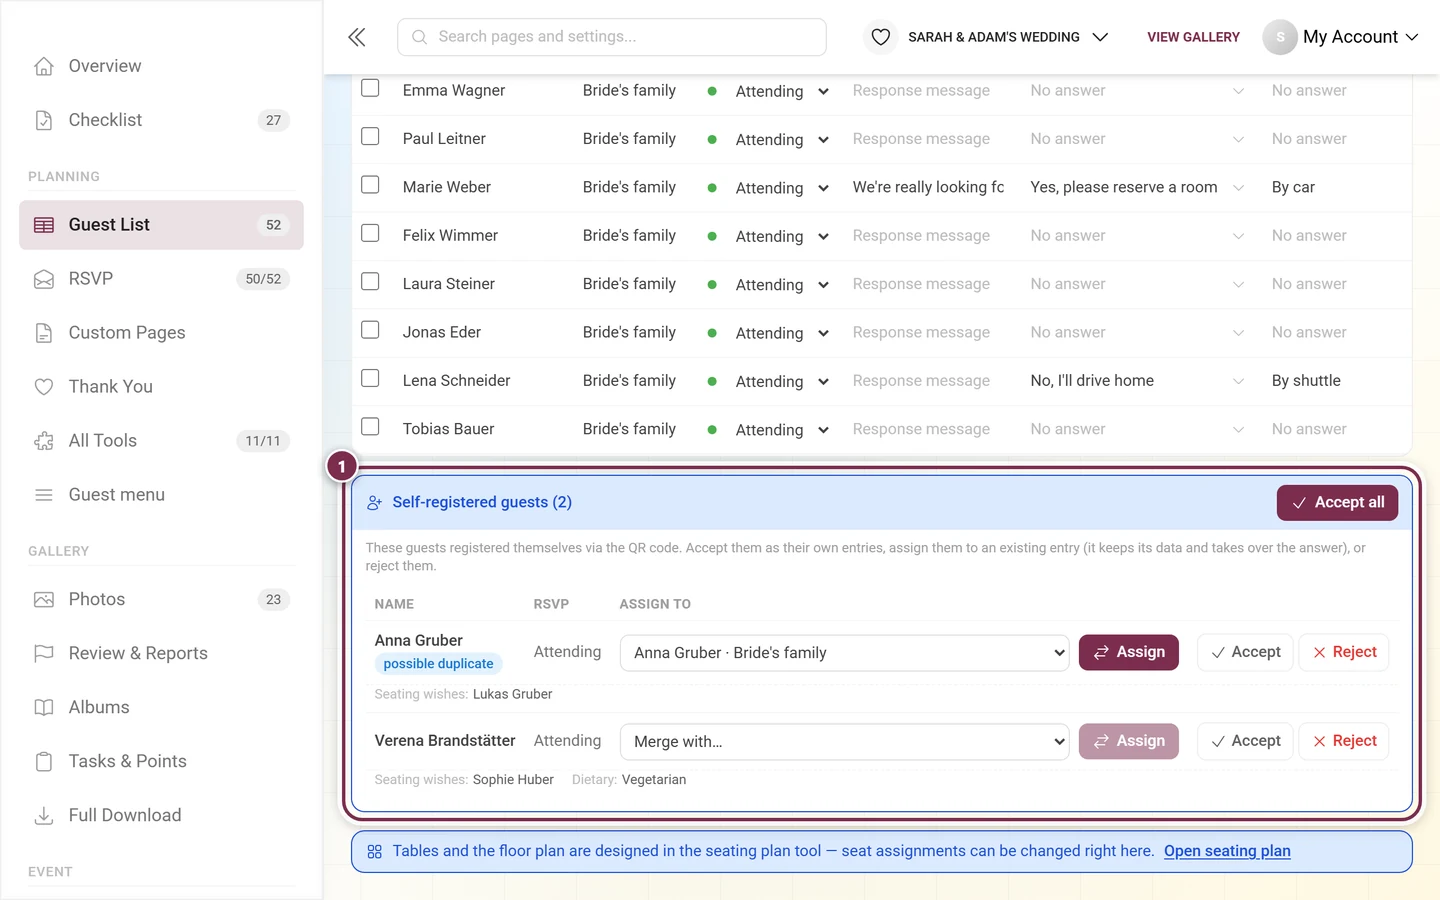
If you allow self-registration in RSVP, guests add themselves through the shared QR code. Those entries do not go straight into the main list but into a separate Self-registered guests block underneath – together with their companions and with whatever they answered (seating wishes, dietary notes, contact, response message, custom questions). Exactly those details are what you need to decide whether it is the same person.
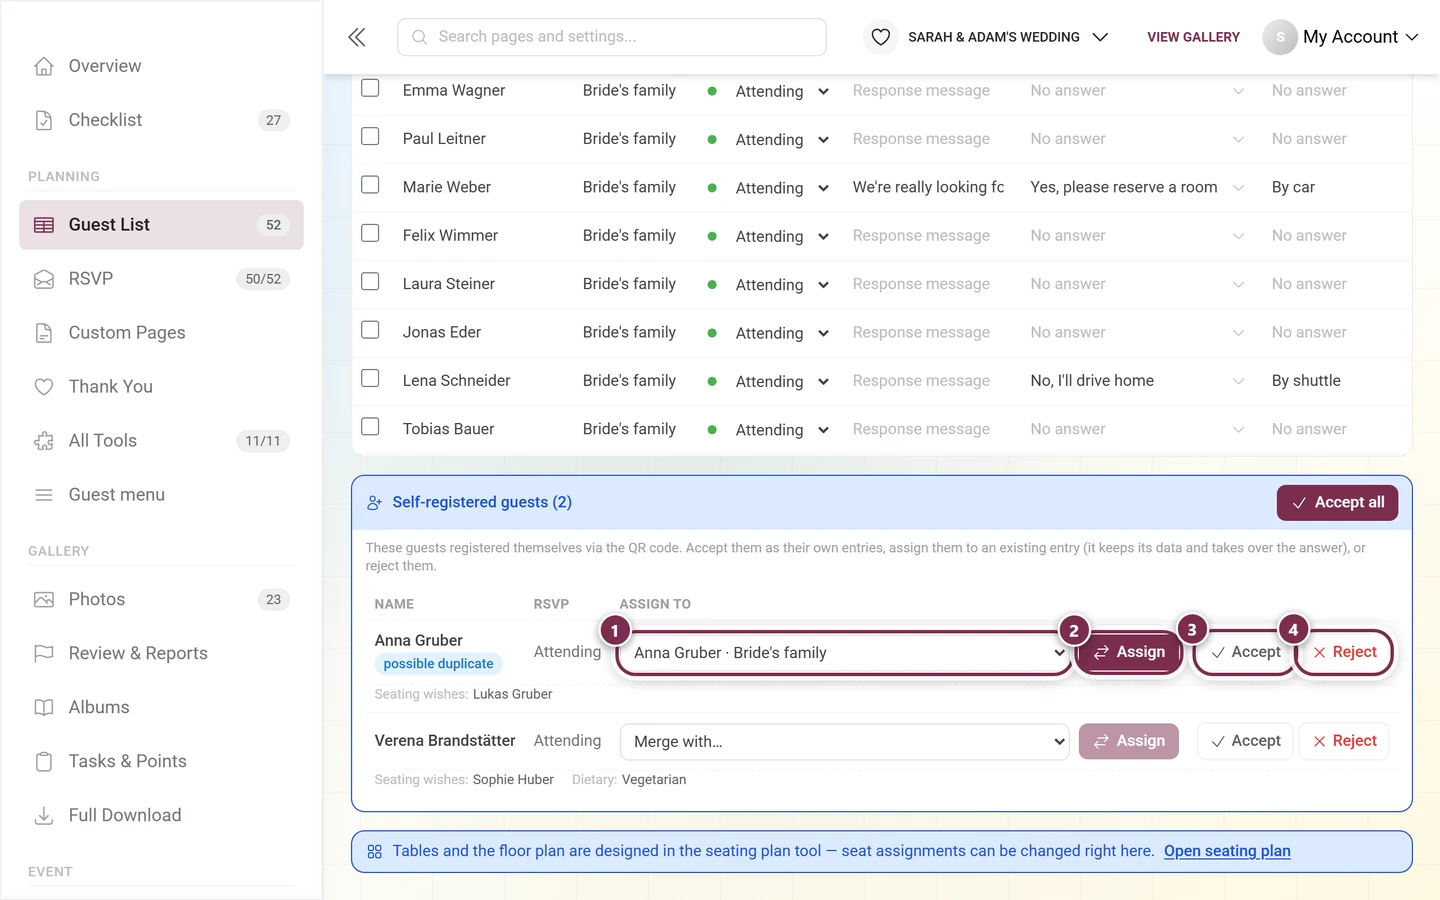
① The box Self-registered guests (2) hangs below the table. Every entry shows the name, the RSVP and underneath it whatever the guest answered – here Seating wishes and Dietary. The first entry carries the possible duplicate flag because that name exists already, which is why its dropdown is preselected. Top right, Accept all takes every entry on at once as standalone guests.① The dropdown under ASSIGN TO – on a suspected duplicate the matching guest already sits in it (“Anna Gruber · Bride’s family”), otherwise it reads Merge with… and you pick them yourself. ② Assign merges the entry into the chosen guest; only then does the button turn dark – in the row below, with nothing picked, it stays gray. ③ Accept turns it into a standalone guest in the main list. ④ Reject removes it along with its companions.
Each entry gives you three routes:
Accept – the guest becomes a standalone entry and moves into the main list.
Assign – the entry is merged into an existing guest. The existing entry keeps its master data and takes over the answer. If Photogala spots a likely duplicate, the matching guest is preselected and the entry is flagged possible duplicate.
Reject – the entry is removed along with its companions.
Accept all in the top right takes every entry on as a standalone guest in one go.
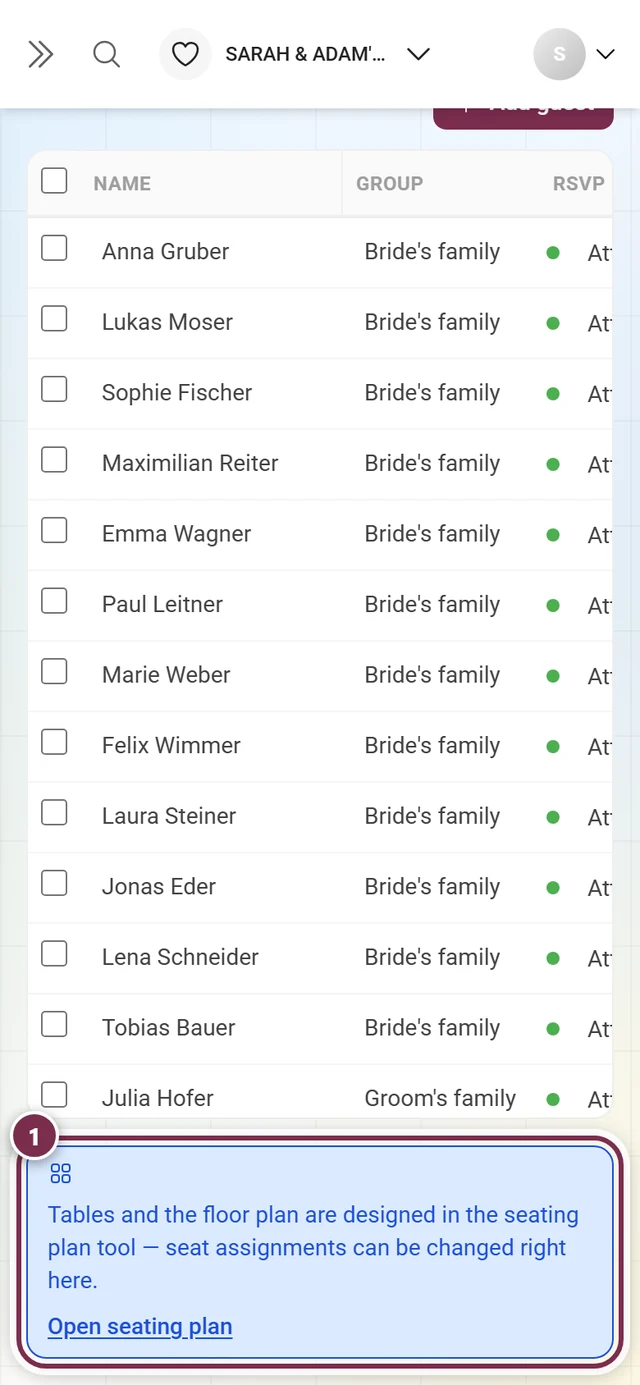
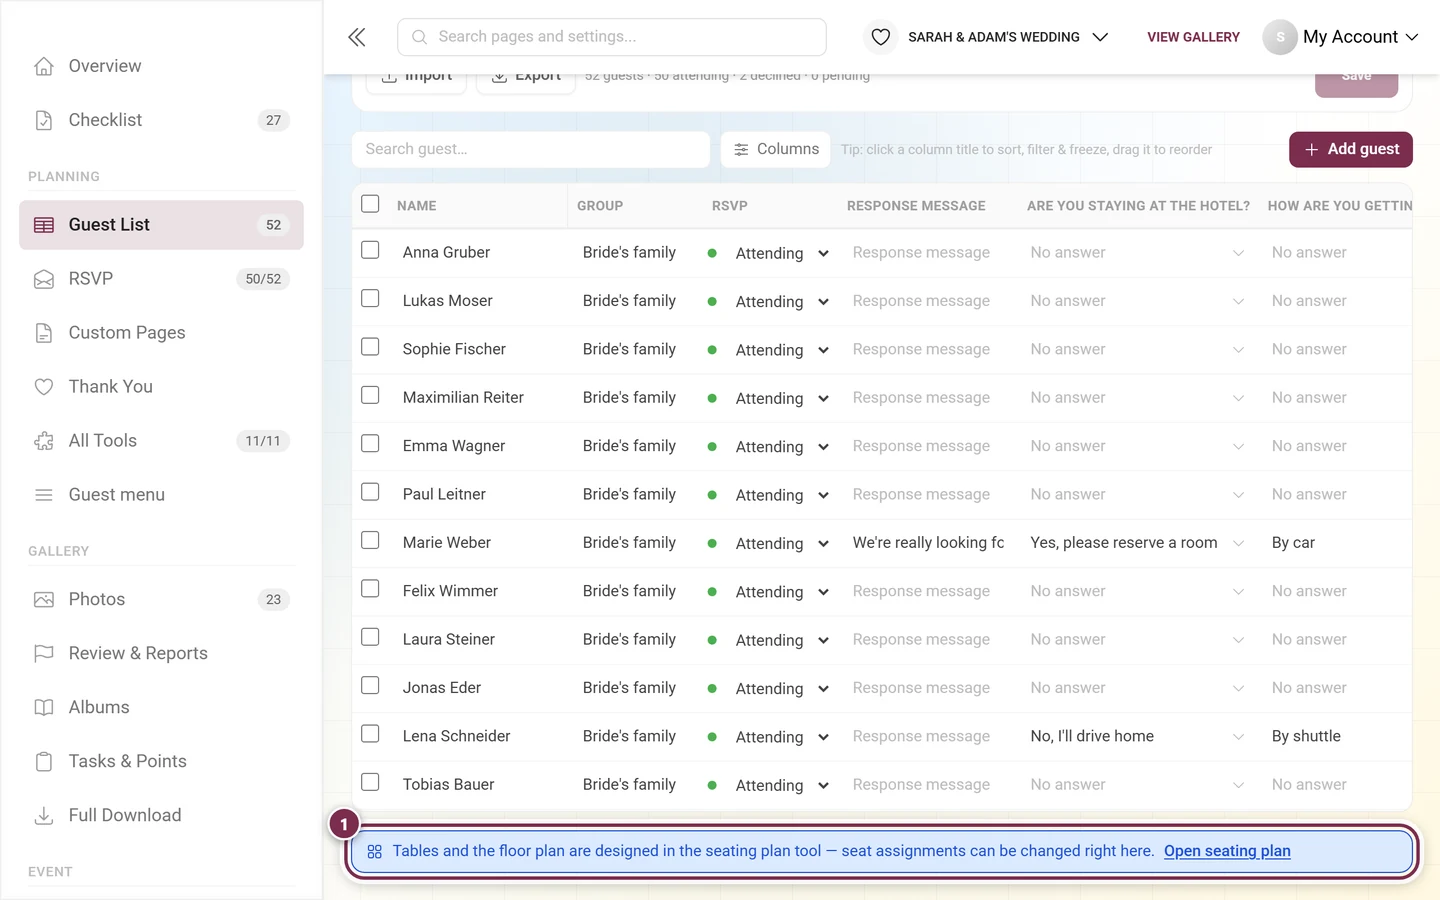
① A permanent band sits below the table: tables and the room layout are designed in the seating plan tool, the seat assignment can be changed right here. The Open seating plan button in the band takes you across.
Once the list stands, it is time to seat people: the Open seating plan button takes you straight into the seating plan. Tables and the floor plan are designed there; the plain seat assignment can also be changed here in the Table / seat column. The other way round, the seating plan brings you back via To the guest list.
A column is missing. It is probably just hidden: check Columns → Visible columns or click Reset layout. Menu and seat columns only appear once the menu has courses and the seating plan has tables.
Rows are missing. A filter or the search is still active. Empty the search field via the × and click Reset filters – the button only shows up when a filter actually bites.
My changes are gone. The table does not save by itself. As long as Unsaved changes is shown, click Save.
Saving reports a conflict. Someone else – or an RSVP answer arriving right then – saved in the meantime. Your input is kept; review it and save again.
The import finds no guests. The file has no rows with names. Check that a name column exists (or separate first/last names) and that the sheet is not empty.
A column is missing from the export. Columns without a single value are unticked by default and marked empty – just tick them in the export dialog.
The Export button is grayed out. Either your plan does not cover the export, or your list is above the guest allowance. Which of the two it is, the box at the top of the dialog tells you.
A guest appears twice. They self-registered. Use Assign in the Self-registered guests block.