Setting up brand & domain
The Brand & Domain area of the reseller portal is the control center of your white-label brand. Its subtitle reads: Configure your white-label branding, domain, and client permissions. Everything you set here applies to all events that belong to your brand.
The five tabs
Section titled “The five tabs”Five tabs sit at the top of the page:
- Brand Identity — name, logo, icon, colors, support contact.
- Domain & Email — which address serves your galleries and which address your mail goes out from.
- Client Permissions — what your clients may change on their events.
- Default Design — the look every new event starts with.
- Legal — legal notice, privacy policy and terms per brand.
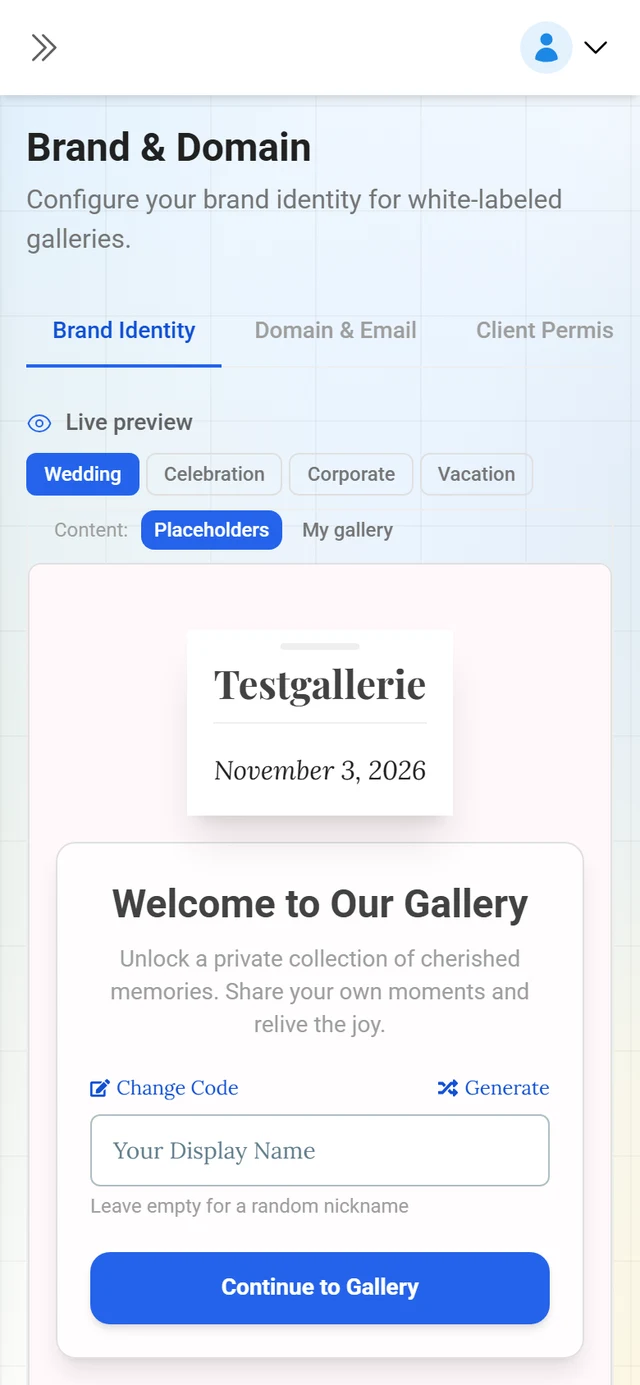
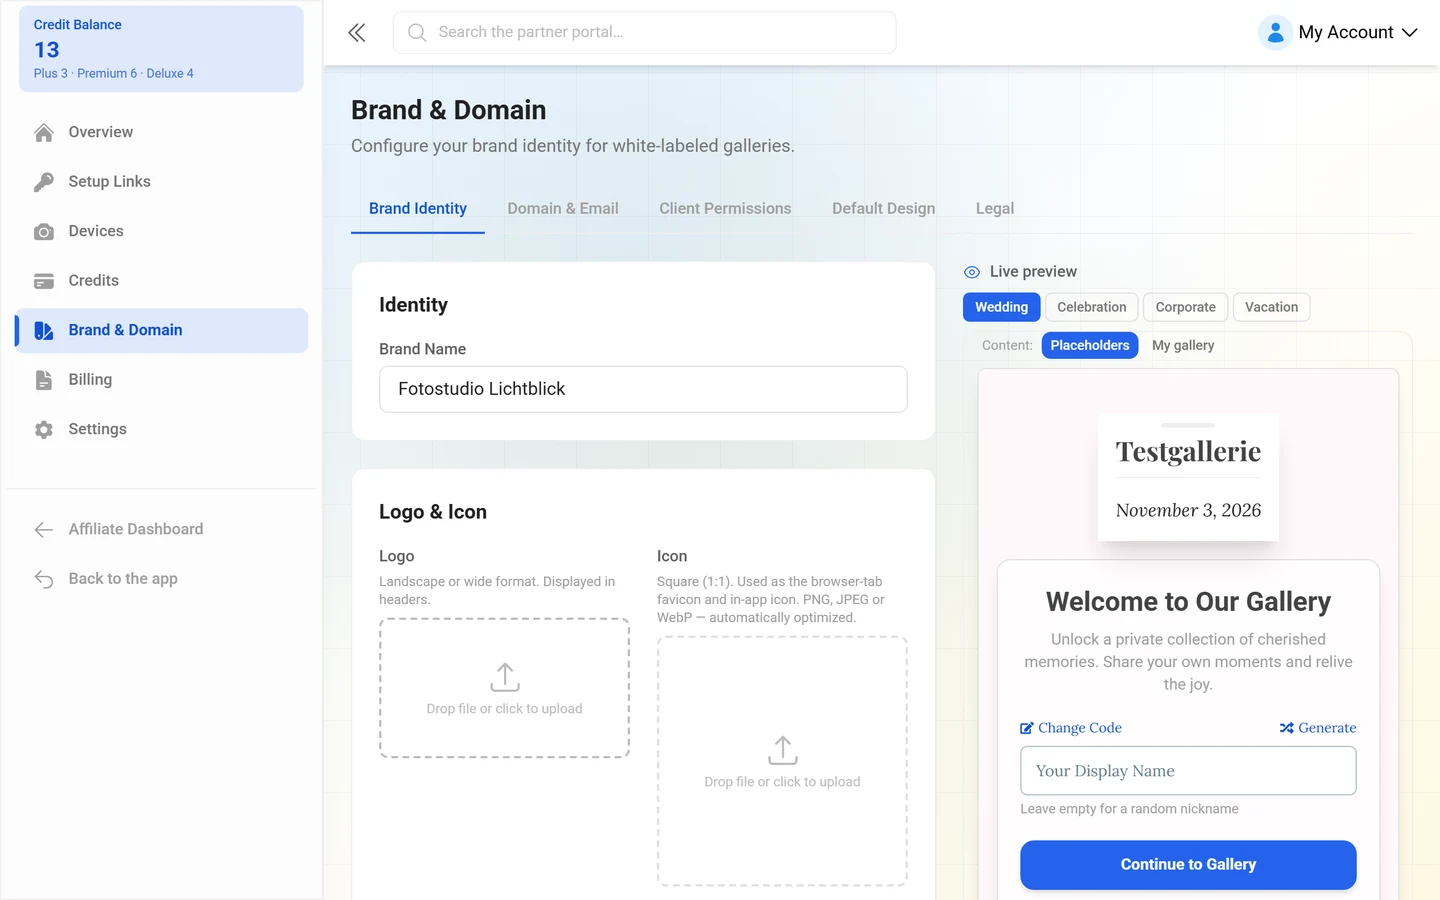
The active tab lives in the address bar (?tab=…), so it survives a page reload — handy for bookmarks.
Tab 1 — Brand Identity
Section titled “Tab 1 — Brand Identity”This is where you define what your brand looks like:
- Brand Name — required, at least 2 characters.
- Logo — landscape or wide format, displayed in headers.
- Icon — square (1:1), used as the browser-tab favicon and in-app icon. PNG, JPEG or WebP, optimized automatically.
- Show brand name next to logo — off means only your wide logo. On means icon plus brand name as text.
- Primary — your brand color. Hover, tints and contrast-safe text are derived from it automatically, for light and dark mode.
- Accent (optional) — a second color your events inherit. Events can still override it; without an accent the platform default applies.
- Support Email and Support URL — the contact your clients see.
- Hide “Powered by Photogala” — removes Photogala branding from your galleries.
- Act as Photogala — shows the Photogala identity instead of your brand. Your domains, linked events and legal pages stay fully active, and your brand stays saved.
A Preview on the right shows how your brand reads to guests. Images may be up to 5 MB; above that the app reports File too large. You save with Save Changes (the first time it says Create Brand).
Tab 2 — Domain & Email
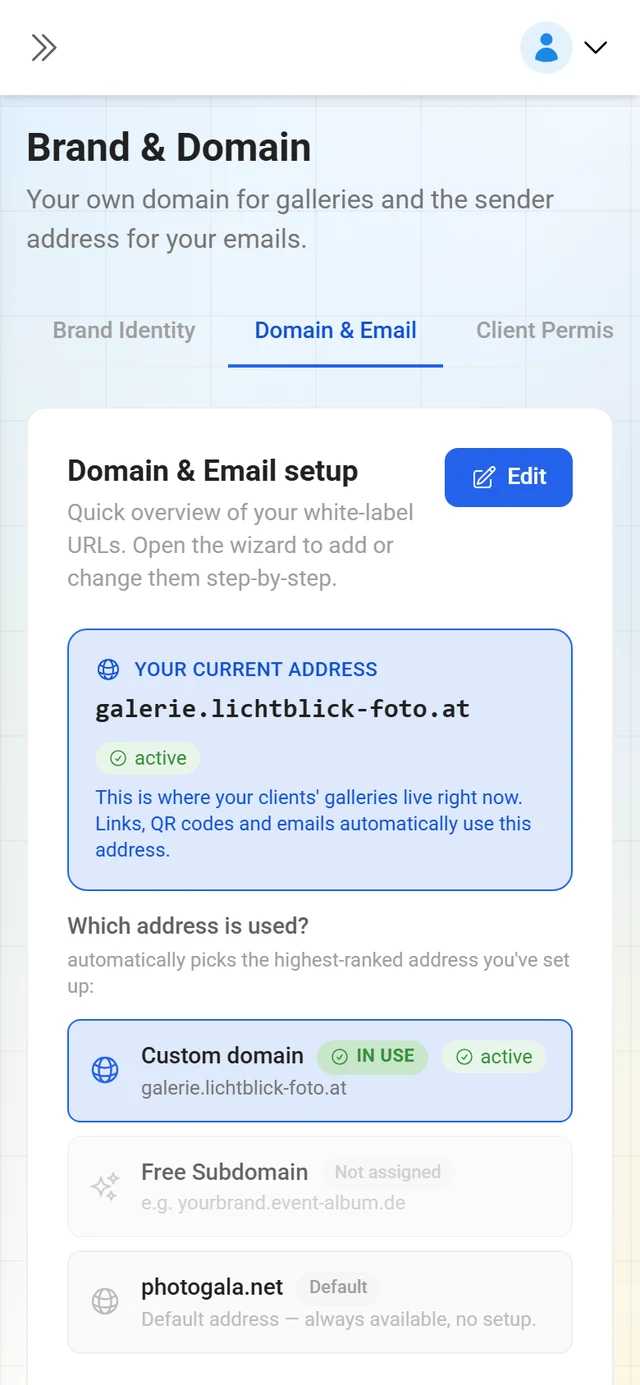
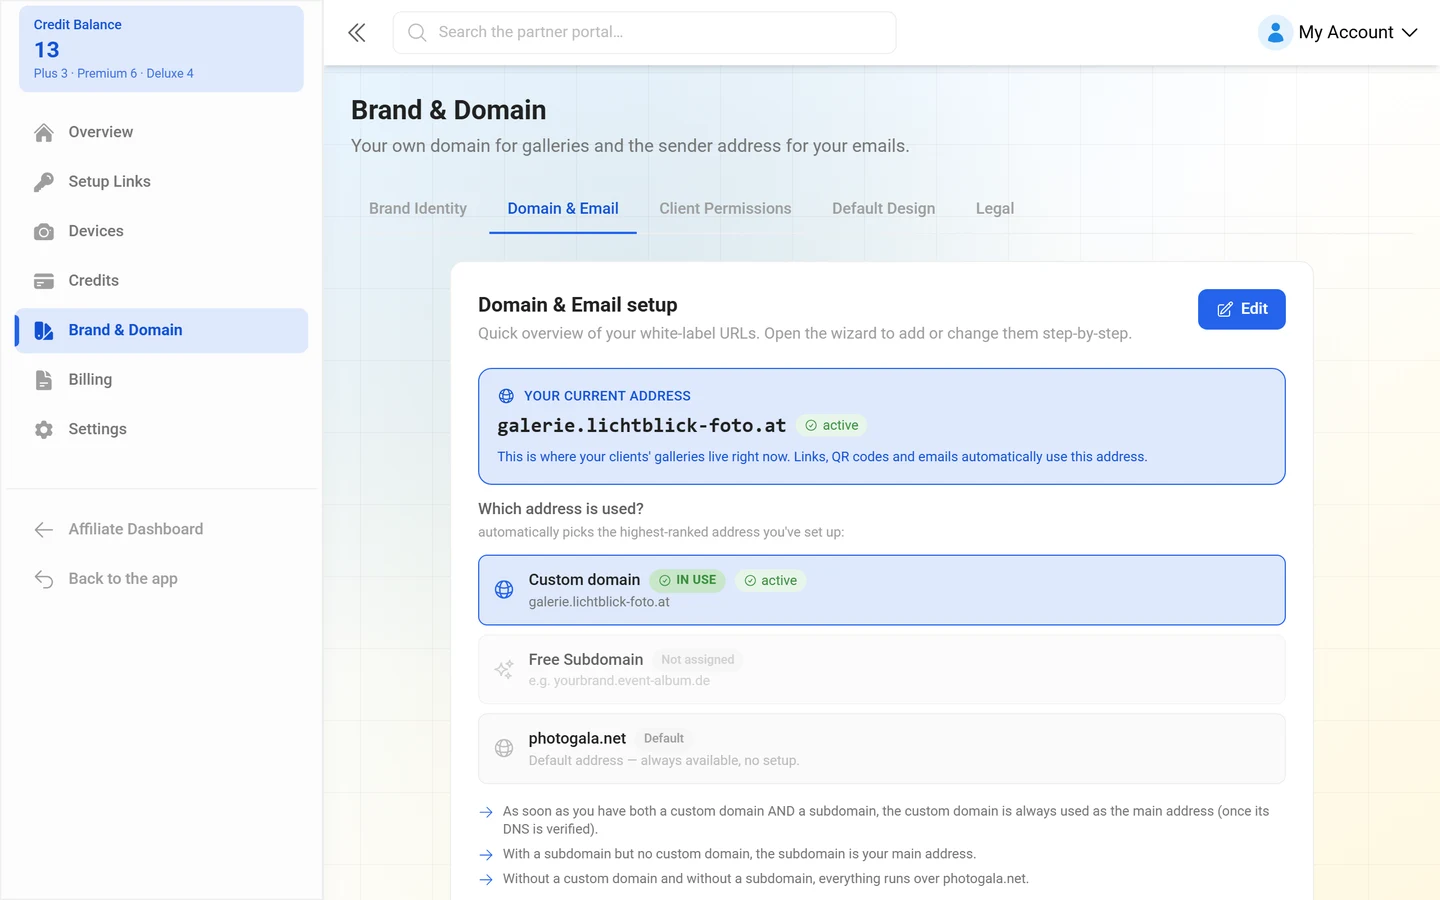
Section titled “Tab 2 — Domain & Email”The tab opens with the Domain & Email setup card and an Set up or Edit button that launches the Set up URLs & Email wizard.
Which address is live right now
Section titled “Which address is live right now”At the very top, Your current address shows the host that serves right now, with the note: This is where your clients’ galleries live right now. Links, QR codes and emails automatically use this address.
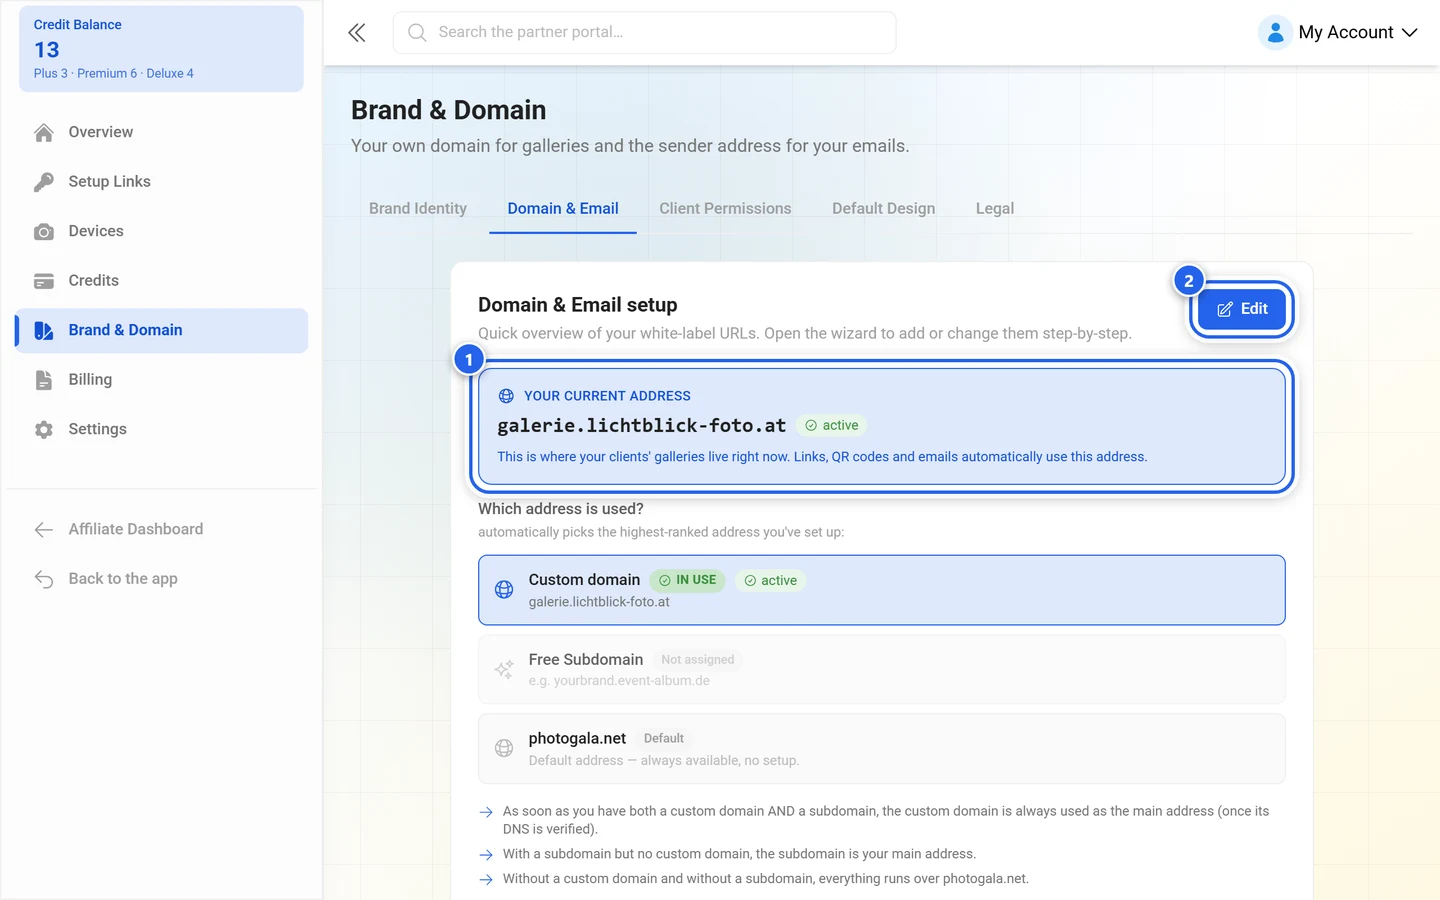
Below it, Which address is used? explains the ranking. Photogala automatically picks the highest-ranked address you have set up:
- Custom domain — once its DNS is verified.
- Free Subdomain
- photogala.net — default address, always available, no setup.
The three rules are spelled out underneath:
- As soon as you have both a custom domain AND a subdomain, the custom domain is always used as the main address (once its DNS is verified).
- With a subdomain but no custom domain, the subdomain is your main address.
- Without a custom domain and without a subdomain, everything runs over photogala.net.
The free subdomain
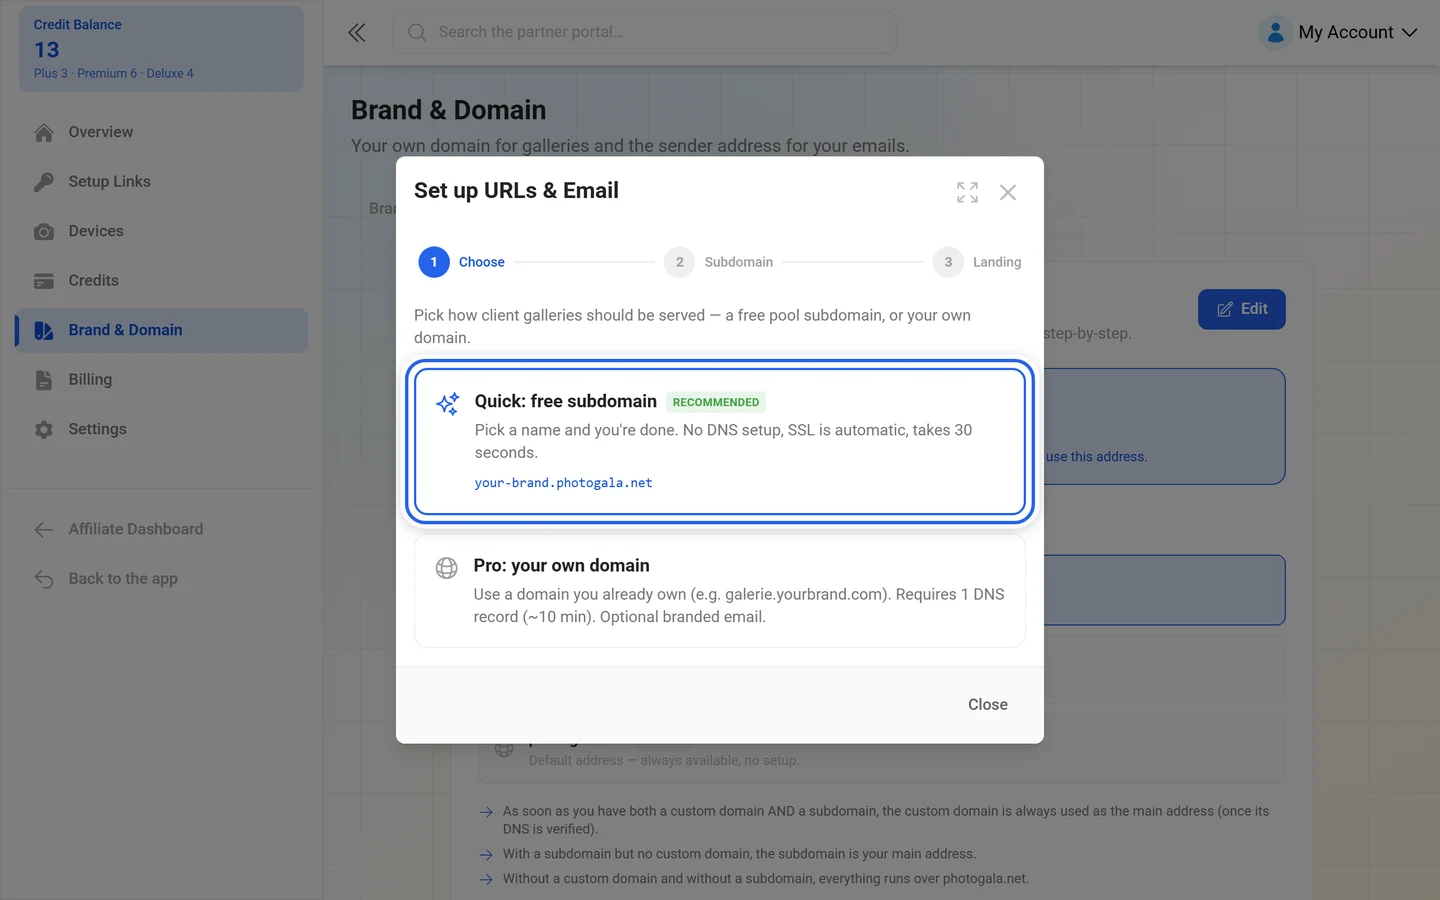
Section titled “The free subdomain”The fastest way to an address of your own. In the wizard the card is called Quick: free subdomain, carries the Recommended badge and promises: Pick a name and you’re done. No DNS setup, SSL is automatic, takes 30 seconds.
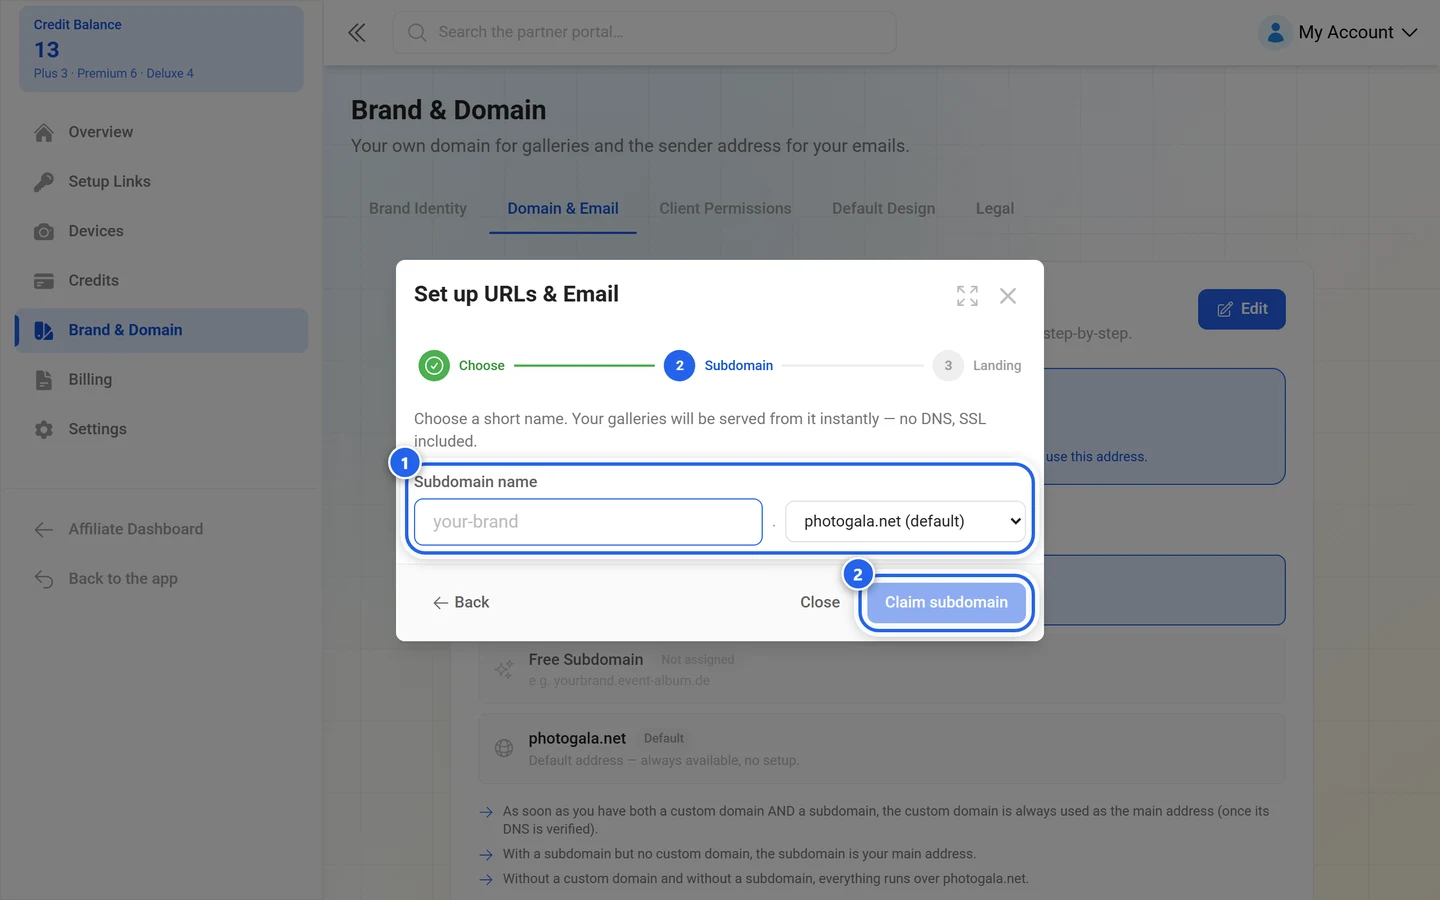
The address is made of your chosen name plus a shared pool domain, so yourbrand.pool-domain — the interface uses yourbrand.event-album.de as its example.
-
Open Brand & Domain → Domain & Email and click Set up (or Edit).
-
In the Choose step, pick the Quick: free subdomain card.
-
Enter your name under Subdomain name. The rule: Use 3+ characters: lowercase letters, digits and dashes only. Availability is checked live (Checking availability…, then Available! or Not available — try another name.).
-
If several pool domains exist, pick the one you want from the list next to the field; otherwise it is fixed. Your galleries will be at: shows the finished address.
-
Click Claim subdomain. The confirmation reads Subdomain assigned! It’s live now. — no DNS record, the certificate is issued automatically.
-
In the final Landing step you decide what visitors see without a specific event link.
Your own domain
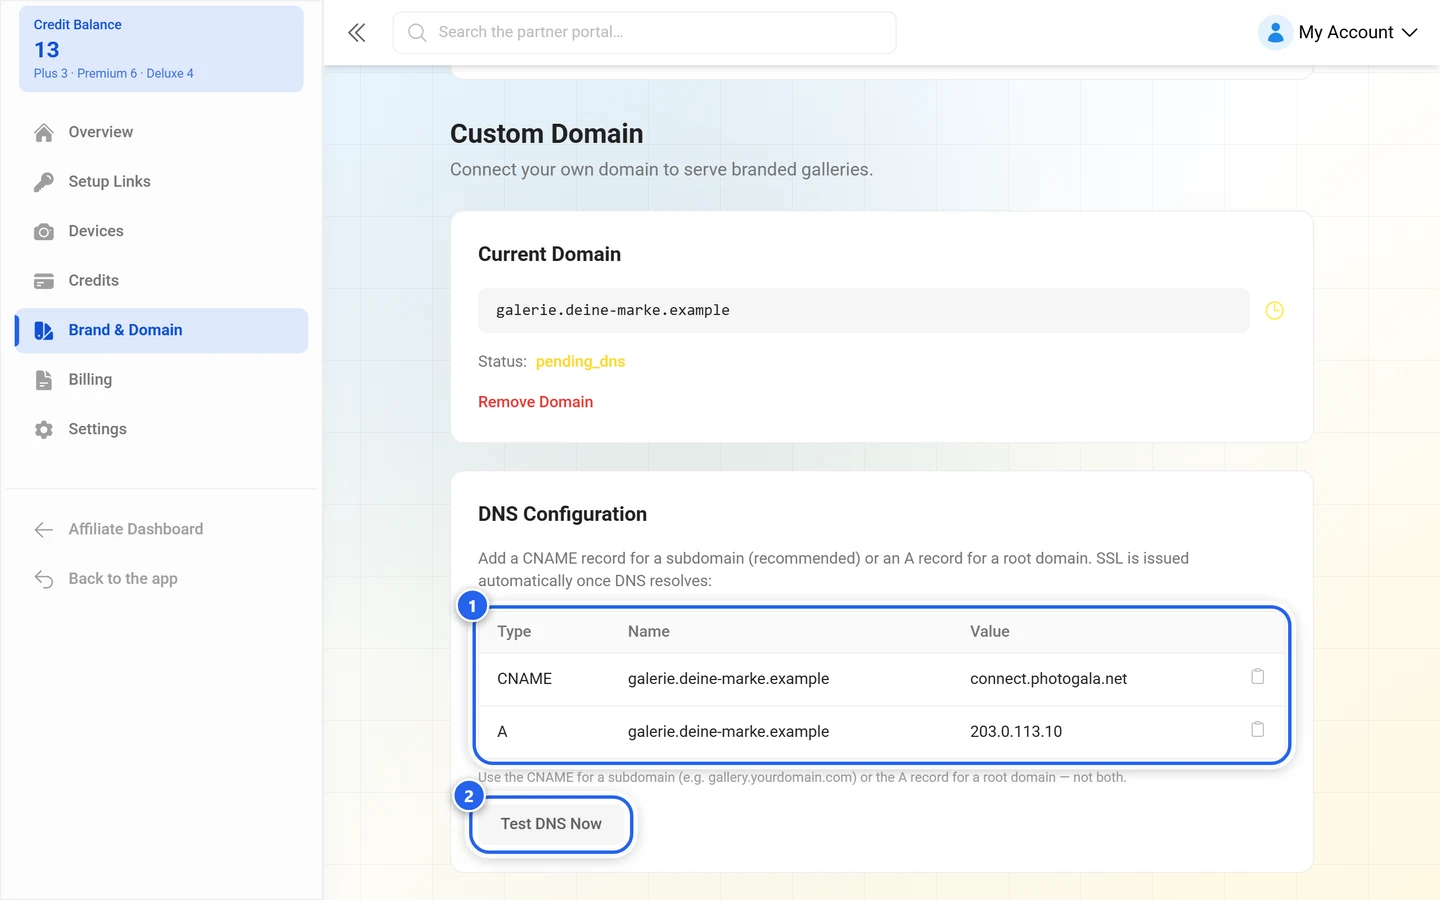
Section titled “Your own domain”In the wizard that is the Pro: your own domain card: Use a domain you already own (e.g. galerie.yourbrand.com). Requires 1 DNS record (~10 min). Optional branded email.
-
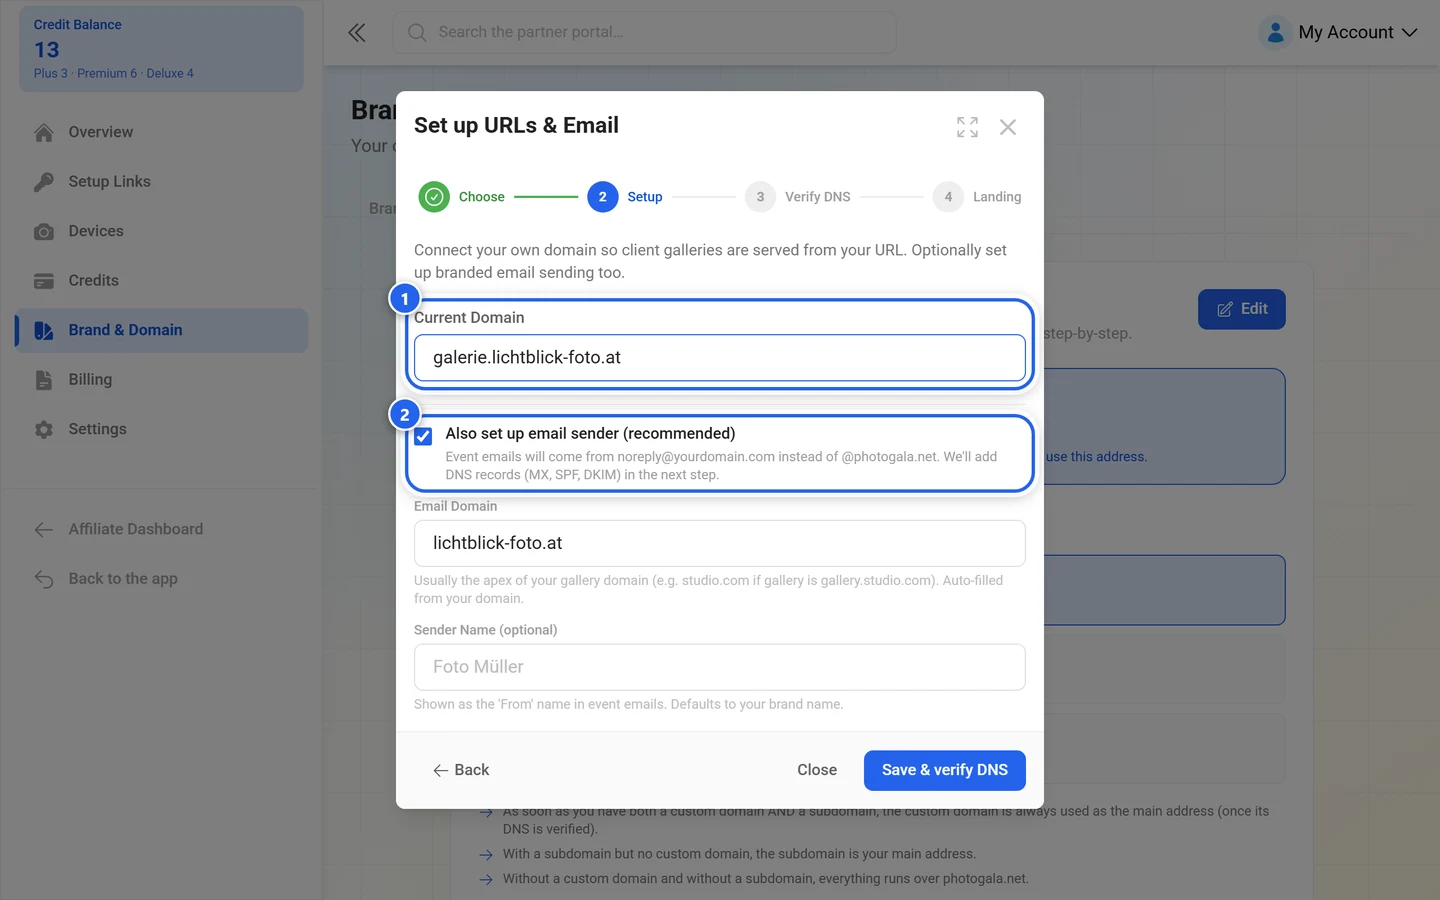
Enter the domain. It has to look like
gallery.example.com— lowercase, nohttp://, no trailing slash. -
At your DNS provider (Cloudflare, GoDaddy, Namecheap, IONOS …) create the record shown. The table has the columns Type, Name and Value. The rule: Use the CNAME for a subdomain (e.g. gallery.yourdomain.com) or the A record for a root domain — not both.
-
Click I’ve added the records — verify, or later Test DNS Now on the main page. Success reports DNS records verified. Your custom domain is ready.
The SSL certificate is issued automatically as soon as DNS resolves. If verification fails the wizard retries by itself (Auto-retry in …) and afterwards only on click. The tip inside the wizard: DNS usually propagates within 5 minutes.
Your own email domain
Section titled “Your own email domain”Without an email domain of your own, Photogala sends your brand’s mail from the official Photogala address. The setup-links page puts it like this: You haven’t set up your own email domain yet. You can send this invitation from the official Photogala address — your branding still shows inside the email — or set up your own domain first. So brand name and logo still appear in the mail body; only the sender is not yours.
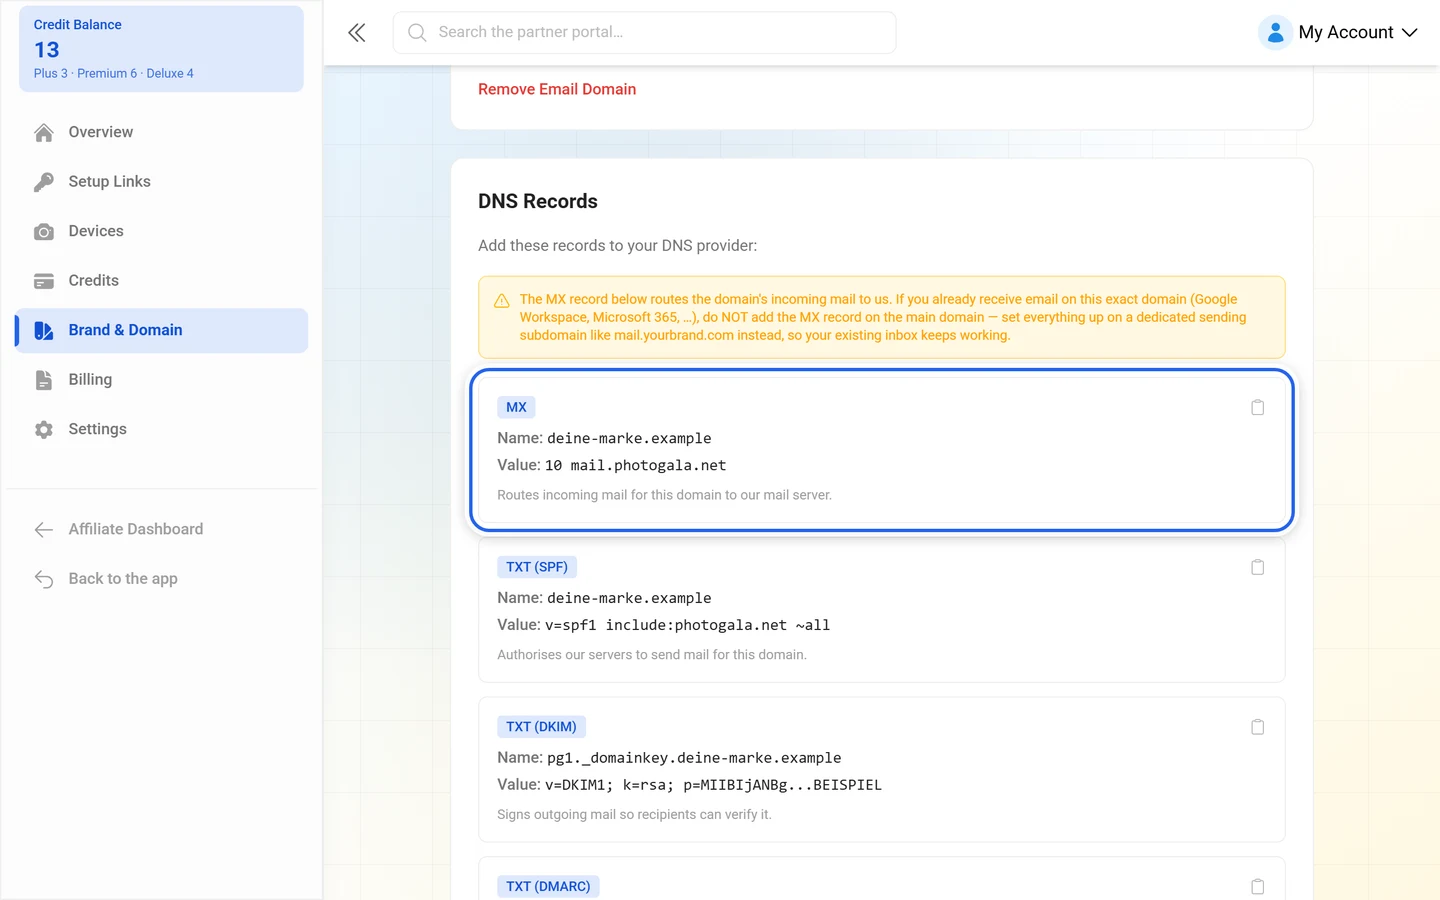
If you do set up your own email domain:
- Enter a bare domain, so
yourbrand.com— nohttp://, no@. Mail then goes out from[email protected]. - Optionally set a Sender Name (optional) — it is shown as the From name; it defaults to your brand name.
- Three DNS records are needed: MX for routing, TXT for SPF and CNAME for DKIM. The wizard lists them under Email DNS records.
- Test DNS Now checks them. Success reports Email DNS records verified. Branded emails are ready.
- On timing: DNS changes can take up to 48 hours to propagate.
The recommended value is the apex of your gallery domain: if the gallery is gallery.studio.com, the email domain is studio.com. When you remove it, mail falls back to the default sender; DKIM and SPF records may stay in your DNS, they cause no harm.
Your brand’s home page
Section titled “Your brand’s home page”The Home page section decides what visitors see when they open your address without a specific event link. The setting applies to ALL of your addresses — subdomain and custom domain alike. Three options:
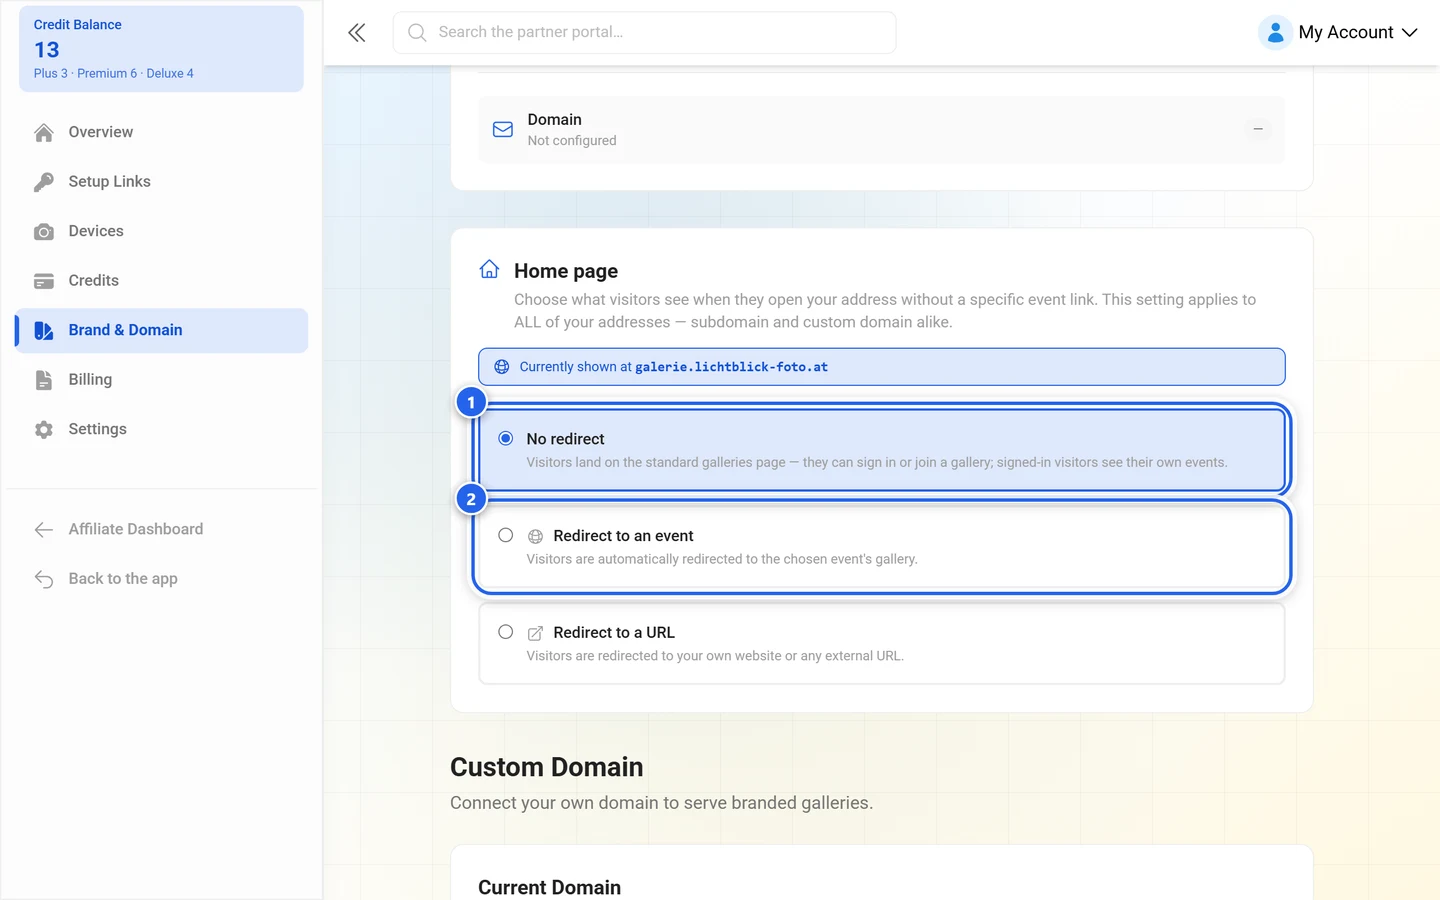
- No redirect — visitors land on the standard galleries page, can sign in or join a gallery; signed-in visitors see their own events.
- Redirect to an event — visitors go straight to the chosen event’s gallery.
- Redirect to a URL — visitors go to your own website or any external address.
Save redirect applies your choice.
Tab 3 — Client Permissions
Section titled “Tab 3 — Client Permissions”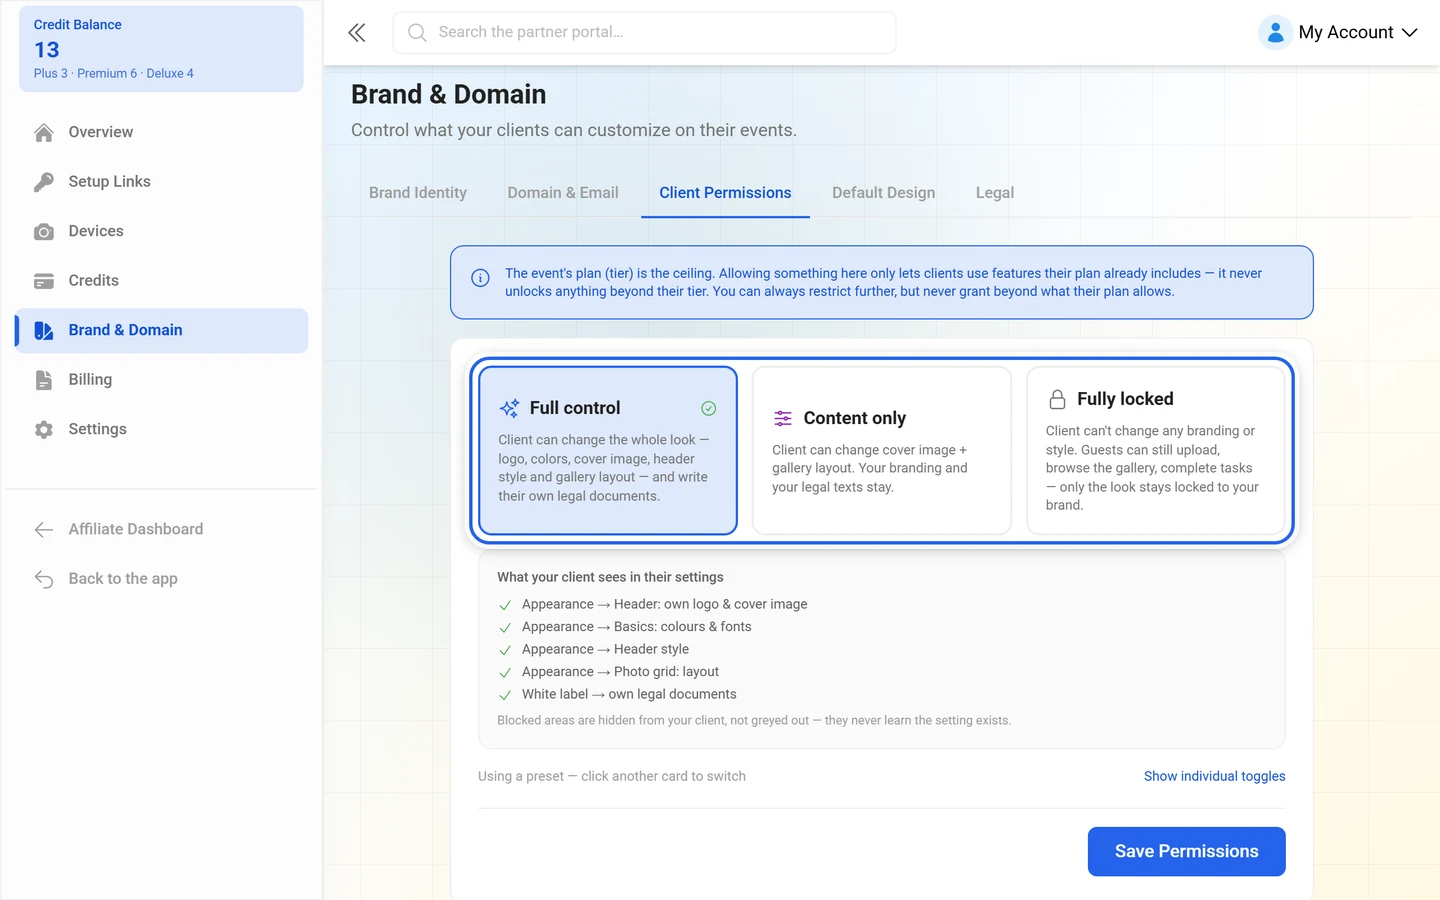
Control what your clients can customize on their events. You pick one of three presets:
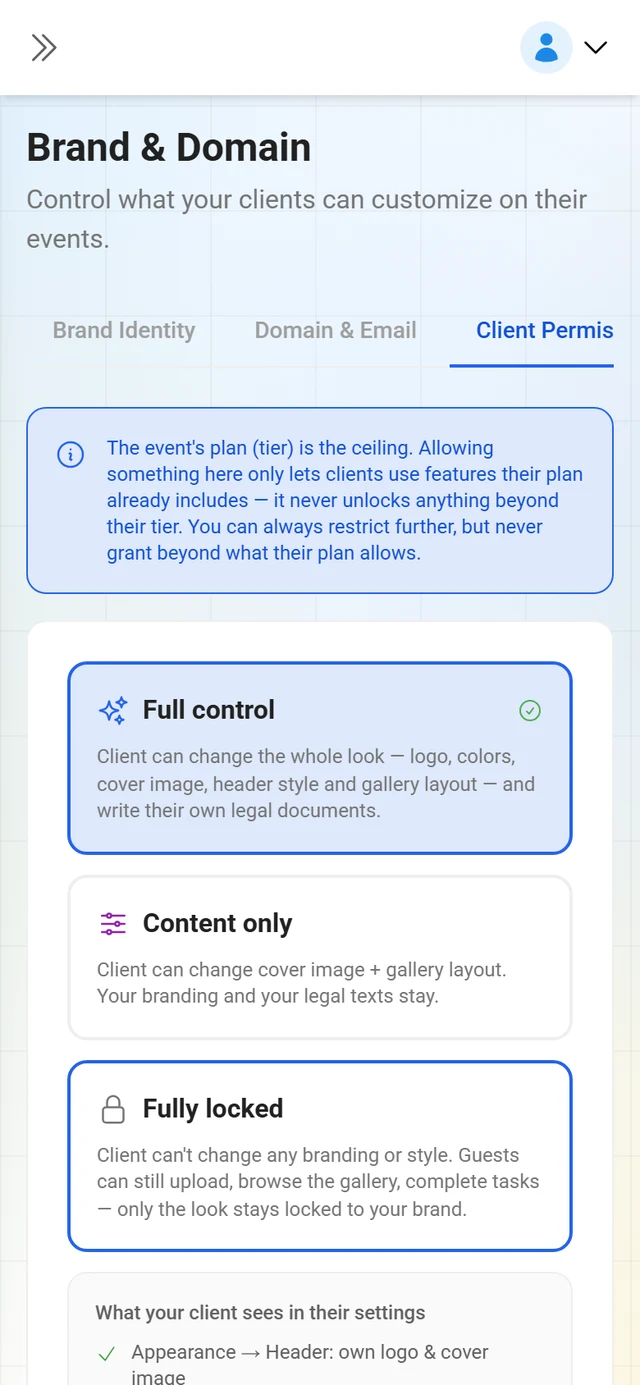
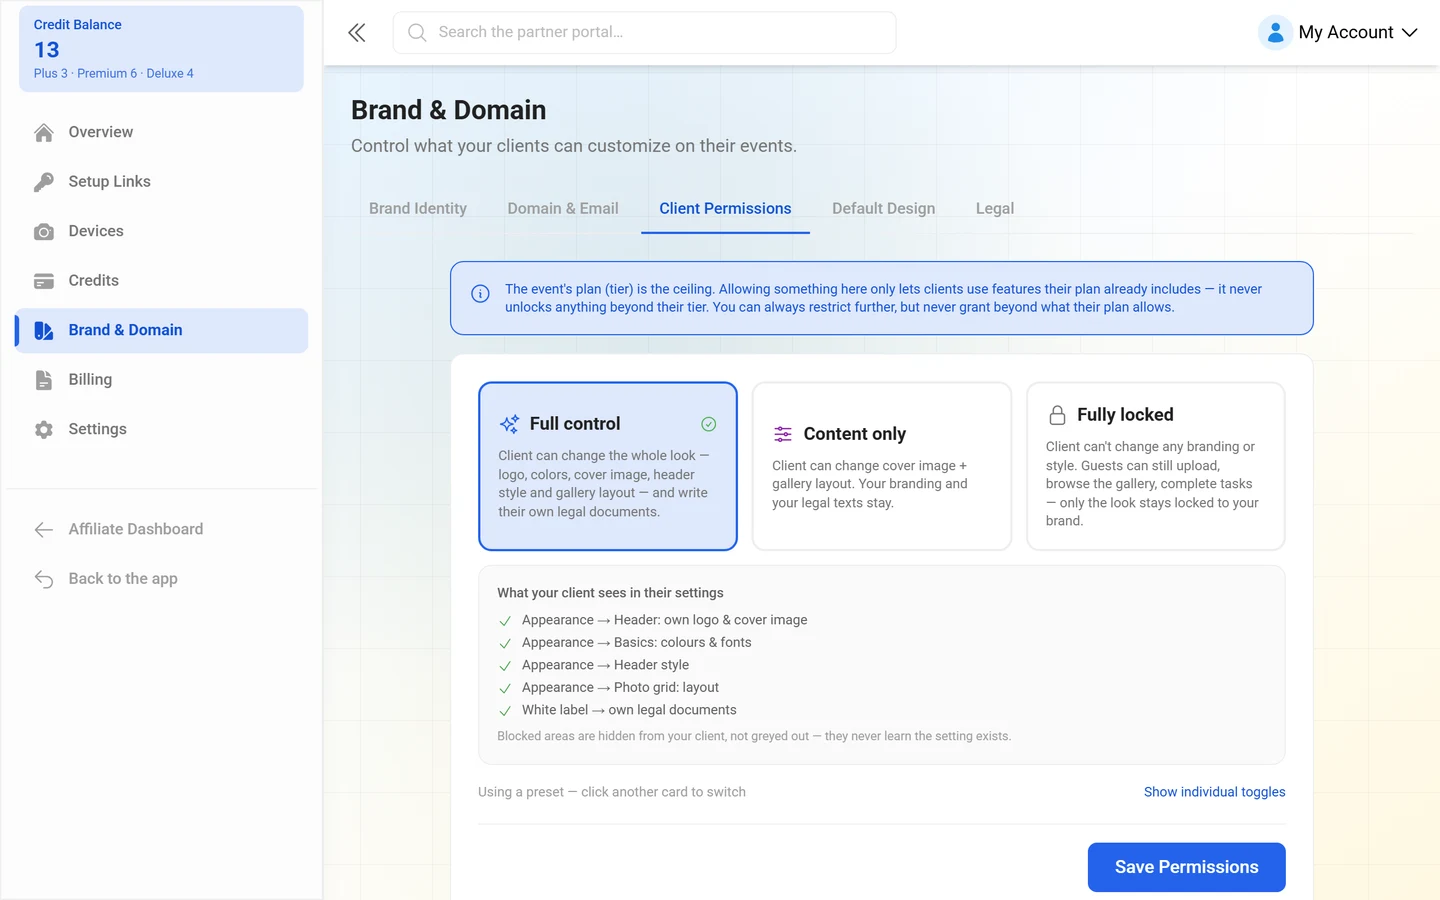
- Full control — client can change the whole look: logo, colors, cover image, header style and gallery layout. Your brand badge stays.
- Content only — client can change cover image and gallery layout. Your branding stays.
- Fully locked — client can’t change any branding or style. Guests can still upload, browse the gallery and complete tasks; only the look stays locked to your brand.
Show individual toggles expands the single rights:
- Change Event Logo — allow clients to upload their own event logo, replacing your brand logo.
- Change Event Colors — allow clients to customize the event color scheme.
- Change Cover Image — allow clients to upload a custom cover image.
- Change Header Style — allow clients to select different header layouts.
- Change Gallery Layout — allow clients to choose gallery display styles.
If you deviate from a preset, Custom configuration is shown below. You save with Save Permissions.
Exceptions for individual events
Section titled “Exceptions for individual events”Under Events & Keys you can override the permissions per event. The section there is called Customization permissions; an event shows either Brand default or Customized for this event. Save for this event sets the exception, Reset to brand default takes it back.
What clients notice
Section titled “What clients notice”Locked settings do not appear in the client’s interface at all — there is no grayed-out switch and no error message. The whole block simply disappears:
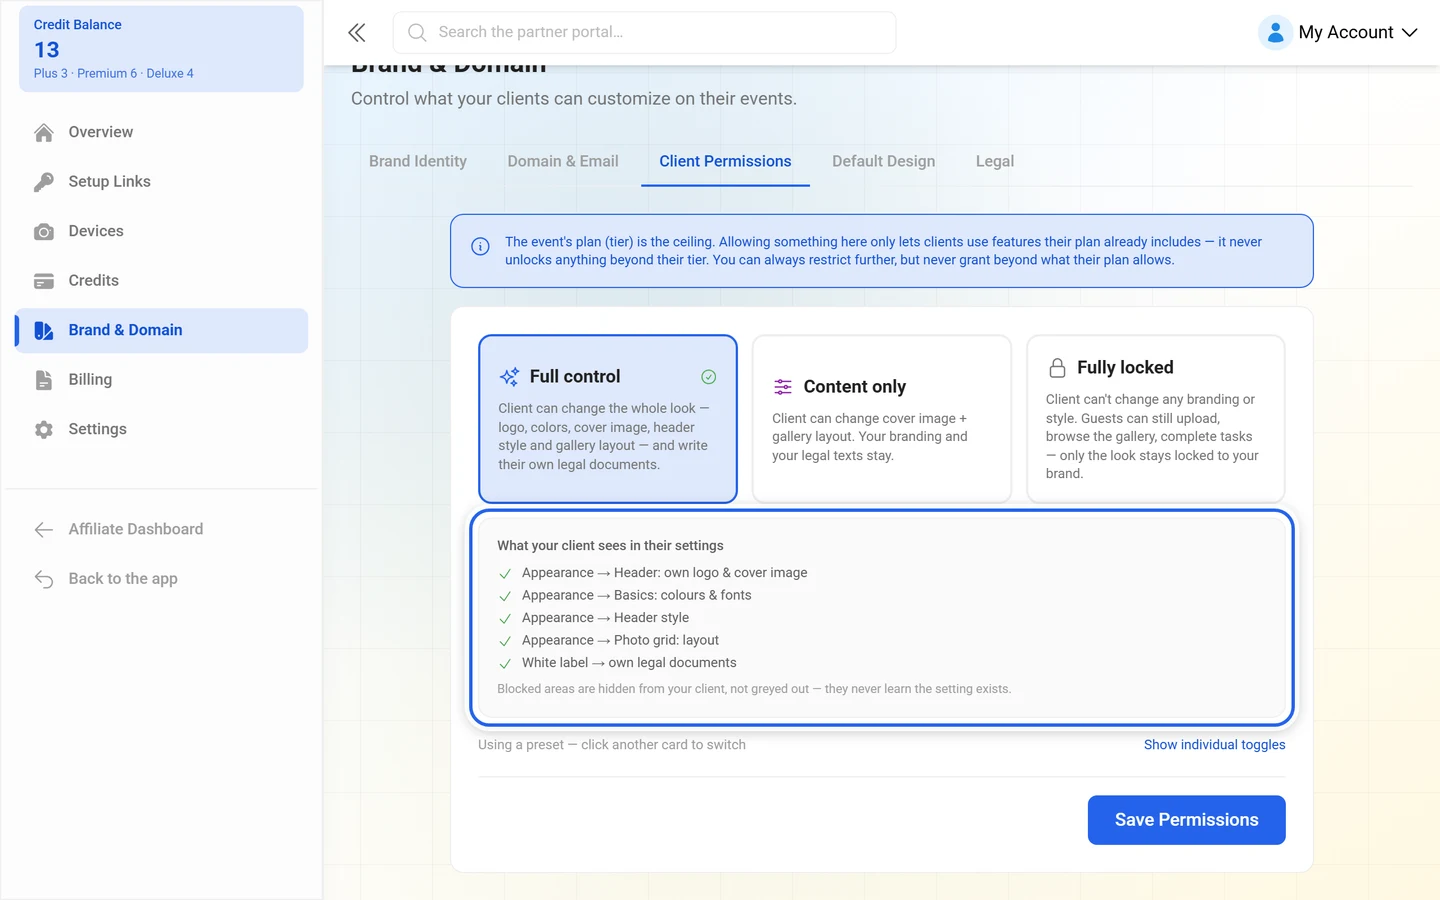
- Without Change Event Logo and Change Cover Image, the branding block is missing from the client’s style tab.
- Without Change Event Colors, the color-scheme area is missing.
- Without Change Header Style the header picker is gone, without Change Gallery Layout the layout picker is.
- Without the domain permission, the client does not see the domain section in their event settings.
What that looks like from the client’s side is described in Customizing the look and Custom domain & white-label.
Tab 4 — Default Design
Section titled “Tab 4 — Default Design”One design that every new client event starts from. The subtitle: Set the look and feature set every NEW event starts with — colors, fonts, layout, photo-wall design, features and privacy. Once a default is saved, New events start from this design. is shown above it.
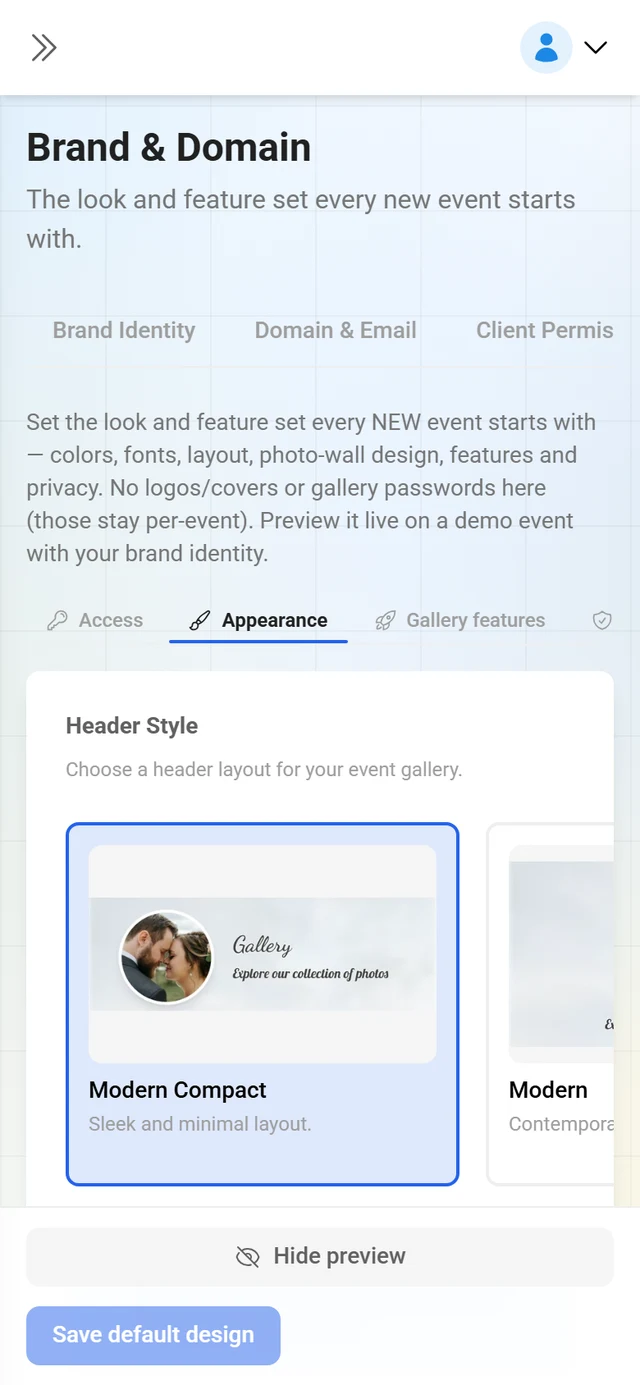
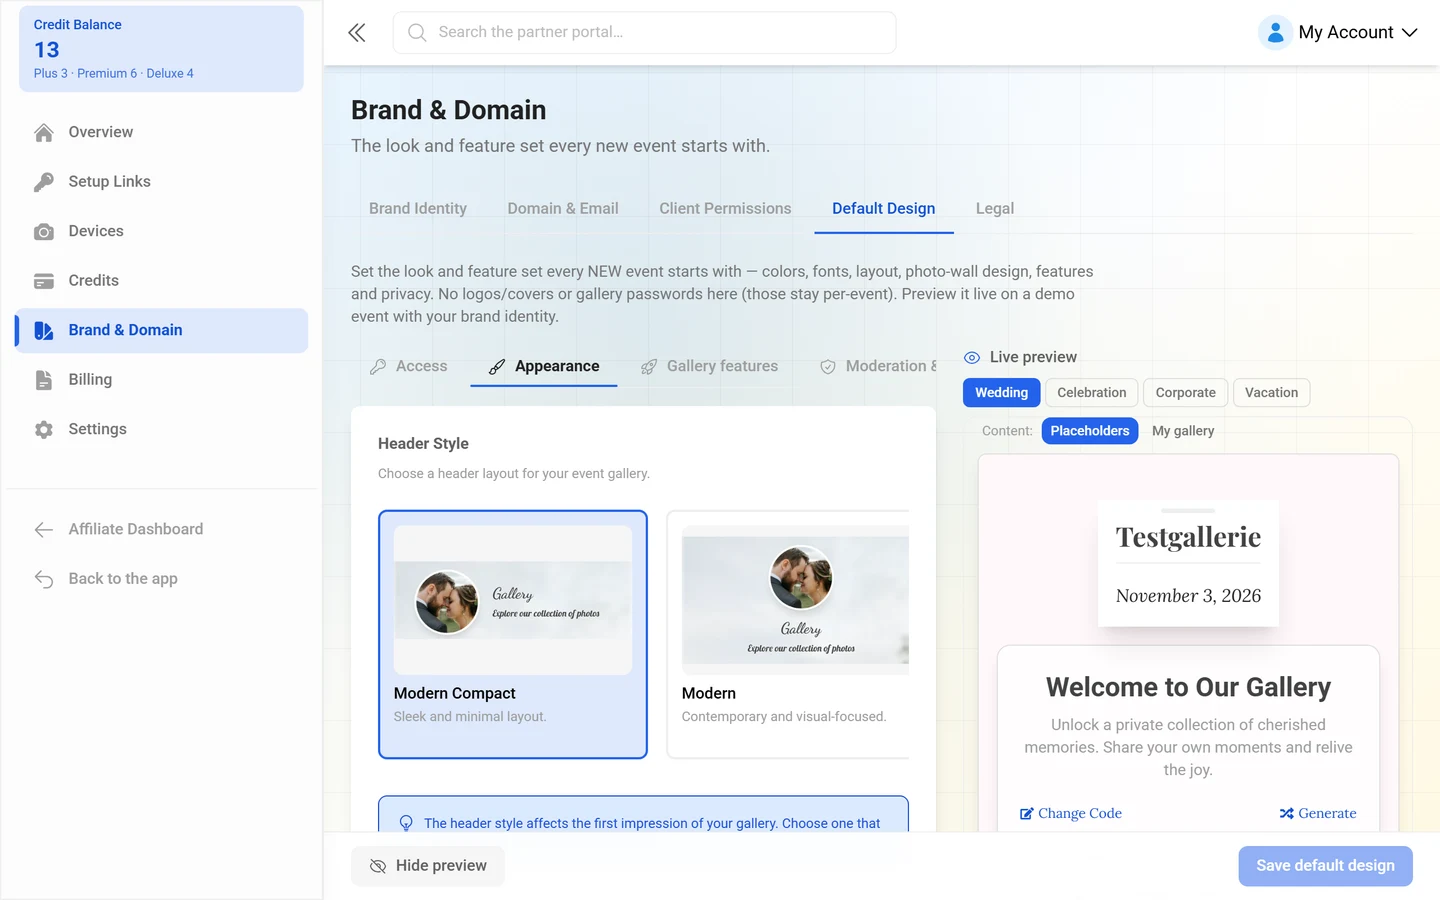
Four sub-tabs: Style, Photo wall, Features and Privacy.
Preview opens a Live preview: the design is shown on a demo event carrying your brand identity, as Wedding, Celebration, Corporate or Vacation. The note explains: Gallery design updates live with your brand colors and logo. Photo-wall design is saved but previewed on the wall view.
Unsaved edits are flagged as Unsaved changes; you apply them with Save default design, drop them with Discard, or reset everything with Clear.
Tab 5 — Legal
Section titled “Tab 5 — Legal”Configure the legal notice, privacy policy and terms shown in your galleries. For each document — Legal Notice / Impressum, Privacy Policy, Terms & Conditions — you pick one of four modes:
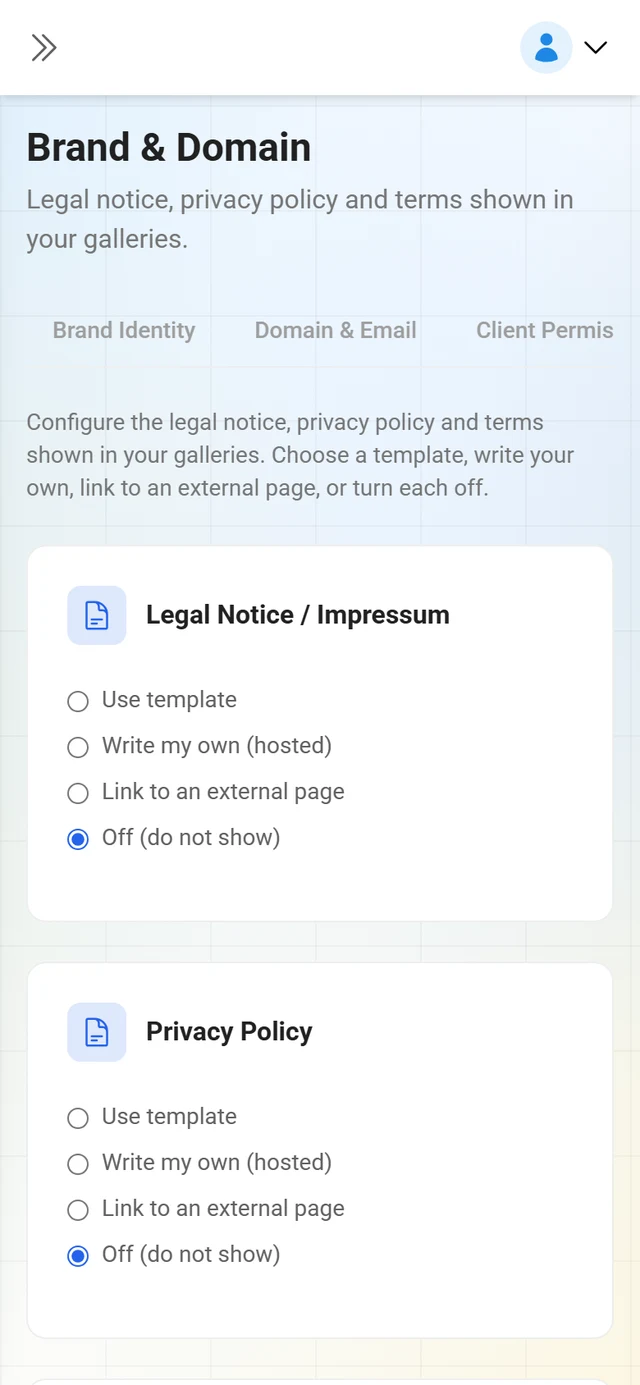
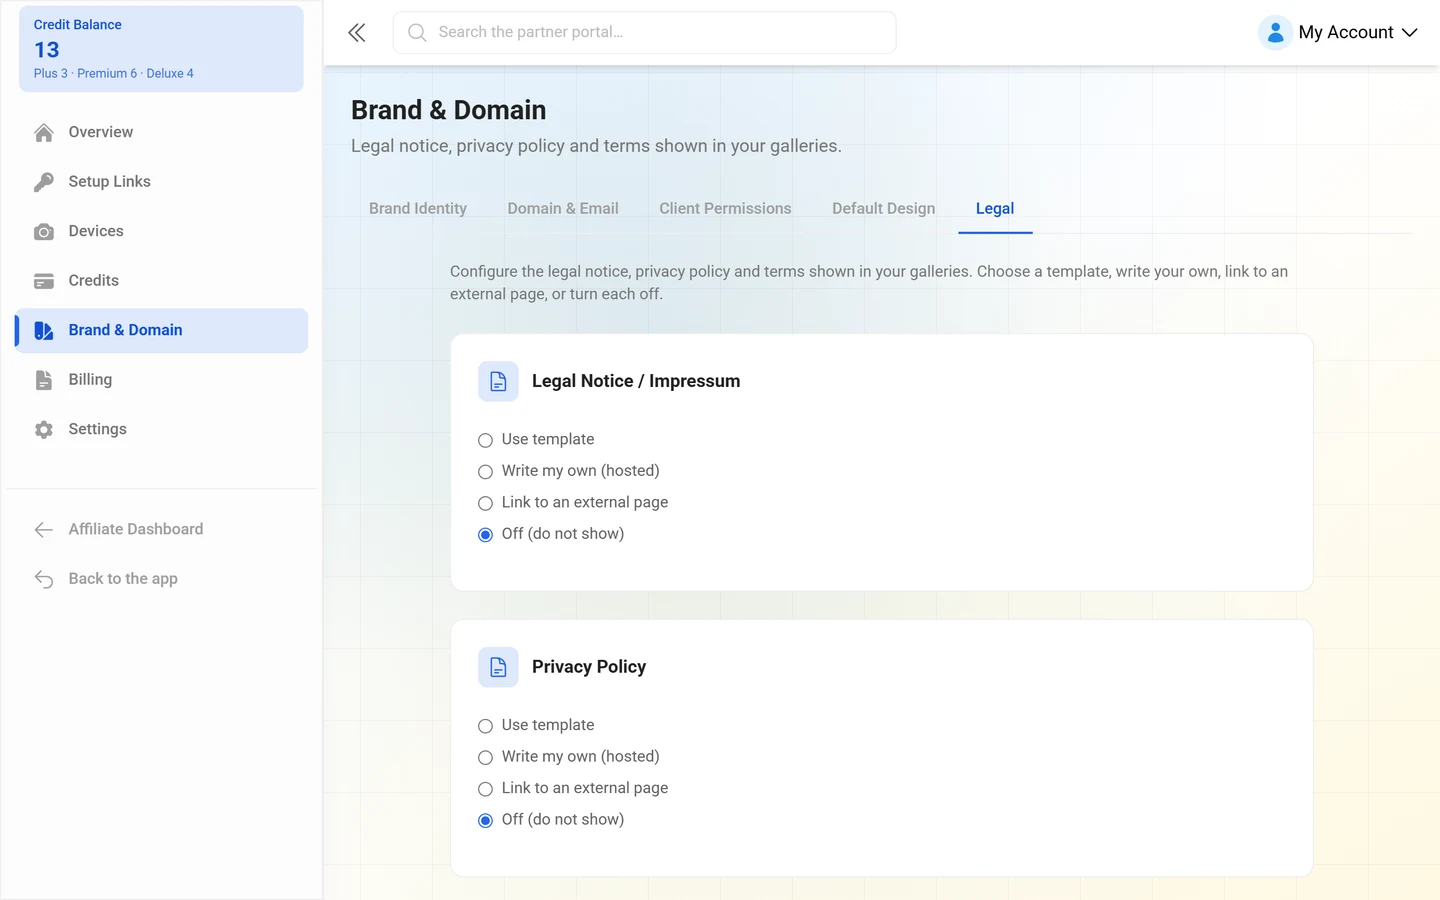
- Use Photogala template — generated from your legal details. The note: Generated automatically from your legal details below. Keep them up to date.
- Write my own (hosted by Photogala) — your own text in the editor. Fill from template starts you off from the template so you can adjust it.
- Link to an external page — the URL has to start with
http://orhttps://. - Off (do not show)
Under Legal details you maintain the data the templates are built from: Company name, Legal form, Address, Postal code, City, Country, Contact email, Phone, VAT ID / UID, Responsible for content, Register number, Register court and Supervisory authority. Optionally the block Data protection officer (optional) with Name and Email is added. Company, address, VAT and contact are shared with your business settings under Settings.
Show preview checks the result, Save Changes applies it.
Troubleshooting
Section titled “Troubleshooting”- A tab only shows the “Create your brand first” banner. Domain, Client Permissions, Default Design and Legal all need a saved brand identity.
- My custom domain is entered but galleries still run on the subdomain. The domain is not verified yet (Not active yet). Only after a successful DNS check does it become the main address.
- The subdomain I want is unavailable. The name is taken; it needs at least 3 characters, lowercase letters, digits and dashes only.
- Old links still work after removing the subdomain. They redirect to your main address for 30 days, then stop.
- Mail still goes out from Photogala. As long as no email domain is verified, that is the fallback. Your branding still stays in the content.
- Since adding the MX record I no longer receive mail on my domain. The MX record must not be set on a domain where you already receive mail. Use a dedicated sending subdomain.
- My client cannot find a setting. Most likely you locked it in the client permissions — locked areas are hidden from them, not grayed out.
- The default design did not change an existing event. It only affects new events.
Related pages
Section titled “Related pages”- Reseller basics — setup links, credits and the rest of the portal
- Managing your device fleet — branded upload addresses for photo booths
- Custom domain & white-label — the host’s view of address and branding
- Customizing the look — what your clients see of the event design
- Legal pages & imprint — the same documents at event level