Seating Plan – Illustrated view, export & print
The seating plan isn’t only a working tool – it is also what your guests see on their phone and what hangs at the reception desk. This page covers the look and every route outwards.
Two views
Section titled “Two views”Above the canvas you switch between two renderings:
- Simple mode – plain shapes and colors. Clear and quick while you sort many tables.
- Illustrated – the drawn scene with paper, furniture, decoration and guest figures.
Both are the same editor: the illustrated view is fully editable too, and switching keeps your selection and zoom. It is also the authoritative one – this is exactly how your guests see the plan, and exactly how it is exported as an image.
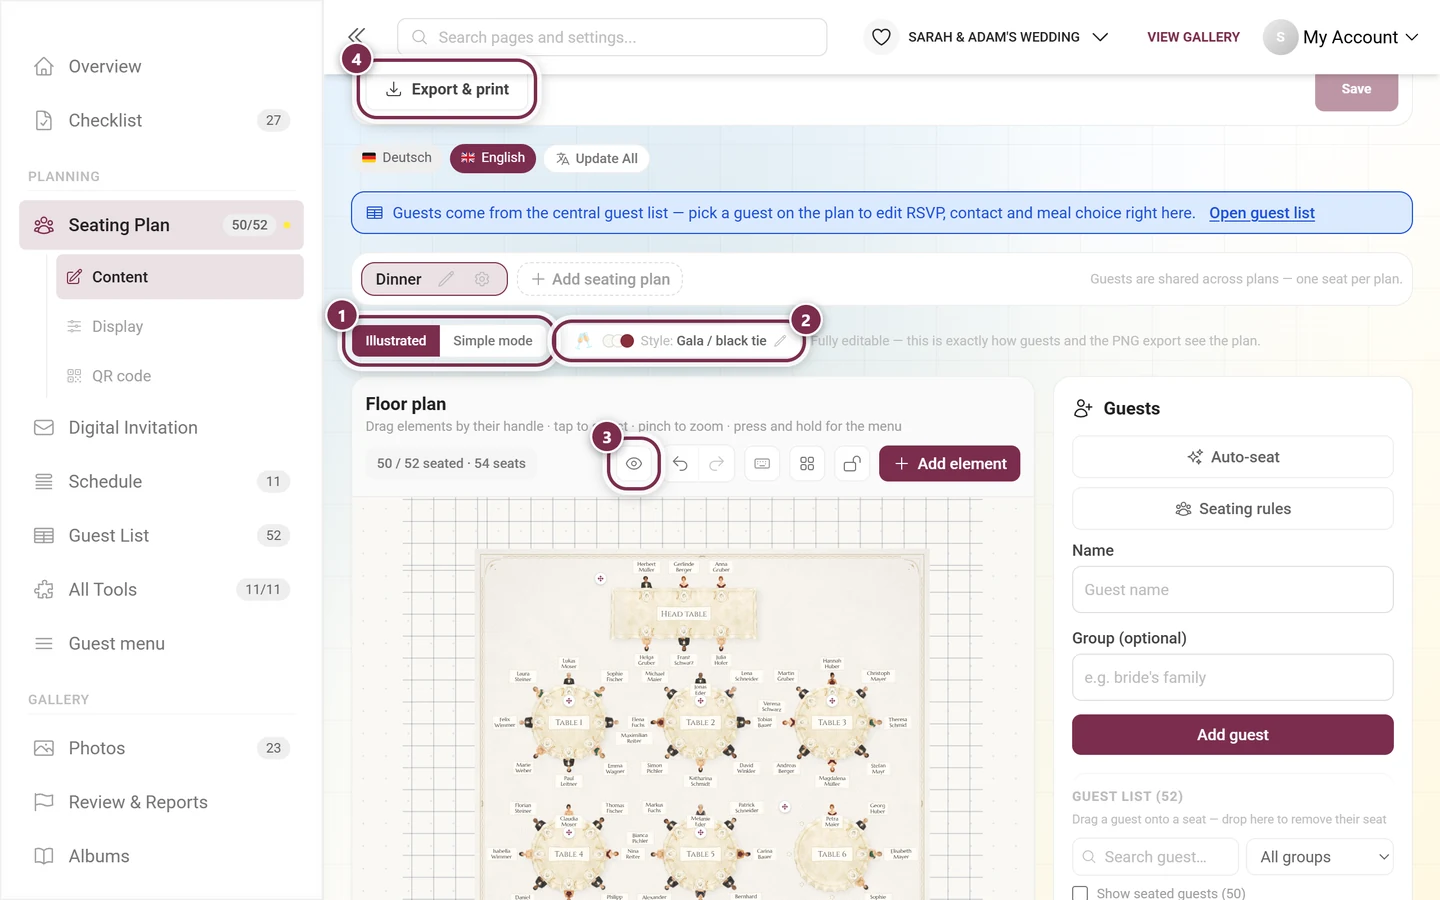
- ① Illustrated / Simple mode – the switch sits right above the canvas. Next to it you read “Fully editable — this is exactly how guests and the PNG export see the plan.”
- ② Style: … – shows the active illustration style; the pencil opens the picker.
- ③ Eye icon – starts the guest view preview. It sits in the floor plan toolbar, between the seat count and the undo arrows.
- ④ Export & print – the dialog with every output, at the very top above the plan.
Guest view preview
Section titled “Guest view preview”The button carries an eye icon only (③ above) – its name Guest view preview appears as a tooltip once you rest the mouse on it. It shows you the pure guest page: name search at the top, illustrated scene below, empty seats hidden. Editing is deliberately blocked there – Exit preview takes you back into the editor.
Illustration styles
Section titled “Illustration styles”The style button opens the Illustration style picker. Every card shows the same small sample plan in that look, so you see beforehand what you get. The choice is saved with the plan and applies to guests, the preview and the image export.
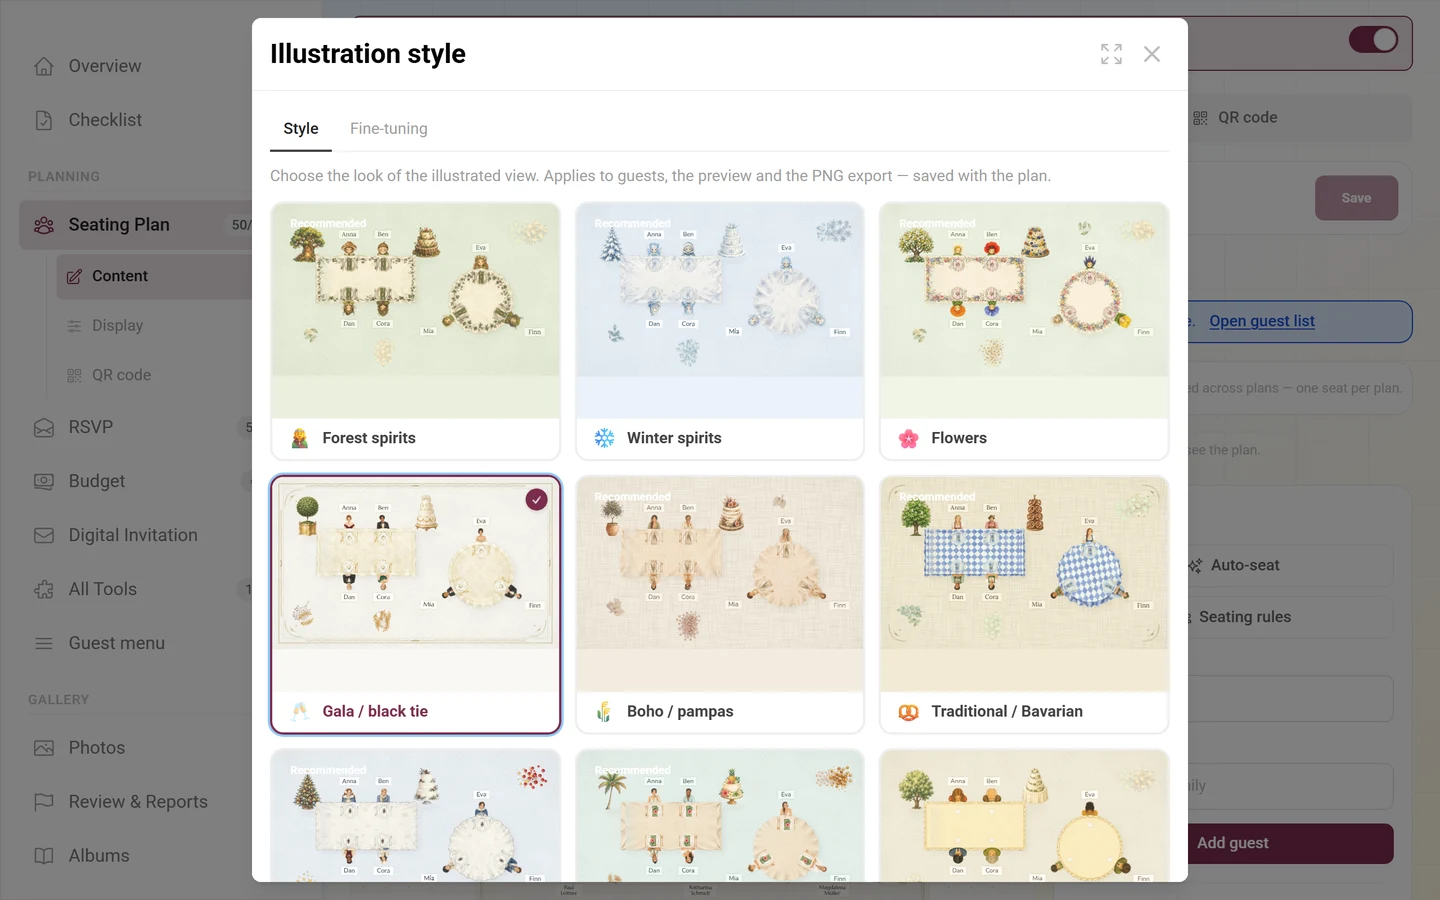
These 19 styles are available:
- People and occasions – Watercolor, Gala / black tie, Boho / pampas, Traditional / Bavarian, Winter / Christmas, Tropical / beach, 1920s Gatsby, Mafia, Wild West.
- Fantasy creatures – Forest spirits, Winter spirits, Flowers, Sea creatures.
- Playful – Animals, Cats, Dogs, Superheroes, Robots, Space.
Styles that suit your event type come first and carry the Recommended hint – but every one of them is selectable. Without a choice of your own, Photogala draws in Gala / black tie.
Fine-tuning
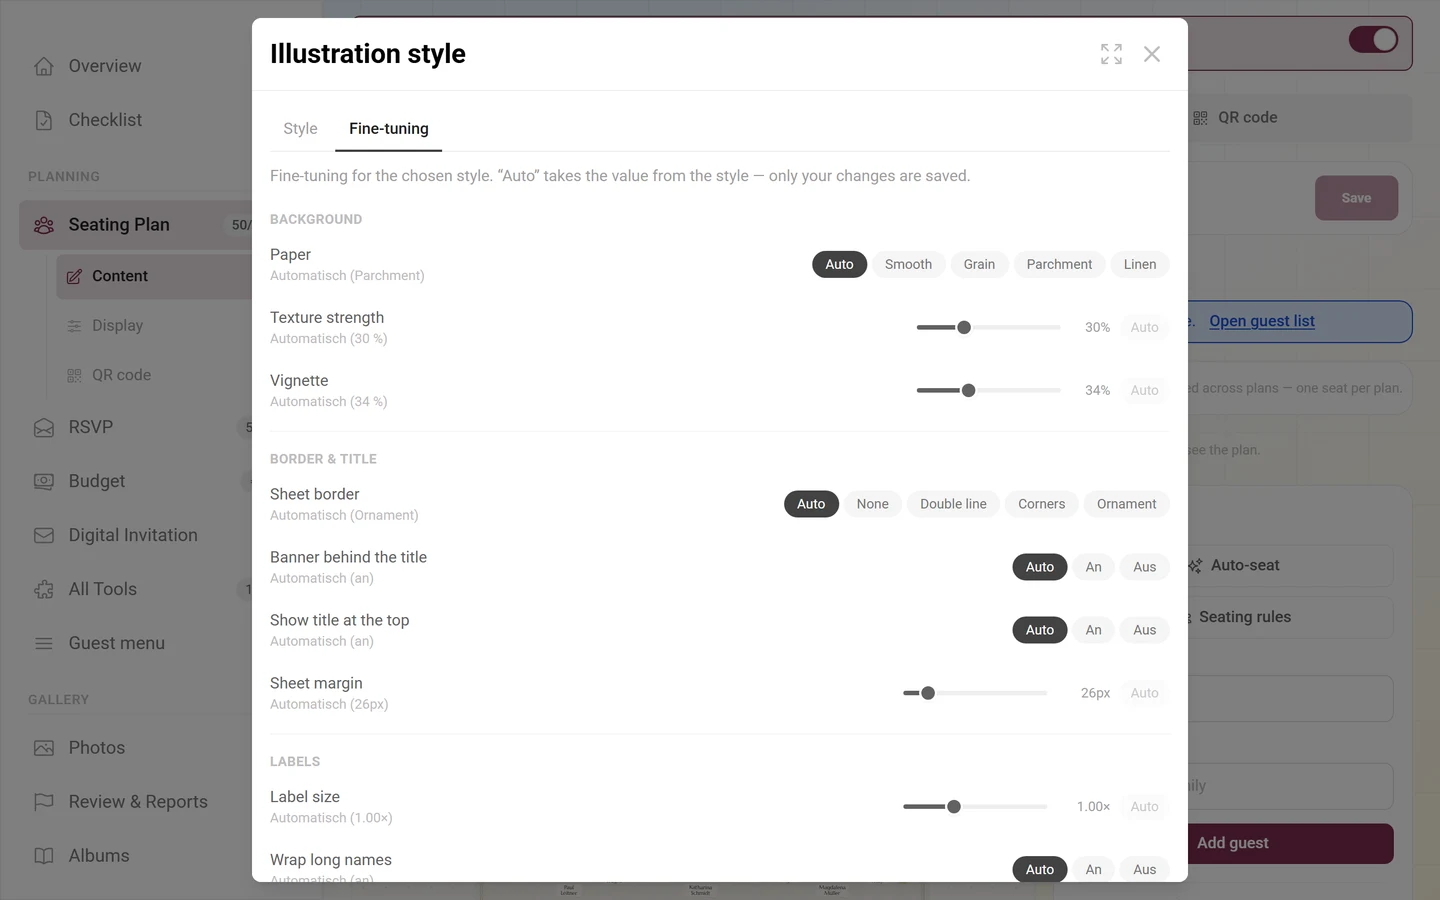
Section titled “Fine-tuning”Next to Style the same dialog holds the Fine-tuning tab, where you adjust single details of the chosen style. The hint at the top spells out how it works: fine-tuning applies to the selected style, Auto takes the style’s own value, and only your deviations are stored. Each row shows the style’s default in brackets, for example Automatic (parchment); a click on Auto drops your deviation again.
Four groups:
- Background – Paper (Smooth, Grain, Parchment, Linen), the Texture strength and the Vignette towards the edge of the sheet.
- Border & title – Sheet border (None, Double line, Corners, Ornament), Banner behind the title, Show title at the top and the Sheet margin in pixels.
- Labels – Label size, Wrap long names, Label font, Text color, the shape of the Name labels (Plain, Plaque, Tag) and Tilt labels slightly.
- Decoration – the Scattered decor: how densely blossoms, twigs and odds and ends lie on the sheet.
Guest figures
Section titled “Guest figures”Every guest is drawn as a small figure. Which one, Photogala guesses from the first name – using a large name list plus a few ending rules. Where the detection finds nothing solid it picks at random rather than guessing wrong.
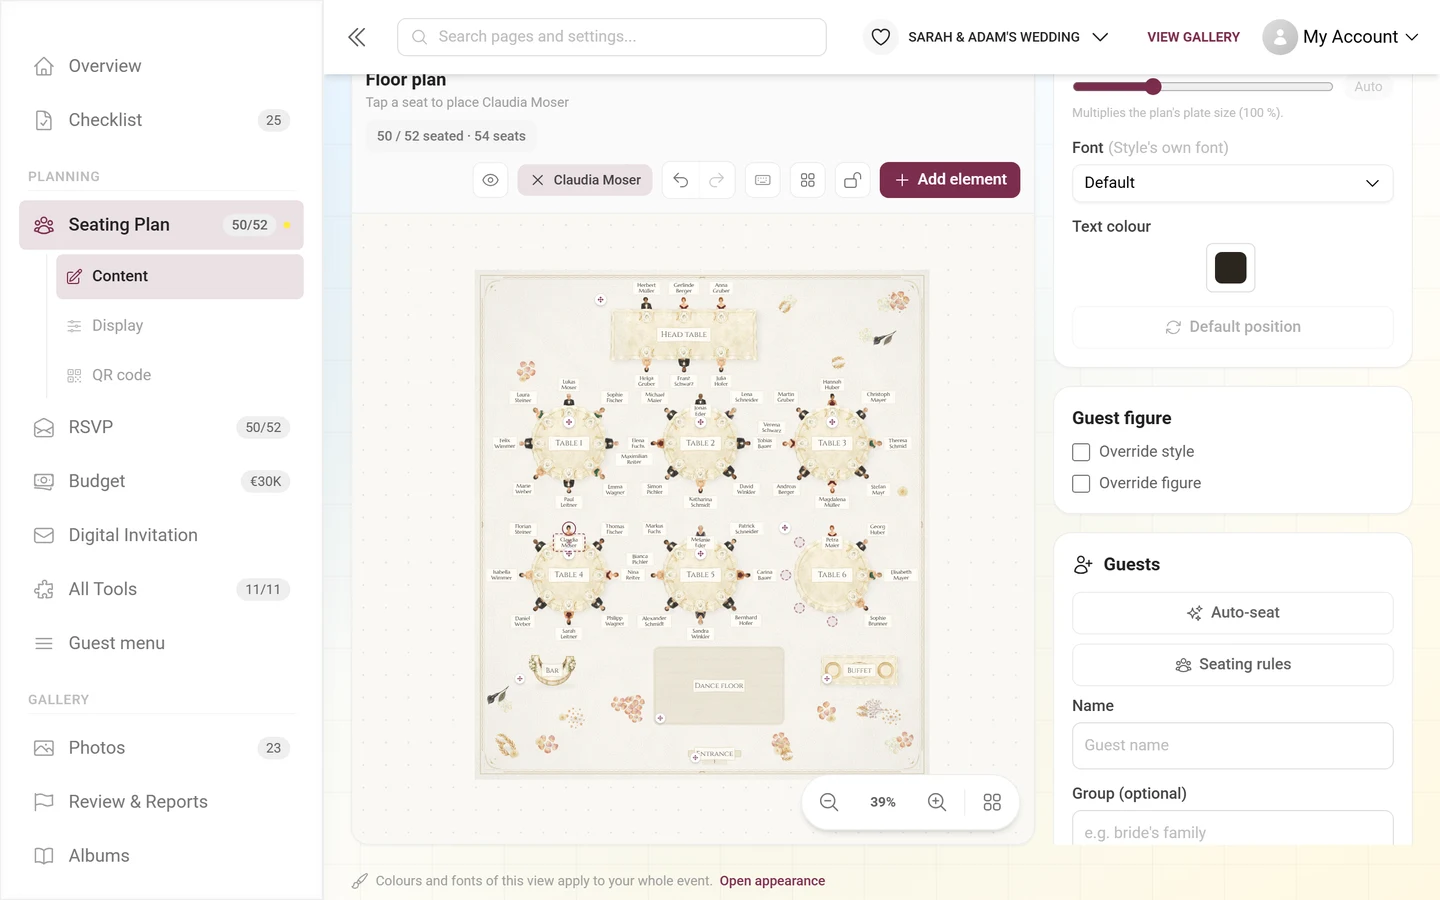
If a figure doesn’t fit, override it in the panel under Guest figure:
- Override style – this one guest is drawn in the look of another style. Handy for the couple or the birthday child.
- Override figure – you pick the exact figure from that style’s variants. Next to the adults there is a separate Children section.
Both stick to the guest, not to the plan – so the figure stays the same across every seating plan.
Decoration in the illustrated view
Section titled “Decoration in the illustrated view”A selected table gets the Decoration (illustrated view) section in the panel:
- Garland – a flower band above the table. Off by default.
- Plates / place settings – draws the settings at the seats. On by default.
- Centerpiece – None, Flowers, Bottles or Plates.
A table’s context menu lets you Move table center: the fixed prop becomes a movable object. The other way round, Decor on the table center places an object back in the middle of a table – decoration placed that way is marked as being on the table and travelling with it. Detach from table separates it again.
Floor objects with dressing of their own – buffet, bar, DJ booth, stage – additionally have the Decoration (plates, bottles …) switch.
Overriding the illustration
Section titled “Overriding the illustration”Under Illustration (illustrated view) you can intervene per element:
- Override style – this one element is drawn in the look of another style.
- Override object – the element gets another object type’s artwork without its label changing.
Labels and name tags
Section titled “Labels and name tags”Names and labels are not fixed in place:
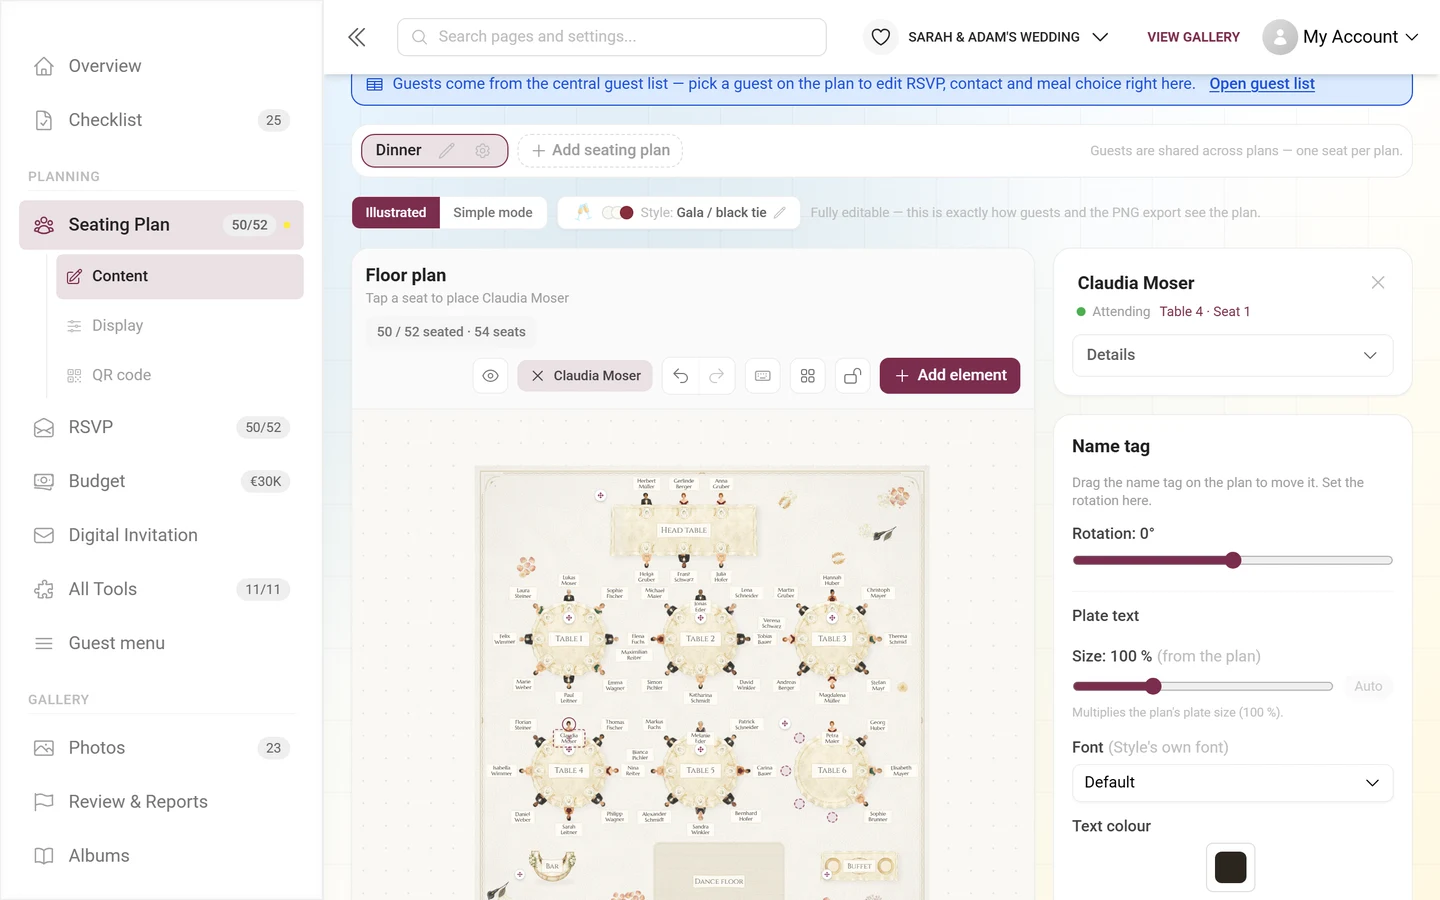
- Name tag – drag a guest’s tag on the plan to a free spot. You set the Rotation as an angle in the panel, and Default position resets both.
- Table name – can be moved, rotated and reset in exactly the same way.
- Object label – a floor object’s label is movable and rotatable too. Whether it appears at all is decided by the Show object label switch in that object’s panel.
Export & print
Section titled “Export & print”The Export & print button opens a dialog with every output. It has two halves: Download and Print & design.
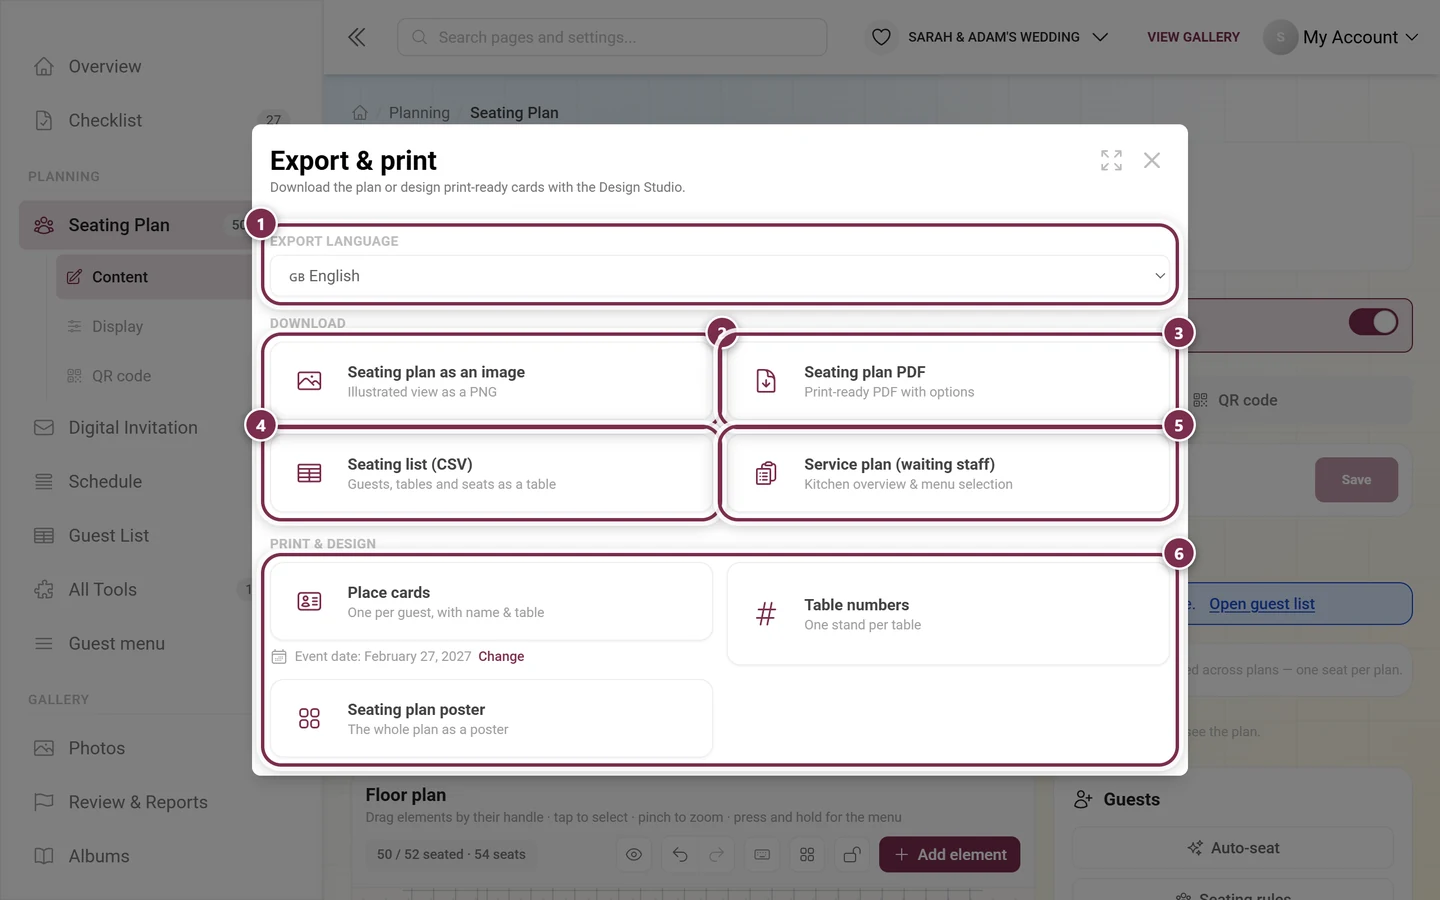
Cards ②, ④ and ⑤ download a file straight away. ③ opens a dialog of its own with a live preview first, and the three cards under ⑥ lead into the Design Studio.
Export language
Section titled “Export language”If your event is multilingual, Export language sits at the very top. The choice applies to all outputs below it – table names, labels and the fixed captions are then rendered in that language.
Seating plan as an image
Section titled “Seating plan as an image”Seating plan as an image saves the illustrated view as a PNG – the whole plan as one picture, good for a messenger, a presentation or as artwork for a print shop.
Seating plan PDF
Section titled “Seating plan PDF”Seating plan PDF opens the Export seating plan as PDF dialog with a live preview: every change rebuilds the PDF, so you see immediately what comes out.
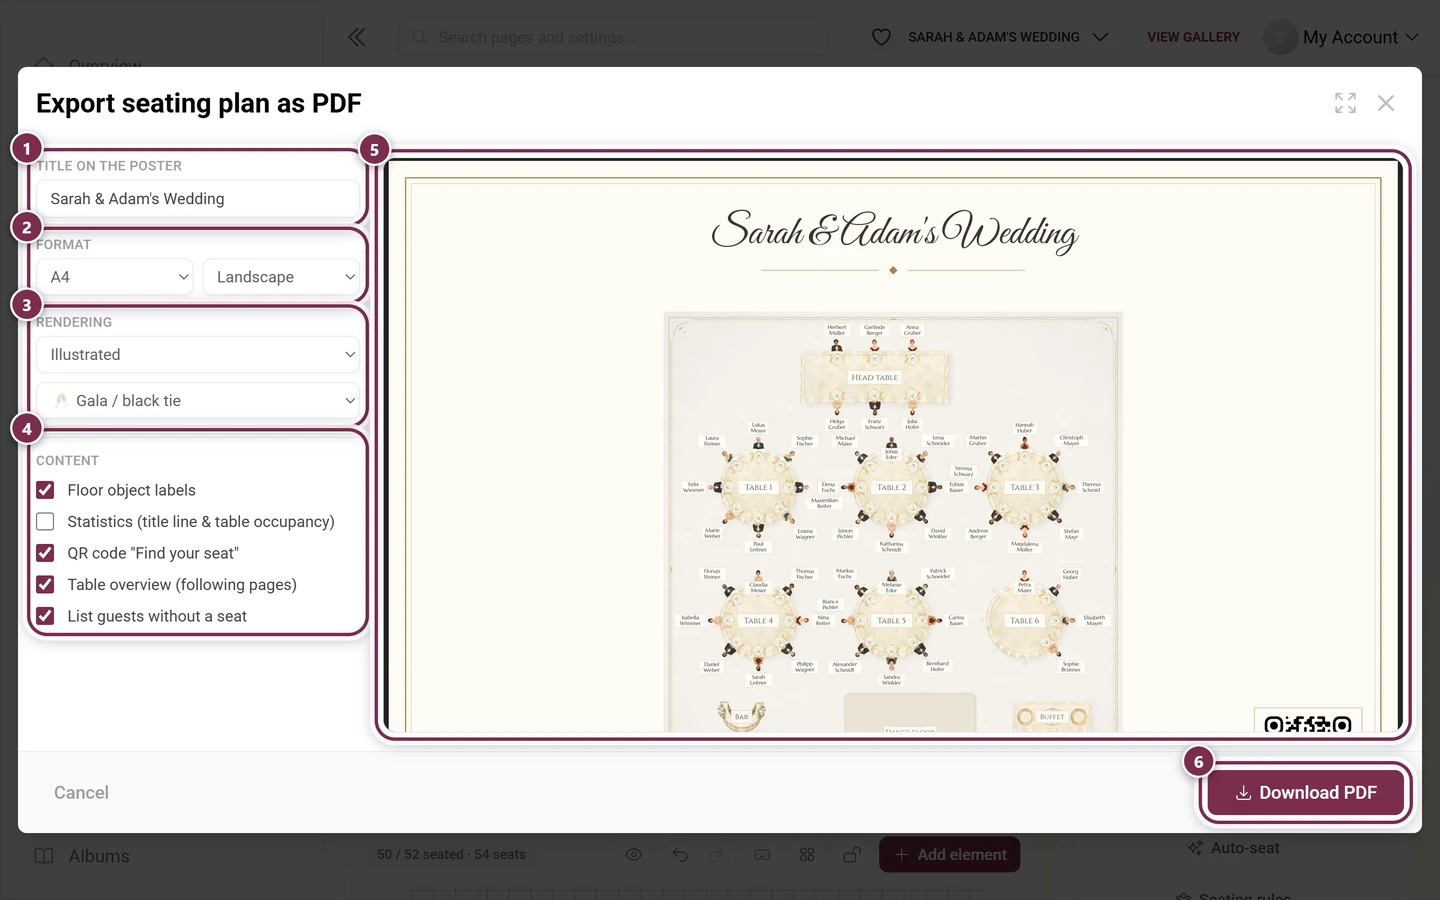
Format and appearance:
- Title on the poster – freely editable, prefilled with your event name.
- Paper size – A4 or A3.
- Orientation – Landscape or Portrait.
- Rendering – Classic (festive) draws a clean vector plan, Illustrated takes the drawn scene. With Illustrated you can pick the style separately, independently of the plan’s own style.
Under Typography you set the look of the text:
- Headings and Body text – one font each
- Text size – makes all text in the PDF larger or smaller
- Colour scheme – Ivory & gold, Black & white (printer friendly) or Event colours
Under Content you switch individual parts on and off:
- Guest names at the seats
- Table names
- Floor objects (dance floor, bar, …)
- Floor object labels
- Measurement lines
- Statistics (title line & table occupancy)
- QR code “Find your seat” – takes guests straight to your event’s seating page
- Plan page (drawn seating plan) – turn it off if you only need the table overview; without the table overview the plan page always stays in
- Table overview (following pages) – table by table, with seat numbers and names
- List guests without a seat – appended to the table overview
With the table overview on, Table overview layout controls its pages: Columns (Automatic or 1 to 4), the Horizontal and Vertical alignment and Only one table per page – which locks the column choice.
Download PDF writes the file.
Seating list (CSV)
Section titled “Seating list (CSV)”Seating list (CSV) produces a table with the columns Guest, Group, Table, Seat and Plus-one (+1). Guests without a seat appear as No seat. The file is prepared for Excel and can be passed on directly.
Service plan for your staff
Section titled “Service plan for your staff”Service plan (waiting staff) is the printout for the kitchen and the floor. It contains:
- Kitchen totals (all guests) – how often each dish was ordered, so the kitchen can plan.
- One table per table with Seat, Guest, Menu and Notes. The notes carry the guest’s dietary details.
- Anyone who chose nothing appears as no choice; empty tables are marked as such. Guests without a seat come last.
Printing via the Design Studio
Section titled “Printing via the Design Studio”The Print & design section opens the Design Studio for each print item – in the right paper format and with the preset browser on top. So you first pick a template (or Start empty) and keep designing freely afterwards.
-
Place cards – one card per guest, with name and table, preset to A7. Every card gets a personal QR link: whoever scans it is recognized as that guest for the session – their nickname is prefilled, their own meal is shown and their own seat is highlighted.
-
Table numbers – one stand per table, preset to A6, with a QR code to the seating page.
-
Seating plan poster – the whole plan as a poster, preset to A4. In the studio you can insert real seating content: the plan as an image, the plan as a list (a heading plus the names per table) or a mini plan per table. If the seating plan changes afterwards, the studio flags the block as stale and refreshes it on request.
Step 1: template or blank sheet
Section titled “Step 1: template or blank sheet”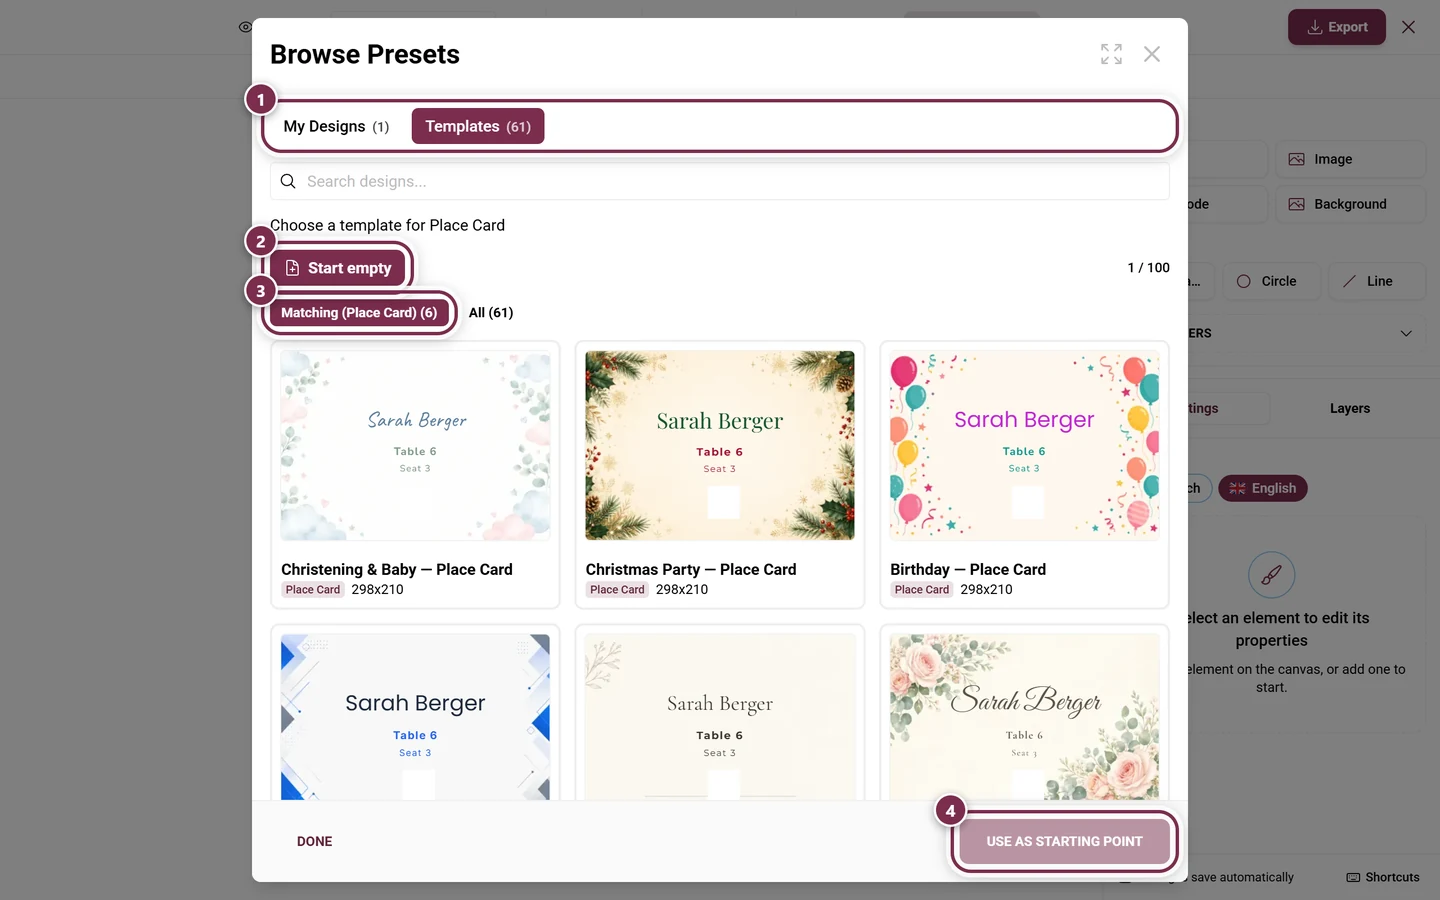
- ① My Designs are your own saved drafts, Templates the ones that ship with Photogala.
- ② Start empty begins with a blank sheet in the right format.
- ③ The browser is pre-filtered: Matching (Place Card) shows only templates for this print item, All brings back the rest.
- ④ Clicking a card selects it – only Use as starting point applies it. Until then the button stays grayed out.
Done closes the browser. If you picked nothing, a blank sheet is waiting for you – you can reopen the browser at any time via Browse Presets.
Step 2: design in the studio
Section titled “Step 2: design in the studio”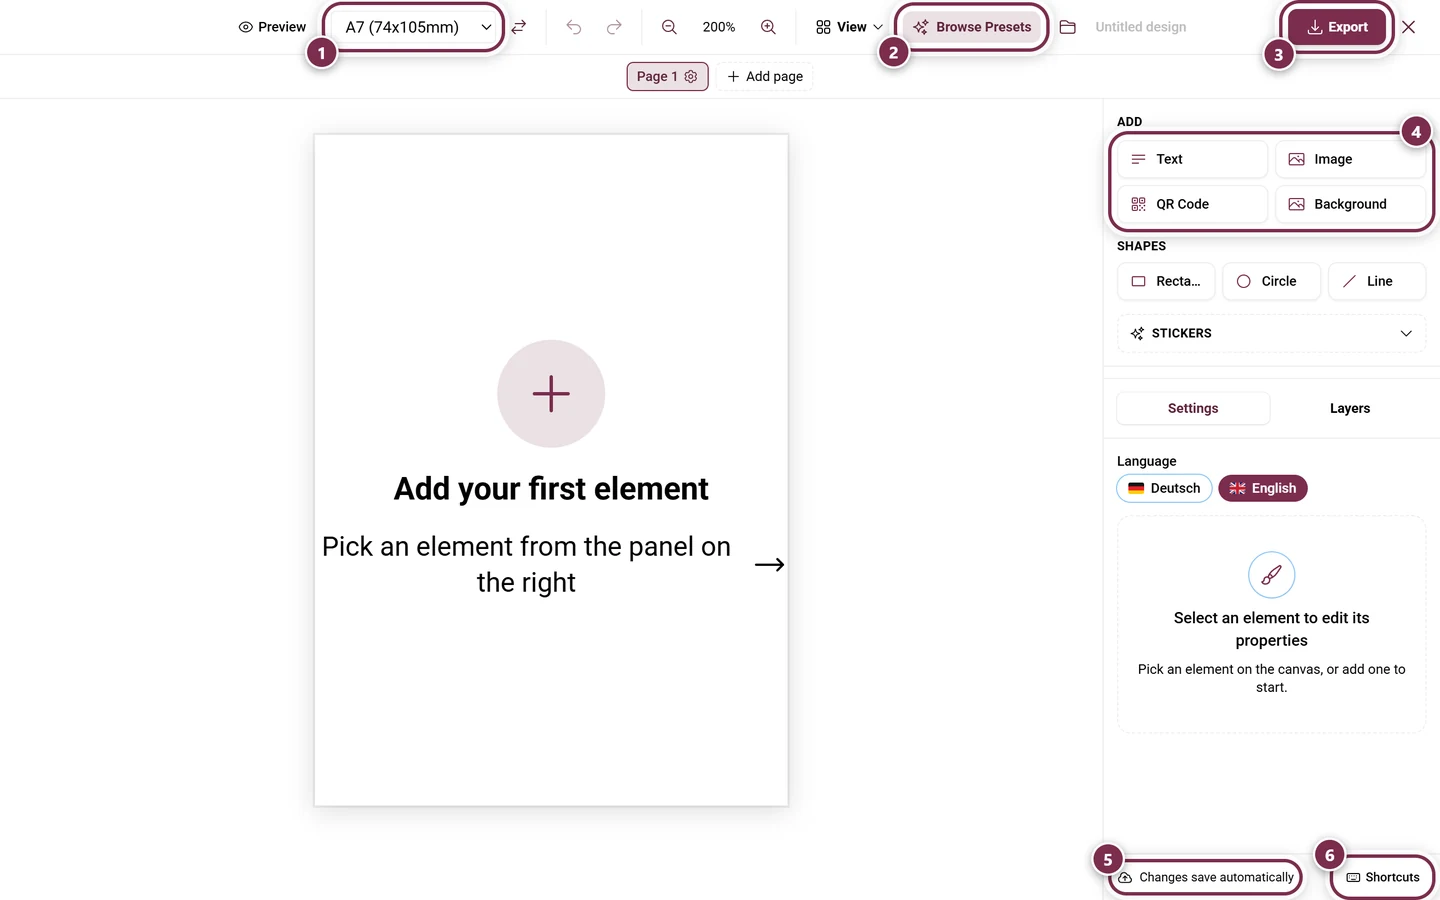
- ① Paper size – place cards default to A7 (74 × 105 mm).
- ② Browse Presets – reopens the browser from step 1.
- ③ Export – takes you to the studio’s output options.
- ④ Add – text, image, QR code and background, with Shapes and Stickers below. Further down sit the Dynamic Fields: Guest name, Table, Seat number, Group, Event name and Event date are filled in per guest when printing.
- ⑤ Changes save automatically – which is why there is no separate save button.
- ⑥ Shortcuts – the list of every keyboard shortcut in the studio.
Layers, pages, the grid and the export settings are described in detail on the Design Studio page.
Troubleshooting
Section titled “Troubleshooting”The QR toggle in the PDF dialog is grayed out. There is no reachable guest address for the seating plan. Check whether the tool is enabled.
The illustrated PDF is missing the toggles for names and tables. That’s intentional – the illustrated scene always draws guest names, table names and floor objects. Choose Classic (festive) if you want to switch them individually.
List guests without a seat can’t be ticked. That toggle depends on the Table overview. Enable that first.
The image export looks soft on very large plans. Very large plans are scaled down while rasterising so the file is produced at all – on some devices you would otherwise get an empty image. For printing, use the Seating plan PDF in A3 instead.
The figure doesn’t suit the guest. The detection comes from the first name and can get it wrong. Set it by hand in the panel via Override figure.
The Design Studio shows a blank sheet. The preset browser was closed with Done without applying a template. Reopen it via Browse Presets, select a card and confirm with Use as starting point.
The export is in the wrong language. Switch Export language at the top of the export dialog and download again.
Related pages
Section titled “Related pages”- Seating plan: Tables & room · Seating guests
- For guests: Find your seat – what your guests see.
- For hosts: Design Studio · Menu · Guest List · Tooling – Overview